
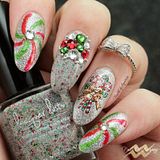
Foil Flower Stamping Mani & Foil Stamping Tips
As I showed you in the previous post, one of the items I received from Harunouta was nail foils. I've never used foils before, but I've been doing a bit of research about how to use them for quite a while now. I've read and watched plenty of tips and tutorials about foils, but the 2 girls I particularly want to thank are Tamira @Lacquer Lockdown and Eleonora @Nail Stamping Mania. Tamira has a great post about what topcoat should be used for nail foils (here), and Eleonora has an informative video showing how to do foil stamping (here). Today's mani is my first attempt on foil stamping, and here is the result.1つ前のポストでご紹介したように、春の歌から送っていただいたアイテムの1つにネイルフォイルがありました。フォイルは今まで使ったことがなかったのですが、使い方については随分前から色んなサイトで勉強させてもらっていました。使い方のヒントやチュートリアルなどもたくさん見ましたが、今回のネイル作成にあたって改めて参考にさせていただいたのがTamira @Lacquer Lockdown と Eleonora @Nail Stamping Maniaのブログと動画。Tamiraのこちらのポストでフォイルに使うべきトップコートについて学習し、Eleonoraのこちらの動画ではフォイルスタンピングのやり方について学習させてもらいました。そして今回フォイルスタンピングに初挑戦。出来上がりはこちら。

Middle & ring finger: I started off with A-England Cathy. I cut the blue-green nail foils to pieces, a bit bigger than nails. I applied a rather thick coat of Essie Good to Go topcoat on Simply Neat Miracle Mat, let it dry for about 30 mins, then stamped a flower image from Harunouta BP-L024 plate using Messy Mansion Carbon & Messy Mansion pink stamper. Then I immediately pressed a piece of foil onto the stamp so the foil sticks to the tacky stamping polish. I took the foil away, then peeled the decal off the mat. I cut the decal to nail size, then applied a thin coat of clear polish on nails as a glue for the decal, and placed the decal on nail. I first applied the Essence clear polish (to avoid the foil to go wrinkly), then finished off with Glisten Glow HK Girl topcoat.
Thumb, pointer & pinkie: Base is A-England Cathy. I simply added some rhinestones I bought in Japan and finished off with HK Girl topcoat.
中指と薬指 : ベースはA-England Cathy。事前に青緑のフォイルを爪より少し大き目のサイズに切り取っておきます。Simply Neat Miracle MatにEssie Good to Goトップコートを厚めに塗り、 30分ほど乾かしてからその上に春の歌のBP-L024プレートの花柄をMessy Mansion CarbonとMessy Mansionピンクスタンパーでスタンプ。間髪入れずにそのスタンプの上にフォイルを押し付け、まだ完全に乾ききっていないスタンピングポリッシュにフォイルがくっつくようにします。フォイルを剥がし、decalをマットから剥がす。decalを爪のサイズに切り取り、decalを貼り付けるために爪に糊代わりにクリアポリッシュを塗ってからdecalを爪に載せる。仕上げにEssenceクリアポリッシュを爪に塗ってから(フォイルのしわ防止のため)、Glisten Glow HK Girlトップコートでフィニッシュ。
親指、人差し指、小指 : ベースは同じくA-England Cathy。日本の楽天ショップで購入したラインストーンをいくつか載せてHK Girlトップコートでフィニッシュ。

These are the polishes I used. A-England Cathy and Messy Mansion Carbon.
使用ポリッシュがこちら。A-England CathyとMessy Mansion Carbon。

Let me tell you, there's a lot of trials and errors involved with this mani. I did a bit of a practice before I actually started creating and filming this mani, but I still didn't know how each step would come out. I did this 'decal on stamping mat' method on my right hand, and intended to do the 'direct stamping on nail' method on the demo hand (left hand), but unfortunately things went wrong so I removed the base and decided to take the decal route.
今回のネイルはいつもと違い、最後まであれこれ試行錯誤しながら進めていったネイルでした。事前に数時間ほどかけて練習してからネイルの作成と動画撮影に臨みましたが、1つ1つのステップがどんな仕上がりになるか予想できずかなり手探り状態でした。まず右手で「スタンピングマットを使ったdecal化」方式で試し、左手では「直接フォイルスタンピング」の方法を試そうと思ったのですが、手早く作業しなくてはいけないので焦って肝心のスタンプが曲がってしまい、あえなくベースからやり直し。結局左手もdecal方式でいきました。

I used a few different clear coats for this mani, and I'd like to explain how and why I used them:
- Face of Australia Aussie Night - I used this as a base coat.
- Essie Good to Go topcoat - I applied this topcoat on the stamping mat for making decals. I usually use Essence clear polish or Daiso topcoat for stamping decals, but I used this for practice because it dries much quicker than these two and saves me time. I usually avoid fast-drying topcoat to make decals because decals can get stiff and not flexible, but I decided to give it a go with this mani. I'll probably switch back to my good ole' essence and Daiso next time.
- Essence clear polish - I used this for 2 purposes; a) as a 'glue' to stick the decal onto the nail, b) as a 'cushion' before applying final topcoat. Decals that are made on the stamping mat are dry, so you need to apply something on your nail for it to stick to the nail. I used essence here, but any topcoat/clear polish will do. I also used this before final topcoat, because I learned that applying HK Girl topcoat directly can crinkle the foils. I first tried Nfu-oh Aqua Base, because water based polish like this is said to do great job to avoid the crinkle on foils. Unfortunately however, it gave the mani a miky look when I tested it, so I decided not to use it. I had no other alternative as a cushion topcoat, so I simply tried essence and it seems to work OK for this purpose.
- Glisten & Glow HK Girl topcoat - Final topcoat to seal the design.
- Face of Australia Aussie Night - ベースコートとして使用。
- Essie Good to Goトップコート - decalを作成するためにスタンピングマット上に使用。普段、スタンピングdecalの作成にはダイソートップコートかEssenceクリアポリッシュの2つしか使わないのですが、今回練習にこちらを使ってみました。理由は乾きが早いので練習時間を短縮できるから。この手の速乾系のトップコートを使うとdecalが硬くなりやすいので普段は避けるのですが、本番にもそのまま使ってみました。やはりdecalが乗りにくかったので、次回はいつものダイソーとessenceに戻すと思います。
- Essenceクリアポリッシュ - これについては2つの目的で使用しました。decalを爪に載せる際の糊代わりとして、そして仕上げのトップコート前の「クッション」として。スタンピングマット上で作成したdecalは乾燥しているので、爪に載せる前に糊となるものが必要です。たまたまessenceを使いましたが、ここはどんなトップコート/クリアでも大丈夫です。そして仕上げのトップコート前にも使いました。理由は、HK Girlを初めとするいくつかの速乾系トップコートをフォイルに直接塗るとしわが出来ると言われているためです。このしわを防ぐクッション代わりにNfu-oh Aqua Baseなどのウォーターベースのポリッシュをはさむといいそうです。ちょうどNfu-ohを持っているので試してみたのですが、しわはできなかったもののネイル全体が乳白色になってしまったので本番では使用しませんでした。替わりとなるものもなく仕方がないのでessenceをこのクッション目的で使ってみたところ、特に問題はありませんでした。
- Glisten & Glow HK Girlトップコート - 仕上げの速乾トップコート。

What I most struggled about this mani is the part where I stick the decal onto my nails. Essie Good to Go I used for decals wasn't a good choice, and I really should have stuck to my usual decal making topcoats (Daiso & Essence). I gave it 30 minutes for it to dry, but maybe this dry time was too long? I really don't know. In trying to 'tame' the decal to lie flat on my nails, I got lots of bubbles and the decals went bumpy on the nails. It looked ok in the end after applying HK Girl topcoat, but I nearly was gonna redo these two fingers. But the good news is that I learned a lot in the process, and I'd like to share some findings with you:
このネイルで一番苦労したのがdecalを爪に貼り付けるところ。これがなっかなか貼りつかないでやんの・・!練習からの流れで本番にも使ってしまったEssie Good to Goはあまりいいチョイスではなかったです。いつものdecal作成トップコート(ダイソー&essence)を素直に使っておけばよかった。乾燥時間にたっぷり30分取りましたが、これが長すぎたんだろうか?よく分かりません。decalを爪に貼り付けようとする過程で気泡はたくさん入るわ、デコボコになるわで散々でした。HK Girlトップコートを塗ったらようやく人様にお見せできる状態になりましたが、写真を確認するまでは本気でやり直そうと思ったぐらい。ただ収穫として、試行錯誤の中でいくつか学んだことがあるのでそれを最後に書きたいと思います。


Tips for foil stamping:
- When you make foil decals on stamping mat, make sure you apply a clear coat/topcoat in a bigger area than your stamper if possible. If this area is small, your stamper can pull the clear coat off the mat when you transfer the image onto it. (#1 in pic above)
- In relation to the point above, avoid using sticky stamper. Again, it can pull the clear coat off the mat.
- Make sure your stamping base (clear coat on stamping mat, or your base polish on nail if you are direct stamping) is fully dry. If it's still tacky, foil will stick to the base as well as the stamping polish when you press it onto the base. (#2 in pic above)
- Work very fast. After you stamp, you have to immediately press the foil onto the stamp while the stamping polish is still tacky. Make sure you have a piece of foil ready.
- Choose a 'somewhat slow drying' stamping polish. I didn't try many, but Messy Mansion stamping polishes (other than metallics) fall into this category. If you use fast drying stamping polish, you have to work lightning fast. If you use much slow drying polish such as Mundo de Unas, you need to pause for a while before you press the foil onto the stamp, otherwise polish will be stuck to the back of the foil instead of foil sticking to the stamp.
- Choose stamping polish colour which blends well with the foil colour. In case foil didn't transfer on some parts of the stamp, that colour shows. I used black stamping polish this time, as it won't affect much if the black shows up. (#3 in pic above)
- Try to choose a stamping image with thicker lines. Thin lines dry faster than thicker ones when you stamp, so foil may not transfer well. (#4 in pic above)
- Some girls give a quick wipe with acetone on the back of the foil, so the foil transfers better. I didn't try this, but you may have to do this depending on the types of foils you get.
フォイルスタンピングのコツ:
- スタンピングマット上でフォイルのdecalを作成する場合、可能であればスタンパーよりも大きいエリアにクリア/トップコートを塗ります。このエリアが小さいと、スタンパーで柄を転写するときにスタンパーがクリアコートをマットから剥がしてしまうことがあります。(上記の画像1参考)
- 上記の点に関連して、ベタつきのあるスタンパーはなるべく避けます。こちらもマットからクリアコートを剥がしてしまうことがあるためです。
- スタンピングのベース(マットを使用する場合はクリアコート、直接スタンピングする場合は爪に塗ったベースポリッシュ)は完全に乾かしておきます。半乾き状態だと、フォイルをベースに押し付けたときにスタンピングポリッシュのみならずベースにもくっついてしまいます。(上記の画像2参考)
- 作業はすばやく行うこと。スタンプ後、スタンピングポリッシュがまだ乾いていない状態ですばやくフォイルをスタンプ柄に押し付ける必要があります。フォイルは手の近くに置いておきます。
- ’乾きがやや遅め’のスタンピングポリッシュを選びます。すべてテストしたわけではありませんが、今回選んだMessy Mansionのスタンピングポリッシュはこのカテゴリに入ります(メタリック以外)。乾きが早すぎるスタンピングポリッシュを使うと超高速で作業する必要があり、Mundo de Unasなどの乾きが遅いポリッシュを使うとフォイルを押し付ける前に一呼吸置かないといけなくなります。このタイミングが慣れないと少し難しいです。早めに押し付けるとフォイルがスタンプに貼りつかず、逆にポリッシュがフォイルの裏にくっついてしまうことになります。
- スタンピングポリッシュの色はフォイルの色に近いものを選びます。スタンプ柄でフォイルが綺麗に貼りつかなかった箇所があると、フォイルの代わりにスタンピングポリッシュの色がそのまま出ます。今回のネイルでは、表面に出ても違和感がない色として黒を選択しました。(上記の画像3参考)
- 慣れないうちはなるべく太い線のスタンプ柄を選択します。線が細いとスタンプしたときにポリッシュの乾きが早くなり、フォイルがうまく貼りつかないことがあります。(上記の画像4参考)
- フォイルの裏側をさっとアセトンで拭くとフォイルの転写がよくなると聞いたことがあります。今回のネイルではこれをする必要はありませんでしたが、フォイルの種類によっては必要になるかもしれません。
Phew! Congratulations to those who have come this far. I'm not an expert on foil stamping, and would like to learn more about it. Please tell me what you think, and share your thoughts and tips in the comments below.
というわけで長大なポストになってしまいましたが、最後までお読みいただきありがとうございます。フォイルスタンピングについてはまだまだ学習中なので、皆様のご意見をお聞かせいただければ幸いです。ご質問などもお気軽にどうぞ。
というわけで長大なポストになってしまいましたが、最後までお読みいただきありがとうございます。フォイルスタンピングについてはまだまだ学習中なので、皆様のご意見をお聞かせいただければ幸いです。ご質問などもお気軽にどうぞ。


10 comments
Write commentsThese are super pretty! As usual, your post is very helpful!!! I have been wanting to try this...but am so glad I waited. Now I feel like I have the info to try it out! Thank you!!
ReplyThe more I look at this manicure, the more I like it because it's very pretty. =)
ReplyThanks Kim! Glad you find the post useful^^ Foil stamping is quite intimidating at first, but right tools & info make all the difference I reckon :)
ReplyThanks hun! Glad you like it^^
ReplyOh my, Harper, I think I accidentally deleted your comment! I'm so sorry!! Glad you find the post useful^^
ReplyHi! I was wondering what scissors do you use to cut the decal and where can I buy them? I really love this design, I'd like to try it for myself.
ReplyThanks hun, glad you like it! I got these scissors from a local chemist :)
Replyhttps://www.priceline.com.au/manicare-cuticle-scissor-straight-1-ea
I like it too! I am in love with glitters and all bright! Thank you for making a good blog. I am making nails too and recently did ombre design with the help of http://nailartstyle.com/ombre-nails website. And where did you get your idea?
ReplyHunni, this is no glitter or ombre mani. No ad on my blog posts please, thank you.
Reply