Delicate Plaid & Flower Mani

Monday, August 29, 2016 5 Comments A+ a-

I'm glad last week is over. I was on another business trip last week, and was dying to go back home. The hotel I was staying at was very nice and spacious, but it had crappy wifi, giving me only 200MB a day. With work and my nail hobby, I easily use 1GB a day, so imagine how hard it was for me to get through the week! Anyway, I created another mani using beautiful hēhē plates I was sent for review.

Thumb, middle & ring finger: Base is Cirque Colors Acid Wash (blue) and Mint Chip (mint) from limited edition Speckled collection. I made a stamping decal out of plaid & flower combo on hēhē 073 plate using Pueen Cosmetics Tropical Dusk, coloured in with white and pink polish. Once the decal is dry, I peeled it off stamper, cut to nail size and placed on these nails. I finished off with Glisten & Glow HK Girl topcoat.

Pointer & pinkie: Base is Cirque Astra (pink). I made a stamping decal out of tribal looking pattern on hēhē 083 plate using Pueen Cosmetics Tropical Dusk, coloured in with white. Rest of the process is the same as above.

I really wanted to go for soft and delicate look, and I'm happy with how this mani turned out. I was going to mattify, but I was happy with the way it is. You get a lot of super cute plaid & flower combinations on this hēhē The Plaids & Florals collection, so make sure to check out Aiyohehe's website.

先週1週間はまた別の州へ出張でした。昨日自宅に戻ってきて疲労困憊。泊まったホテルは素敵だったのですが、ホテルのネットが遅く1日200MBまでしか使えないという制限があってイライラ。。。早く家に帰りたくて仕方がなかったです。仕事や趣味で1日軽く1GBは使う私としてはかなりキツい1週間でした。

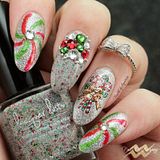
それはさておき、レビュー用に送られてきたhēhēプレートを使ったネイルをもう1つ作成してみました。出来上がりはこちら。
Finished product. Sun shot with Glisten & Glow HK Girl topcoat

親指、中指、薬指 : ベースはCirque ColorsのSpeckledコレクションのAcid Wash(青)とMint Chip(ミント)。hēhē 073プレートの格子&花柄をPueen Cosmetics Tropical Duskでスタンプし、白と薄ピンクで色付けしてdecalを作成。decalが乾いたらスタンパーから剥がし、爪のサイズに切り取ってこの3本の爪に乗せる。仕上げはGlisten & Glow HK Girlトップコート。

人差し指と小指 : ベースはCirque Astra(ピンク)。hēhē 083プレートのトライバル風の柄をPueen Cosmetics Tropical Duskでスタンプし、白で色付けしてdecalを作成。後のプロセスは上記と同じ。

使用ポリッシュはこちら。
Polishes used

左から、

JOSS Will Not
Elcorazon Active Biogel 423/277 Cream
Cirque Acid Wash
Cirque Mint Chip
Cirque Astra
Pueen Tropical Dusk
By the way, something weird is happening to my Cirque Astra. I bought this and other Cirque polishes from Femme Fatale Cosmetics. They arrived in perfect condition, but in a month or two, this Astra started to turn brown. I contacted FFC and they sent me replacement, but this 2nd bottle (pic above) started to behave the same. So super sad :(

ちなみに上の写真はCirque Astraなんですが、ちょっと変なことになってます。CirqueはすべてFemme Fatale Cosmeticsで購入し、届いたときは完璧な状態だったのですが、1~2か月ほどするとAstraだけ茶色っぽく変化してしまいました。FFCに連絡して新しいポリッシュを送ってもらったのですが、その交換品のAstra(上の写真)も同じ運命に(。-_-。)チーン。しかもこのポリッシュ、いつもお世話になっているネイルのお友達にプレゼントするために自分用とお友達用に2本買ったもの。お友達の分を送った時は変色は見られなかったのですが、時間が経ってどうなったか・・・。よりによってプレゼント品がこんなことになるとは悔しい(T_T)
Anyway, those soft Cirque colours & the grayish stamping polish went so well with these stamps.
I'm glad I chose them!

まぁそれはいいとして、この3本のCirqueとグレーっぽいスタンピングポリッシュとスタンプ柄との組み合わせ、なかなかいいですね。ソフトな感じに仕上がって気に入りました。本当はマット化する予定だったのですが、このままでも十分可愛いのでそのままに。
This flower on hēhē 073 plate is sooo pretty. In fact, every single flower on this hēhē collection is! 

hēhēのThe Plaids & Floralsコレクションのお花、どれも本当に可愛いです。格子柄との組み合わせも豊富なので、気になる方はAiyooheheのWebサイトを覗いてみてください。

Galaxy Nail Using Magnetic Polish & hēhē Stamping Plate

Friday, August 19, 2016 0 Comments A+ a-

I created my first design using one of the hēhē stamping plates sent for review. I started off with black polish for all nails. Then I applied a few blobs of 4 magnetic polishes by Bow Nail Polish on stamper, smooshed that onto nail, and once dry, applied essence space queen (clear glitter topper) for added sparkles and hovered the magnet over nail for 5 to 10 seconds. When that's dry, I stamped space object patterns from hēhē 088 with Messy Mansion Soft Gold, then finished off with Glisten & Glow HK Girl topcoat.

I bought these Bow Polish magnetics from color4nails recently and was itching to try them. So glad I did, coz they're so fun to use! The magnet I used is also from color4nails, and same stuff as this one. The stamping images on this hēhē plate are so cute, and they complement well with the base.

前回の記事でご紹介したhēhēプレートを使った最初のネイル。出来上がりはこちら。
Finished product, taken in the sun

ベースは全爪黒。Bow Nail Polishの4本のマグネティックポリッシュをスタンパー上に垂らしていき、爪の上にポンポンと乗せる。乾いたらessence space queen(グリッタートッパー)を塗り、すぐさま爪の上にマグネットを5~10秒ほど当てる。乾いたらhēhē 088の宇宙柄をMessy Mansion Soft Goldでスタンプし、Glisten & Glow HK Girlトップコートでフィニッシュ。

使用ポリッシュはこちら。
Polishes used

上段左から、

Face of Australia Don't Judge Me!
essence space queen
Messy Mansion Soft Gold

下段左から、

Bow Nail Polish Motivation
Bow Nail Polish Ritual
Bow Nail Polish Divine and Conquer
Bow Nail Polish Your Idol
It was so mesmerising to see how the magnet makes colour transient. In this shot,
you can see the part where I hovered the magnet on pointer and pinkie quite well 

color4nailsで最近購入したBow Nail Polishの4本のマグネティックを今回初めて使ってみました。マグネティックポリッシュは私がネイルにはまりだした数年前にはもう全盛期を過ぎて下火だったので今まで1本も持っていなかったのですが、最近ロシアのブランドを中心に復権してきているようですね。使用したマグネットは同じくcolor4nailsで購入しましたが、これと同じものです。マグネットを当てたところ以外は一段色が暗くなるのですが、見ていて面白いです。スタンプで隠れちゃいましたが、上の画像の人差し指と小指なんかマグネットのエフェクトがよく見えていると思います。
You see how easy it was to create this mani. The head of the rocket got cut off a bit,
but I'm happy with how the stamping came out also!

マグネットを当てるときに爪が乾いているとエフェクトが出ないようなので、グリッタートッパーを塗ってすぐにマグネットを当てました。たっぷり5~10秒ほどじっと当てたままにするとエフェクトがしっかり出ます。いや~本当に簡単だった、このネイル。4本のマグネティックとグリッターのおかげでビッグバンのような絵面になりましたね。中指のロケットの頭が少し切れちゃってますが、スタンピングもなかなか上手く行って結構気に入りました。

hēhē Stamping Plate - Plaids & Florals and Science Collection Review

Wednesday, August 17, 2016 8 Comments A+ a-

I told you I received quite a few nail mails while I was away in July. One of them was hēhē stamping plates. I have a few older hēhē plates that were sent by Harunouta, but this time, I received 2 newer collections directly from the brand owner herself. The brand Aiyoohehe is based in China and run by two lovely ladies, Siqi and Haiyan (designer). I absolutely love hēhē stamping plates, and was super excited to hear about the new collections. You can read about my previous reviews and manis I did with hēhē plate here.

Before I go into review, here are the links to Aiyoohehe store and SNS:

7月の出張中にいくつかnail mailが届いたと以前書いたと思いますが、その1つがhēhēスタンピングプレートでした。hēhēのプレートは春の歌から送っていただいたものを既に何枚か持っていますが、今回はブランドのオーナーさんが直接新作コレクションを送ってくださいました。Aiyooheheは中国を拠点にしたブランドで、SiqiとHaiyan(デザイナー)という2人の女性が運営しています。hēhēのプレートは私の好みに合ったものが多く、今回新作を送っていただける話を聞いて非常に楽しみにしていました。hēhēプレートの過去のレビューとネイルアートはこちらでご覧いただけます。

レビューに入る前に、AiyooheheのショップとSNSへのリンクはこちら。


These are what I received. They were carefully wrapped in thick bubble wraps and came in a box. Top half of this pic, 073-084 plates, are The Plaids & Florals Collection, and the bottom half, 085-096 are The Science Collection. Each plate only costs $2, or you can buy a whole collection (12 plates) for $23.

こちらが受け取った商品。箱の中に厚めの緩衝材にしっかりと包まって届きました。画像上段、073-084がThe Plaids & Floralsコレクション、そして画像下段、085-096がThe Scienceコレクションです。各プレートを個別に購入する場合は1枚2ドル、コレクション一式(12プレート)購入する場合は23ドルです。


Each plate comes inside a paper sleeve, and there's no blue film on it so you don't have to go through peeling it. (UPDATE: This was because they are review samples. All the plates you purchase come with blue film on them.) Plate size is roughly 5.5cm in diameter, exactly the same size with Born Pretty or Bundle Monster round plates.

各プレートは紙スリーブに入っていますが、青いフィルムは付いていないのでいちいちフィルムを剥がさなくていいようになっています。(追記:レビューサンプルには青いフィルムは付いていませんが、購入品はフィルム付きだそうです。)プレートのサイズは直径約5.5cmで、Born PrettyやBundle Monsterの丸プレートなどとまったく同じサイズです。

Now, I'll show you each plate pic followed by paper swatch. All the polishes used are Ya Qin An polishes from Harunouta. The purpose of the swatch is to see the general quality of each plate, so please note that some images may be truncated or lost.  

それではプレートの写真に続けて紙swatchをお見せします。使用したスタンピングポリッシュは春の歌のYa Qin Anポリッシュ。このswatchの目的はプレートの全体的なクオリティを見ることですので、柄の一部が切れていたり載っていない柄もあるかも思いますがご了承ください。


hēhē 073 to 076 from The Plaids & Florals collection. As the collection name shows, they have plaids and flowers combined in one. How pretty are these?? I shouldn't have used the pale blue stamping polish as it's hard to see, but every single plate stamps beautifully.

The Plaids & Floralsコレクション、hēhē 073から076。コレクション名から分かるように、格子柄と花が組み合わされています。いいねいいね~とっても可愛いです。水色のスタンピングポリッシュが見づらくて恐縮ですが、どのプレートも綺麗にスタンプしました。


hēhē 077 to 080. 3 of them are cute sweater patterns. Again, awesome quality.

hēhē 077から080。うち3枚は可愛いセーター柄ですね。こちらもクオリティは良好。


hēhē 081 to 084. Oh my, daisies & lilies!! Love love love. I'm excited about that deer and the tribal plate also. 

hēhē 081から084。デイジーに百合~♡ (*´д‘*)鹿プレートもトライバルプレートも使いやすそうだし、この4枚すごくイイ!


Moving onto The Science collection, these are hēhē 085-088. Dinosars, scientific symbols, space objects...they are all so unique in my collection! Again, all the images stamp beautifully.

お次はThe Scienceコレクション、hēhē 085から088。恐竜に科学記号(?)に宇宙・・・・どれもこれも手持ちにない柄ばかりでめちゃユニーク(゚∀゚)。こちらも素晴らしいクオリティです。


hēhē 089-092. More scientific symbols, some cute creatures, etc. I mis-stamped some images on 092, so I stamped again (the 3rd pic). All look great.

hēhē 089から092。科学記号、漫画風の生物などなど。092プレートの一部の柄がうまく転写できなかったので再スタンプしました(3枚目の写真)。すべて良好。


Last 4 from The Science collection, hēhē 093-096. Weather symbols, flowers, scientists & famous people, etc. Look how detailed those people are! 094 is so pretty also.

The Scienceコレクションの最後の4枚、hēhē 093から096。天気、花、科学者や偉人などなど。偉人さんたちのディテールがすごい(゚∀゚) 094も可愛いなぁ。

As you can see, all images stamp amazingly, and I'm super impressed with the quality. I love that these plates are so unique, there are seriously no images that I've seen on other brand plates. Hats off to the designer who must have spent a considerable amount of time coming up with these images and putting together in the collections. I already created one mani with these plates, and would like to share it very soon. Stay tuned!

ご覧のようにどの柄も綺麗にスタンプしており、彫りの問題なども見受けられず非常に優秀なプレートたちです。柄のバラエティも素晴らしく、「この柄、他のプレートで見たなぁ・・」というようなマンネリ柄は一切なくどれもユニーク。デザイナーさんが手間と時間をかけて柄を考え、これらのコレクションにまとめ上げたことがよく分かり非常に好感が持てます。この中のプレートを使って既にネイルを1つ作成したので、後日お見せしたいと思います。


*Products sent for honest review
*記事中の製品はレビュー目的で送っていただいたものです

Foil Flower Stamping Mani & Foil Stamping Tips

Friday, August 12, 2016 10 Comments A+ a-

As I showed you in the previous post, one of the items I received from Harunouta was nail foils. I've never used foils before, but I've been doing a bit of research about how to use them for quite a while now. I've read and watched plenty of tips and tutorials about foils, but the 2 girls I particularly want to thank are Tamira @Lacquer Lockdown and Eleonora @Nail Stamping Mania. Tamira has a great post about what topcoat should be used for nail foils (here), and Eleonora has an informative video showing how to do foil stamping (here). Today's mani is my first attempt on foil stamping, and here is the result.

1つ前のポストでご紹介したように、春の歌から送っていただいたアイテムの1つにネイルフォイルがありました。フォイルは今まで使ったことがなかったのですが、使い方については随分前から色んなサイトで勉強させてもらっていました。使い方のヒントやチュートリアルなどもたくさん見ましたが、今回のネイル作成にあたって改めて参考にさせていただいたのがTamira @Lacquer Lockdown と Eleonora @Nail Stamping Maniaのブログと動画。Tamiraのこちらのポストでフォイルに使うべきトップコートについて学習し、Eleonoraのこちらの動画ではフォイルスタンピングのやり方について学習させてもらいました。そして今回フォイルスタンピングに初挑戦。出来上がりはこちら。


Middle & ring finger: I started off with A-England Cathy. I cut the blue-green nail foils to pieces, a bit bigger than nails. I applied a rather thick coat of Essie Good to Go topcoat on Simply Neat Miracle Mat, let it dry for about 30 mins, then stamped a flower image from Harunouta BP-L024 plate using Messy Mansion Carbon & Messy Mansion pink stamper. Then I immediately pressed a piece of foil onto the stamp so the foil sticks to the tacky stamping polish. I took the foil away, then peeled the decal off the mat. I cut the decal to nail size, then applied a thin coat of clear polish on nails as a glue for the decal, and placed the decal on nail. I first applied the Essence clear polish (to avoid the foil to go wrinkly), then finished off with Glisten Glow HK Girl topcoat.

Thumb, pointer & pinkie: Base is A-England Cathy. I simply added some rhinestones I bought in Japan and finished off with HK Girl topcoat.

中指と薬指 : ベースはA-England Cathy。事前に青緑のフォイルを爪より少し大き目のサイズに切り取っておきます。Simply Neat Miracle MatにEssie Good to Goトップコートを厚めに塗り、 30分ほど乾かしてからその上に春の歌のBP-L024プレートの花柄をMessy Mansion CarbonとMessy Mansionピンクスタンパーでスタンプ。間髪入れずにそのスタンプの上にフォイルを押し付け、まだ完全に乾ききっていないスタンピングポリッシュにフォイルがくっつくようにします。フォイルを剥がし、decalをマットから剥がす。decalを爪のサイズに切り取り、decalを貼り付けるために爪に糊代わりにクリアポリッシュを塗ってからdecalを爪に載せる。仕上げにEssenceクリアポリッシュを爪に塗ってから(フォイルのしわ防止のため)、Glisten Glow HK Girlトップコートでフィニッシュ。

親指、人差し指、小指 : ベースは同じくA-England Cathy。日本の楽天ショップで購入したラインストーンをいくつか載せてHK Girlトップコートでフィニッシュ。


These are the polishes I used. A-England Cathy and Messy Mansion Carbon.

使用ポリッシュがこちら。A-England CathyとMessy Mansion Carbon。


Let me tell you, there's a lot of trials and errors involved with this mani. I did a bit of a practice before I actually started creating and filming this mani, but I still didn't know how each step would come out. I did this 'decal on stamping mat' method on my right hand, and intended to do the 'direct stamping on nail' method on the demo hand (left hand), but unfortunately things went wrong so I removed the base and decided to take the decal route. 

今回のネイルはいつもと違い、最後まであれこれ試行錯誤しながら進めていったネイルでした。事前に数時間ほどかけて練習してからネイルの作成と動画撮影に臨みましたが、1つ1つのステップがどんな仕上がりになるか予想できずかなり手探り状態でした。まず右手で「スタンピングマットを使ったdecal化」方式で試し、左手では「直接フォイルスタンピング」の方法を試そうと思ったのですが、手早く作業しなくてはいけないので焦って肝心のスタンプが曲がってしまい、あえなくベースからやり直し。結局左手もdecal方式でいきました。


I used a few different clear coats for this mani, and I'd like to explain how and why I used them:

  • Face of Australia Aussie Night - I used this as a base coat.
  • Essie Good to Go topcoat - I applied this topcoat on the stamping mat for making decals. I usually use Essence clear polish or Daiso topcoat for stamping decals, but I used this for practice because it dries much quicker than these two and saves me time. I usually avoid fast-drying topcoat to make decals because decals can get stiff and not flexible, but I decided to give it a go with this mani. I'll probably switch back to my good ole' essence and Daiso next time.
  • Essence clear polish - I used this for 2 purposes; a) as a 'glue' to stick the decal onto the nail, b) as a 'cushion' before applying final topcoat. Decals that are made on the stamping mat are dry, so you need to apply something on your nail for it to stick to the nail. I used essence here, but any topcoat/clear polish will do. I also used this before final topcoat, because I learned that applying HK Girl topcoat directly can crinkle the foils. I first tried Nfu-oh Aqua Base, because water based polish like this is said to do great job to avoid the crinkle on foils. Unfortunately however, it gave the mani a miky look when I tested it, so I decided not to use it. I had no other alternative as a cushion topcoat, so I simply tried essence and it seems to work OK for this purpose.
  • Glisten & Glow HK Girl topcoat - Final topcoat to seal the design.
今回ネイルではクリアコートを複数使ったので、どんな目的で&何故これらを使ったのか説明したいと思います。
  • Face of Australia Aussie Night - ベースコートとして使用。
  • Essie Good to Goトップコート - decalを作成するためにスタンピングマット上に使用。普段、スタンピングdecalの作成にはダイソートップコートかEssenceクリアポリッシュの2つしか使わないのですが、今回練習にこちらを使ってみました。理由は乾きが早いので練習時間を短縮できるから。この手の速乾系のトップコートを使うとdecalが硬くなりやすいので普段は避けるのですが、本番にもそのまま使ってみました。やはりdecalが乗りにくかったので、次回はいつものダイソーとessenceに戻すと思います。
  • Essenceクリアポリッシュ - これについては2つの目的で使用しました。decalを爪に載せる際の糊代わりとして、そして仕上げのトップコート前の「クッション」として。スタンピングマット上で作成したdecalは乾燥しているので、爪に載せる前に糊となるものが必要です。たまたまessenceを使いましたが、ここはどんなトップコート/クリアでも大丈夫です。そして仕上げのトップコート前にも使いました。理由は、HK Girlを初めとするいくつかの速乾系トップコートをフォイルに直接塗るとしわが出来ると言われているためです。このしわを防ぐクッション代わりにNfu-oh Aqua Baseなどのウォーターベースのポリッシュをはさむといいそうです。ちょうどNfu-ohを持っているので試してみたのですが、しわはできなかったもののネイル全体が乳白色になってしまったので本番では使用しませんでした。替わりとなるものもなく仕方がないのでessenceをこのクッション目的で使ってみたところ、特に問題はありませんでした。
  • Glisten & Glow HK Girlトップコート - 仕上げの速乾トップコート。

What I most struggled about this mani is the part where I stick the decal onto my nails. Essie Good to Go I used for decals wasn't a good choice, and I really should have stuck to my usual decal making topcoats (Daiso & Essence). I gave it 30 minutes for it to dry, but maybe this dry time was too long? I really don't know. In trying to 'tame' the decal to lie flat on my nails, I got lots of bubbles and the decals went bumpy on the nails. It looked ok in the end after applying HK Girl topcoat, but I nearly was gonna redo these two fingers. But the good news is that I learned a lot in the process, and I'd like to share some findings with you:

このネイルで一番苦労したのがdecalを爪に貼り付けるところ。これがなっかなか貼りつかないでやんの・・!練習からの流れで本番にも使ってしまったEssie Good to Goはあまりいいチョイスではなかったです。いつものdecal作成トップコート(ダイソー&essence)を素直に使っておけばよかった。乾燥時間にたっぷり30分取りましたが、これが長すぎたんだろうか?よく分かりません。decalを爪に貼り付けようとする過程で気泡はたくさん入るわ、デコボコになるわで散々でした。HK Girlトップコートを塗ったらようやく人様にお見せできる状態になりましたが、写真を確認するまでは本気でやり直そうと思ったぐらい。ただ収穫として、試行錯誤の中でいくつか学んだことがあるのでそれを最後に書きたいと思います。


Tips for foil stamping:
  • When you make foil decals on stamping mat, make sure you apply a clear coat/topcoat in a bigger area than your stamper if possible. If this area is small, your stamper can pull the clear coat off the mat when you transfer the image onto it. (#1 in pic above)
  • In relation to the point above, avoid using sticky stamper. Again, it can pull the clear coat off the mat.
  • Make sure your stamping base (clear coat on stamping mat, or your base polish on nail if you are direct stamping) is fully dry. If it's still tacky, foil will stick to the base as well as the stamping polish when you press it onto the base. (#2 in pic above)
  • Work very fast. After you stamp, you have to immediately press the foil onto the stamp while the stamping polish is still tacky. Make sure you have a piece of foil ready.
  • Choose a 'somewhat slow drying' stamping polish. I didn't try many, but Messy Mansion stamping polishes (other than metallics) fall into this category. If you use fast drying stamping polish, you have to work lightning fast. If you use much slow drying polish such as Mundo de Unas, you need to pause for a while before you press the foil onto the stamp, otherwise polish will be stuck to the back of the foil instead of foil sticking to the stamp. 
  • Choose stamping polish colour which blends well with the foil colour. In case foil didn't transfer on some parts of the stamp, that colour shows. I used black stamping polish this time, as it won't affect much if the black shows up. (#3 in pic above)
  • Try to choose a stamping image with thicker lines. Thin lines dry faster than thicker ones when you stamp, so foil may not transfer well. (#4 in pic above)
  • Some girls give a quick wipe with acetone on the back of the foil, so the foil transfers better. I didn't try this, but you may have to do this depending on the types of foils you get.
フォイルスタンピングのコツ:
  • スタンピングマット上でフォイルのdecalを作成する場合、可能であればスタンパーよりも大きいエリアにクリア/トップコートを塗ります。このエリアが小さいと、スタンパーで柄を転写するときにスタンパーがクリアコートをマットから剥がしてしまうことがあります。(上記の画像1参考)
  • 上記の点に関連して、ベタつきのあるスタンパーはなるべく避けます。こちらもマットからクリアコートを剥がしてしまうことがあるためです。
  • スタンピングのベース(マットを使用する場合はクリアコート、直接スタンピングする場合は爪に塗ったベースポリッシュ)は完全に乾かしておきます。半乾き状態だと、フォイルをベースに押し付けたときにスタンピングポリッシュのみならずベースにもくっついてしまいます。(上記の画像2参考)
  • 作業はすばやく行うこと。スタンプ後、スタンピングポリッシュがまだ乾いていない状態ですばやくフォイルをスタンプ柄に押し付ける必要があります。フォイルは手の近くに置いておきます。
  • ’乾きがやや遅め’のスタンピングポリッシュを選びます。すべてテストしたわけではありませんが、今回選んだMessy Mansionのスタンピングポリッシュはこのカテゴリに入ります(メタリック以外)。乾きが早すぎるスタンピングポリッシュを使うと超高速で作業する必要があり、Mundo de Unasなどの乾きが遅いポリッシュを使うとフォイルを押し付ける前に一呼吸置かないといけなくなります。このタイミングが慣れないと少し難しいです。早めに押し付けるとフォイルがスタンプに貼りつかず、逆にポリッシュがフォイルの裏にくっついてしまうことになります。 
  • スタンピングポリッシュの色はフォイルの色に近いものを選びます。スタンプ柄でフォイルが綺麗に貼りつかなかった箇所があると、フォイルの代わりにスタンピングポリッシュの色がそのまま出ます。今回のネイルでは、表面に出ても違和感がない色として黒を選択しました。(上記の画像3参考)
  • 慣れないうちはなるべく太い線のスタンプ柄を選択します。線が細いとスタンプしたときにポリッシュの乾きが早くなり、フォイルがうまく貼りつかないことがあります。(上記の画像4参考)
  • フォイルの裏側をさっとアセトンで拭くとフォイルの転写がよくなると聞いたことがあります。今回のネイルではこれをする必要はありませんでしたが、フォイルの種類によっては必要になるかもしれません。
Phew! Congratulations to those who have come this far. I'm not an expert on foil stamping, and would like to learn more about it. Please tell me what you think, and share your thoughts and tips in the comments below. 

というわけで長大なポストになってしまいましたが、最後までお読みいただきありがとうございます。フォイルスタンピングについてはまだまだ学習中なので、皆様のご意見をお聞かせいただければ幸いです。ご質問などもお気軽にどうぞ。


Quick Review on Harunouta Items

Monday, August 08, 2016 2 Comments A+ a-

Today I'm showing you some items sent for review by Harunouta. Harunouta is basically a Japanese site of Born Pretty Store, but they also sell exclusive items that BPS don't carry. You can follow their instagram account here.

I have done numerous reviews for them in the past already, and I was approached again in February to do another one. I picked some items from their shop, but this time the parcel took 3 months to get here. Usually it only takes about 2-3 weeks at the longest. Bear in mind that although the site is in Japanese, they ship from China. I sometimes experience delays in mail delivery coming from China and Russia, so I wasn't surprised. Anyway, let's have a look at what I got.

今日は春の歌から届いた品のご紹介。このブログでも何度も紹介しているので説明不要かと思いますが、春の歌はネイルグッズを中心に扱うオンラインショップです。インスタグラムをフォローしたい方はこちらからどうぞ。

レビュー依頼の打診をいただいたのが今年の2月。ショップから何点か選び、品物が届いたのが5月でした。いつもは2,3週間で届くのですが、今回は3か月かかりました。ちなみに春の歌のサイトは日本語ですが、発送元は中国。中国やロシアからのオーダーすると、たまにこうしてかなり時間がかかることがあります。ショップの問題ではなく配送システムの問題なので、のんびり待つしかありません。今回は軽くご紹介といった簡易的な内容になりますが、興味がある方は続きをどうぞ。


These are what I received. 3 Ya Qin An stamping polishes, 3 jars of nail foil, 3 stamping plates, and 1 liquid nail tape.

こちらが受け取った品。Ya Qin Anスタンピングポリッシュ3本、ネイルフォイル3つ、スタンピングプレート3枚、そしてリキッドテープが1本。


First up is 3 Ya Qin An stamping polishes. If you read my previous Harunouta reviews, you see how fabulous these stamping polishes work. Product page is here and here. I asked for #21 (orange), #22 (rusty red), and #25 (pale blue). Looking at the product page though, I think I got the wrong item - I think the pink on the left is not #22, but #15. Ya Qin An polishes don't have the number or name on the bottle, so there's no knowing which colour it actually is.

最初にお見せするのがYa Qin Anスタンピングポリッシュ3本。過去の春の歌レビューを読まれたことがある方は、これらのポリッシュがかなり優秀であることはご存知かと思います。製品ページはこちらこちら。選んだのは#21(オレンジ)、#22(くすみ赤)、#25(水色)だったのですが、どうも違うアイテムが届いたような感じがします。製品ページを見る感じ、写真のピンクは#22ではなく#15のように見受けられます。Ya Qin Anポリッシュはボトルに番号や名前が書いていないので、実際にどの色が届いたのかイマイチ判別が付きません。


Here are the paper swatch on both black and white. They stamp so nice and bold on both colours.

そしてこちらが白と黒の紙上でのswatch。どちらの色の上でも抜群の発色です。


Next up is nail foils. Product page is here. I chose #2, #15 & #21. I have never used nail foils in actual manis before. Hope I can come up with some fun use of them.

お次はネイルフォイル。製品ページはこちら。選んだのは#2、#15、#21の3点。フォイルはいまだに実際のネイルで使ったことはありません。何か楽しい使い方がないか模索していきます。


Liquid nail tape. Product page is here. I was curious to see if this is glue-based liquid tape or latex-based. Good news is that it's latex-based. If you are allergic to latex, you should avoid using it though. Once you apply on your skin, it dries in a minute or so and peels off in one good piece. Sweet.

リキッドネイルテープ。製品ページはこちら。製品ページを見た感じ、グルー系かラテックス系か判断が付かなかったのですが、幸いなことにラテックス系のリキッドテープでした。ラテックスアレルギーの方は残念ながら使えませんが。指の周りに塗ると1~2分で乾き、剥がす時も一度に綺麗に剥がれます。


Lastly, 3 stamping plates. 2 BP-L rectangle plates and 1 BP round plate.

最後にスタンピングプレート3枚。BP-Lシリーズの長方形プレートが2枚と、BPシリーズの丸プレートが1枚。


Here's a close look of each plate. This is BP-L019. Product page is here. Various birdies! How cute are those cartoonish owls? Certainly not a type of mani I would normally go for, but hey, it's nice to have some variety.

1枚1枚詳しく見ていきます。こちらはBP-L019で製品ページはこちら。鳥さんいっぱい!漫画風のフクロウが可愛いですな~。こういう可愛い系の柄って普段あまり使わないのですが、もしやりたくなったときのために1枚あってもいいかなと。


This is BPL-025, product page is here. Another animal plate. It looks like I had a good intention of doing some animal manis back in February, but I don't remember what sort of mani ideas I had in mind. Anyway, it's another nice-to-have plate.

BPL-025プレート。製品ページはこちら。またもや動物プレートです。どうも2月の段階では動物ネイルをやる気満々だったようですねw ただ、どういうネイルを目指してこれらのプレートを選んだのか、今となっては思いだせない・・・。何かアイデアが降りてきたら使いたいと思います。


Finally, BP-60 plate. Product page is here. I was hoping to use this for Easter in March, but because of the delivery delay, I couldn't get to use it. Maybe next year!

最後にBP-60プレート。製品ページはこちら。3月のイースターのときにこのプレートを使う予定だったのですが、届いたのが5月だったので使うことができず。また来年に取っておきます。

So there you have it. Be sure to check out Harunouta store if you're interested in any of these items. If you have difficulty reading Japanese, then I recommend visiting Born Pretty Store and doing product search by product number.

というわけで春の歌から届いた商品の簡単なご紹介でした。最近は独自ラインのスタンピングプレートを発売したりと、アイテム数が充実しているようですね。気になるアイテムがある方はショップを覗いてみてください。

追記:8/19から春の歌オリジナルスタンピングプレートの新作が発売になります。こちらもお見逃しなく。


*Products sent for honest review
*記事中の製品はレビュー目的で送っていただいたものです

Swirls & Rainbow Stamping Mani

Friday, August 05, 2016 4 Comments A+ a-

Another month has flown past, and it's August already. I was in another state most of July, and only came back home the other day. It's good to be home! A bunch of nail mails were waiting for me, so I guess I'm gonna be busy for a while. Sad thing is that I have some nail breaks from doing dishes while I was away, because the accommodation we stayed at had no dish washer. Grrrr... I'm slightly unmotivated because of this, but hopefully they all grow out soon.

Today's mani is what I created a while ago, even before Ane Li's tribute mani. I started off with white base, then using four colours (yellow, turquoise, purple & pink), made a diagonal gradient for all nails. I stamped a swirly image from Cici & Sisi wedding season plate using Messy Mansion Chalk, and partially stamped the same pattern with Messy Mansion Carbon. Finished off with Glisten & Glow HK Girl topcoat.

I had a bunch of untried Picture Polish shades with me, so I decided to use some of them. This is actually the first time I tried diagonal gradient, and I quite like the effect. Maybe I should do gradient manis more often.

7月もあっという間に過ぎてもう8月。先月は他の州に滞在していて、つい先日戻ってきました。やっぱり自宅はいいなぁ~。nail mailもいくつか届いていたので、しばらくまた忙しくなりそうです。ただ、先月滞在していた宿に食洗器がなかったこともあり、連日の皿洗いで爪が数本折れてしまってモチベーションがダダ下がり中・・。家事をされているネイルアーティストの皆さん、皿洗いは本当に爪に悪いのでお気を付けください。

さて、今日のネイルはだいぶ前に作成したものです。前回のAne Liさんの追悼ネイルよりも前に完成していましたが、披露のタイミングが逆になってしまいました。出来上がりはこちら。
Finished product. Taken in the sun

ベースは白。黄色、ピンク、ターコイス、紫の4色でスポンジに斜めに塗っていき、爪に載せる。その後、Cici & SisiのWedding Seasonプレートの渦巻き柄をMessy Mansion Chalkでスタンプし、同じ柄の一部を使って再度Messy Mansion Carbonでスタンプ。HK Girlトップコートで仕上げ。

使用ポリッシュはこちら。
Polishes used

左から、

JOSS Will Not
Picture Polish tingle
Picture Polish sorbet
Picture Polish peaches n' cream
Picture Polish wisteria
Messy Mansion Chalk
Messy Mansion Carbon
Colour order of gradient is slightly different for middle/pinkie and pointer/ring fingers,
so it kinda looks like I used more than 4 colours, doesn't it?

Picture Polishは2月に大量購入したのですが、今まで塗れずにいたので出張先に数本持っていきました。せっかくなのでここで一気に4本使用。人差し指/薬指ペアと中指/小指ペアでグラデーションの色の順番を変えてみたので、なんとなく4色以上使っているような感じに見えますかね。
I can't get enough of swirls. It was an easy mani, but I got heaps of positive comments for this mani on IG

実はこのネイル、個人的には失敗作だと思っていました。ブログにも「ここがだめ」「あそこがだめ」とあれこれ書こうと思っていたのですが、インスタでいつもよりお褒めの言葉が多かった・・(爆。なのでわざわざ欠点を挙げつらうことはせずそっとしておきます(笑。初挑戦の斜めグラデの出来は悪くないし、渦巻きスタンプも好きだからまぁよしとする。