Ejiubas Nail Vinyls (ES-013~ES-020) Review

Thursday, September 22, 2016 0 Comments A+ a-

Anyone who's into stamping should know the brand Ejiubas by now. They make fabulous stamping plates which I reviewed on this post before, but they also sell other nail art necessities such as gel nail polish, stamping mat, and nail vinyls. Today I'm reviewing their nail vinyls.

Before I go into review, here are the links to Ejiubas shop and SNS:

スタンピングをされる方であればEjiubasというブランドをどこかで耳にしたことがあるのではないかと思います。このブランドは素敵なスタンピングプレートを作る会社で、私も以前に一度レビューしたことがありますが、ジェルやスタンピングマット、それからネイルスティッカーなどのその他ネイルアート製品も多数リリースしています。今回レビューするのはネイルスティッカーです。※ちなみに英語ではnail vinyls(発音は「ヴァイナル」)なのですが、日本語で何と呼ばれているのかよく分かりません。便宜上「スティッカー」としますが、決まった訳があるのであればどなたか教えてください。

レビューに入る前に、EjiubasのショップとSNSへのリンクはこちら。

This is what I received. 8 sheets of nail vinyls that contain heaps of different designs. You can purchase this set from here or here, and the price is $12.99 as of this writing.

こちらが受け取った品。さまざまなデザインのネイルスティッカー8シートです。この商品はこちら、またはこちらから購入でき、価格は執筆時点で$12.99。
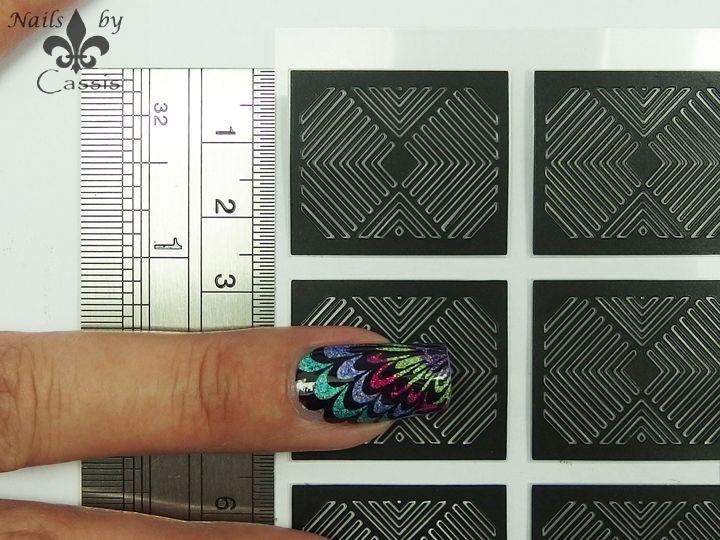

Each sheet is separated into 12 sections, and each section measures 2.5 x 3.0cm as shown above. My nail is about 2.0cm, so you can see it's fairy large.

各シートは12のセクションに分かれており、各セクションは2.5 x 3.0cmです。私の爪の長さが2.0cmなので、かなり大きいのがお分かりいただけると思います。


For those of you who are not familiar with the use of nail vinyls, the packet comes with an instruction you can refer to. Now, I'll show you each individual sheet followed by a close-up shot.

製品の使い方がよく分からないという方のためにこのような指示書が同封されています。迷ったら参考にしてみてください。それでは、中身のシートを1枚ずつご紹介します。


ES-013 sheet contains 2 different geometric patterns. It has 6 stickers per design, meaning you can only do 6 nails to do the same design. I really wished there are at least 10 stickers. I usually play around with nail vinyls to practice on nail stick, then to my right hand before I do the main hand. This means by the time I get to do my left hand, I'm only left with 1 or 2 stickers depending on how much I use beforehand.

ES-013シートには2種類の幾何学模様が含まれています。1つのデザインに付きスティッカーは6枚、つまり同じデザインを作成するのに6本の爪にしか使えないということになります。ここはせめて10枚は欲しいところ。私は通常ネイルを作成するときにまずネイルスティックで練習してから右手を仕上げ、本番の左手に取り掛かります。ということは、事前にどれだけ使ったかにもよりますが左手をやる頃にはスティッカーが1~2枚しか残らない計算になります。


ES-014 sheet contains 2 designs, one looking like UK flag, and the other like a curtain. If I ever do a UK mani, I'll probably reach for this one. Again, 6 stickers for each design.

ES-014シートはイギリス国旗のような柄とカーテンのような柄の2つのデザイン。イギリスネイルを今後やる場合に使いたいシートですね。こちらも1デザインにつき6枚です。


ES-015 contains another fun looking geometric designs. I especially like the one on the right hand side.

ES-015はまた別の幾何学模様2種類。右側のデザインなんか、楽しい使い方ができそうです。


ES-016 sheet has yet another geometric designs. Ohhh I love this one! Those triangles will make a fab designs for sure.

ES-016も幾何学模様です。このシートいいですね~。右側の三角形なんか、使い道がいろいろありそうです。


ES-017 contains gorgeous roses. Whole 12 stickers are the same pattern, which I reckon is great. Also note that the sticker is fairy large, so if you have smaller nails, you may get 2 uses out of one sticker. I have a feeling this sheet is going to be very popular.

ES-017は豪奢な薔薇のデザイン。12枚すべて同じ柄なのでちょっと練習したいときにも安心して使えます。また、スティッカー自体大きめなので、小爪な方は1枚で2つの爪に使えるかもしれません。このシートは人気が出るんじゃないでしょうか。


ES-018 is a butterfly nail vinyl. Again 12 stickers for the same design. I'll explain later, but you can cut this sticker in two parts and do 2 separate nails if necessary.

ES-018はチョウチョのデザイン。こちらも12枚すべて同じ柄です。後で説明しますが、1枚を2つに切り分けて2つの爪に使うこともできます。


ES-019 contains random zigzag shape. I'll use this one for demo later.

ES-019はランダムな形状のジグザグ模様。後でデモをお見せするときにこのシートを使います。


Last one, ES-020 contains 4 different designs, 3 of which has star, heart, and butterfly in thin lines, and the other is like a heartbeat pattern. This sheet is so unique and pretty. For the star/heart/butterfly stickers, you can potentially get 15 uses out of one design. 

最後のシート、ES-020には4つのデザインが含まれており、そのうちの3つは星、ハート、チョウチョの柄が直線の中に入ったもので、もう1つは心拍のような柄。ユニークなシートですね。星、ハート、チョウチョのスティッカーは小さめなので、それぞれ15回分使えることになります。

Next, I'll be showing you a quick demo on how to use these vinyls. I'll show you 2 ways, one using a silicone mat and the other using directly on nails.

それでは次に、これらのスティッカーの使い方を簡単にお見せします。やり方は2通り、シリコンマットを使う方法と爪に直接使う方法をデモします。


First I'll show you how to use nail vinyls using silicone mat. For this demo, I use ES-019. 
  1. Peel vinyl off the sheet using tweezers.
  2. Stick it onto clean surface of the silicone mat.
  3. Apply nail polish of your choice to the vinyl.
  4. Peel the vinyl off the mat. Make sure you do this while polish is still wet.
  5. Apply topcoat on the design on the mat to make a decal.
  6. Peel the decal off the mat.
  7. Stick the decal onto your nail and apply topcoat.
まずシリコンマットを使用したネイルスティッカーの使い方をご紹介します。このデモではES-019を使用。
  1. ツイーザーなどを使用してシートからスティッカーを剥がす。
  2. シリコンマットが汚れていないことを確認し、スティッカーを貼り付ける。
  3. お好きなポリッシュをスティッカーの上から塗る。
  4. スティッカーをマットから剥がす。ポリッシュが乾く前にこれをやること。
  5. マット上のデザインにトップコートを塗ってdecal化する。
  6. マットからdecalを剥がす。
  7. decalを爪に貼り付けてトップコートを塗る。

Next, I'll show you how to use nail vinyls directly on nails. For this demo, I use ES-018. I still have watermarble mani on, so I just use that as a base.
  1. Peel vinyl off the sheet using tweezers.
  2. Apply it onto your nail. Make sure your nail is completely dry.
  3. If the vinyl is too big, cut it off so it sticks better to your nail.
  4. Apply nail polish of your choice to your nail. You can also use sponge here.
  5. Peel the vinyl off while the polish is still wet, and apply topcoat.
  6. (Optional) The other part of the vinyl that's left on the sheet can also be used. Simply apply it on your nails and topcoat.
次に、爪に直接ネイルスティッカーを貼って使う方法をご紹介します。このデモではES-018を使用。前回のウォーターマーブルネイルをベースに使います。
  1. ツイーザーなどを使用してシートからスティッカーを剥がす。
  2. スティッカーを爪に貼り付ける。このとき、爪は完全に乾いた状態であることが重要です。
  3. スティッカーが大きすぎる場合は、ハサミで切り取って爪の表面にぴったりと貼りつくようにする。
  4. お好きなポリッシュをスティッカーの上から塗る。またはスポンジを使っても可。
  5. ポリッシュが乾かないうちにスティッカーをすぐに剥がしてトップコートを塗る。
  6. (オプション) シートに残った残りのスティッカーも形状や大きさによっては使えます。爪に貼り付けてトップコートを塗れば完成。
I only used these two vinyls to do the test so far, but they both worked great. Out of two methods, my favourite is the one using silicone mat. Applying polish on the flat surface on the mat rather than on curvy nails give much cleaner outline, and in case it doesn't come out great, you can simply discard that and do it again. If you do it on your nails and the design didn't come out nice, then you risk having to redo the base and start all over again. Besides, polish on your nail has to be completely dry, otherwise the vinyl will peel off the base, where if you use silicone mat, it doesn't really matter if the polish on nail is still tacky.

上記のデモで使った2種類のスティッカーしかまだ試していませんが、どちらも使用感は良好です。2つの方法のうち、私のお勧めはシリコンマットを使う方法。マットの平たい表面にポリッシュを塗る方がカーブのある爪の上で塗るよりもデザインの輪郭がはっきりするのと、万が一輪郭が綺麗にならなくてもまたやり直せばいいだけです。一方、爪の上でスティッカーにポリッシュを塗ってうまくいかない場合、ベースからやり直す羽目になります。また、爪に直接使う場合はベースが完全に乾いていないとスティッカーがベースを剥がしてしまうことになりますが、マットを使えば爪の上のポリッシュは完全に乾いていなくても問題ないという利点もあります。

So there you have it! Hope this review is helpful to those who are unsure about how to use nail vinyls, and to those who are wondering what this particular vinyl set is like. This nail vinyl set from Ejiubas offers a nice variety of designs, so if you are interested, be sure to check out their store. I can't wait to do some designs with them.

ということで、Ejiubasのネイルスティッカーのご紹介でした。使い方が分からなかった方、興味はあるけど使い勝手はどうだろうと悩んでいた方たちの参考になれば幸いです。今回ご紹介したセットはデザインのバラエティも豊富でいろいろ楽しめると思います。気になる方はショップを覗いてみてください。これからどんな風に使おうか考えてみます。


*Products sent for honest review
*記事中の製品はレビュー目的で送っていただいたものです

Messy Mansion Stamping Polish & Carbon Stamper Review

Monday, September 19, 2016 4 Comments A+ a-

This post is going to be a very long one, so grab your coffee, sit back, and have fun! Back in July, I picked few items from Messy Mansion website to do a review on my blog. July and August was an extremely busy month with heaps of other nail mails received to do the review, but I'm glad I could finally get to play with Messy Mansion products. 

Before I go into review, here are the links to Messy Mansion store and SNS:

今日のポストはかなり長めなので、お茶でも飲みながらのんびりとお読みください。7月の終わり頃、Messy Mansionの製品レビューをやるためにサイトをチェックしていくつかのアイテムを選定しました。7月と8月は各社からnail mailが一気に届いて忙しく、少し時間が経ってしまいましたが、ようやくMMのレビューをできる運びとなりました。

レビューに入る前に、Messy MansionのショップとSNSへのリンクはこちら。

These are what I received. I actually have more in the mail, but I'll leave the other half in another post and concentrate on these items in this post. These are 2 sets of stamping polishes and Carbon Stamper set.

こちらが受け取った品。実はもう少しあるのですが、長くなりすぎるので残りのアイテムは別の機会にレビューをすることにします。今回ご紹介するのはスタンピングポリッシュのセット2つとCarbonスタンパーセット。

I'll show you the Carbon Stamper set first. Product page is here. Price is $12USD, and comes with 2 stamper heads, 1 holder and a scraper in a fancy organza bag.

まずはCarbonスタンパーセットからお見せします。製品ページはこちらで、価格は$12(米ドル)。内容物はスタンパーヘッド2つ、ホルダー1つ、スクレイパー1枚で、ロゴ入りのオーガンザバッグに入って届きました。

Stamper heads are white and dark navy (almost black). You can switch between the two depending on the stamping polish colour.

スタンパーヘッドは白とダークネイビー(ほぼ黒)の2色。スタンピングポリッシュの色に応じて2つを切り替えて使うことができます。

Stamper head in holder measures about 3.6cm in diameter, so it's quite big. Holder is a matte black which makes it easy to get a good grip, and has a beautiful Messy Mansion logo printed at the bottom. Scraper is a credit card size, and is medium-firm.

スタンパーヘッドはホルダーに入った状態で直径3.6cmなので、かなり大きめです。ホルダーは艶消しブラックで滑ったりすることなく握りやすくなっており、底にはMessy Mansionのロゴが印字されています。スクレイパーはクレジットカードと同じ大きさで、硬さは中程度。

Stamper heads are pleasantly squishy, maybe about the same squishiness with my beloved Messy Mansion pink stamper. They are also relatively sticky. Below I'll show you the test swatch done with some Messy Mansion stamping polishes (which I'll show you later) and MM plates. Back of the stamper heads is a bit oily, so I went and washed them with water before swatching.

スタンパーヘッドはかなり柔らかめ。私の愛用Messy Mansionピンクスタンパーと同じぐらいと言っていいと思います。ベタつきもかなりあります。以下、Messy Mansionスタンピングポリッシュ(後でご紹介します)とMMプレートを使用したテストswatchをお見せします。スタンパーヘッドの裏が少し油っぽかったので、水で洗ってからswatchしています。

As you can see, the quality is amazing as with all other Messy Mansion stampers. I can see a tiny bit of bald spots on the white head, but not to the degree that puts me off using it of course. In fact, I already knew they work great - I sneakily used these stampers for the paper swatch for the hēhē plates!

ご覧のように他のMessy Mansionのスタンパーと同様、品質は良好。白のヘッドの方は多少のかすれは見られますが、もちろん使いたくなくなるレベルではありません。ちなみに、hēhēプレートの紙swatchのときにこのスタンパーをこっそり使っていました。なので今試すまでもなく品質がいいことは分かっていました。

Overall, I'm super excited about this stamper set. I only have a handful of bigger size stamper, and was desperately in need of more, especially this squishy. I know these are going to be my new favs.

総論としてこのスタンパーセット、非常に気に入りました。このサイズのスタンパーは数えるほどしか持っていなかったので、特にこのぐらい柔らかいものを欲しいと思っていました。今後かなり活躍してくれると思います。

Moving onto stamping polish. This set is called Artist collection. Product page is here, and the price is $50 for the set of 6. Each bottle is 15ml, and you can also buy individually for $10 each. The set comes in a box shown above.

次にスタンピングポリッシュのご紹介。このセットはArtistコレクション。製品ページはこちらで、6本セットで$50。各ボトルは15ml入りで、バラで買う場合は1本$10。セットで買う場合は上の箱に入って届きます。

And this set is called Hydrangea collection. Product page is here, and the price is $50 for the set of 6. Each bottle is 15ml, and you can also buy individually for $10 each except for the topcoat seen at the far right. Again, the set comes in a box shown above.

そしてこちらのセットはHydrangeaコレクション。製品ページはこちらで、6本セットで$50。各ボトルは15ml入りで、バラで買う場合は1本$10ですが、一番右のトップコートはバラ売りはしていないようです。こちらのセットも上の箱に入って届きます。

All the polishes in this Artist set are nice and vibrant, and they are good for those who want basic colours. Please see the pic above for polish names.

Artistセットの方はパッキリカラーが中心で、まずは基本色を揃えたい人に最適のセットになっています。各ポリッシュの名前は上の画像を参考にしてください。

And this is Hydrangea set. Love these soft colours! I have most basic colours, but am lacking some soft ones like these. I'm curious to see what the topcoat is like also. I'll test it out later. Below I'll show you the swatch on nail stick in black and white. I used Carbon stamper for the swatch.

そしてこちらがHydrangeaセット。ソフトな色合いがいいですね~。私は基本色はほとんど持っていますが、こういう柔らかい系があまりなかったのでちょっと嬉しいです。一番右のトップコートも気になるので後でテストしてみようと思います。それではswatchを見てみましょう。黒と白に塗り分けたネイルスティックにCarbonスタンパーを使ってスタンプしています。

First up is Artist collection. Most of them are really dark colours in bottle, so I didn't expect them much to stamp over black but I'm surprised they are quite visible. Over white, they all look impressive.

まずはArtistコレクションから。ボトルで見る限りどれも濃い色なので黒の上ではどうかな?と思っていたのですが、意外と黒の上でも発色いいです。白の上ではどれもクッキリはっきりですね。

And this is Hydrangea collection. As they are all lighter colours, they all look great over black. Dogwood Pink (pale pink) is a very subtle pink, so it's not very visible over white.

そしてHydrangeaコレクション。こちらはソフトな色合いのセットなので、黒の上での発色は抜群。Dogwood Pink(薄ピンク)だけはかなり白に近い色なので、白の上ではあまり見えません。


And here is the quick test of 'Top Notch' topcoat that comes with Hydrangea collection. Bottom left pic is before topcoat and bottom right is after topcoat. Application is smooth and it leaves the mani nice and glossy. I didn't time properly, but I could safely touch the surface after 5 minutes, so the actual dry time is shorter than that. What excites me most is that it doesn't smear the stamping. I exclusively use Glisten & Glow HK Girl topcoat for all my manis, because this is the only topcoat I have that doesn't smear stamping (aside from Seche Vite that I never use because of its shrinkage problem). Love it!

そしてこちらがHdrangeaコレクションに付属する'Top Notch'トップコートの簡単なテスト。左下がトップコート前、右下がトップコート後です。塗り心地はスムーズで艶の出方も良好。きちんと時間を測りませんでしたが、5分後には表面を触っても問題なかったので実際の乾燥時間はそれより短いと思います。何より一番感心した点は、スタンピングを引きずらないこと。私のトップコートの選択肢は今までGlisten & Glow HK Girlトップコートだけでした。というのも、手持ちのトップコートのうちこれが唯一スタンピングを引きずらないトップコートだから(縮みが激しいためもう使っていないSeche Viteは除く)。これからはこちらも併用していこうと思います。

So what do you think? I'm beyond excited about all of these polishes! Now I'd like to talk about formula and other important aspects of these stamping polishes: 
  • Messy Mansion stamping polishes are 5-free, vegan, and can also be used as a one-coat regular polish.
  • They are neither thick or thin, and application is nice and smooth.
  • No nasty smell. Smell is that of a regular polish. 
  • None of them show any separation (I have them over a month).
  • None of them stain my stampers.
  • Drying time is a bit on the slow side. You don't need to work lightning fast.

どうでしょうか?どれもいい色でニヤニヤが止まりませんでした。これらのスタンピングポリッシュのフォーミュラやその他の特徴についても触れておきます。
  • Messy Mansionスタンピングポリッシュは5フリーかつビーガン(動物由来の成分なし)。一度塗りでOKな通常ポリッシュとしても使用可能。
  • もったりしたり水っぽいということはなく、塗り心地はスムーズ。
  • 匂いは通常ポリッシュと同程度で至って普通。
  • どのポリッシュも分離は見られず(現在手元に来て1ヶ月以上経過)。
  • スタンパーに染みになるものもなし。
  • 乾く時間はやや遅い方。つまり、光の速さで作業しなくても多少時間を掛けることが可能。

I'll finish off this post by showing you some comparison swatches with other brand stamping polishes. Swatch is done on black paper this time. The brands to compare are Mundo de Uñas (review), Ya Qin An (review), and Pueen Super Intense polishes (review). A bit of information before doing comparison; I heavily use all of the above brand stamping polishes in my designs and they all work amazingly. Earlier this year when I was severely sick, however, my body chemical seems to have changed and now I can't stand the smell of some of them, namely MdU and Ya Qin An. I'm staying away from them as much as possible as they make me sick and give me migraine. I have to wear industrial mask when I have to use them, which is really sad. Another reason why I'm excited to have these Messy Mansion stamping polishes that are free from nasty smell. Also note that MdU is 2-free, as opposed to Ya Qin An (3-free), Pueen & MM (both 5-free). OK enough talk, let's see the swatches.

ポストの締めくくりとして、他のブランドのスタンピングポリッシュとの比較swatchをお見せします。Swatchは黒い紙の上で行っています。比較するブランドは、Mundo de Uñas (レビュー)、Ya Qin An (レビュー)、Pueen Super Intenseポリッシュ (レビュー)の3点。比較に入る前に少しお話しておきたいことがあります。これらのスタンピングポリッシュは私の過去のデザインでたびたび使用され、どれも素晴らしい品質です。ですが、今年前半に体調を崩してから体質が変わってしまったようで、一部のポリッシュの匂いがどうしても受け付けなくなってしまいました。具体的に言うとMdUとYa Qin Anがそうです。頭痛が起きたり気分が悪くなるので、復帰してからはこの2つのブランドはなるべく使わないようにしています。使う必要がある場合はガスマスクのような業務用マスクを付けています。そんな背景があって、嫌な匂いのしないMessy Mansionのスタンピングポリッシュが加わって非常に嬉しく思っているところです。また、MdUは2フリー、Ya Qin Anは3フリー、PueenとMMはどちらも5フリーであることも留意すべき点です。では前置きはこれくらいにして比較をどうぞ。

First up is green comparison. From left to right: Mundo de Uñas Green - Mundo de Uñas Military Green - Messy Mansion Forest. Excuse the blur in photo. They look pretty similar in bottle, but they look different over black.

まずは緑の比較。左から、Mundo de Uñas Green - Mundo de Uñas Military Green - Messy Mansion Forest。写真がぶれててすみません。ボトルで見る感じはどれも似ていますが、黒の上ではだいぶ違いがありますね。

Next is blue comparison. From left to right: Messy Mansion Blue You A Kiss - Mundo de Uñas Blue - Pueen Royal Blue. MdU looks almost like neon, and the other two are a bit similar but not dupes.

次は青の比較。左から、Messy Mansion Blue You A Kiss - Mundo de Uñas Blue - Pueen Royal Blue。MdUはネオンに近い青で、他の2本はかなり似ているもののdupeではありません。

Purple comparison. From left to right: Messy Mansion Royal Purple - Mundo de Uñas Purple - Ya Qin An Purple - Pueen Charmed Lilac. Sorry for not-so-great photo quality. Purple is such a difficult colour to photograph. MdU and Ya Qin An both stain my stamper, so I hardly use them. MM is the darkest in bottle, thus darkest over black.

紫の比較。左から、Messy Mansion Royal Purple - Mundo de Uñas Purple - Ya Qin An Purple - Pueen Charmed Lilac。紫は写真で正確な色を表すのが難しいので、上の写真はちょっと微妙です。MdUとYa Qin Anはスタンパーに染みが付くのでほとんど使いません。MMはボトルで見ても一番濃い色なので、黒の紙の上でも一番濃いです。

Red comparison. From left to right: Messy Mansion Red-y Or Not - Mundo de Uñas Reddish - Pueen Exotic Red. I hardly come across a red stamping polish that stamps vibrant over black other than MdU Reddish, but this MM red is quite good even though it's a darker red in bottle.

赤の比較。左から、Messy Mansion Red-y Or Not - Mundo de Uñas Reddish - Pueen Exotic Red。赤のスタンピングポリッシュって作るのが難しいんでしょうか。MdU Reddish以外に黒の上でしっかり発色するものをあまり見たことないのですが、MMの赤はボトルではかなり濃い赤であるにもかかわらずなかなか健闘しているんじゃないでしょうか。

Orange comparison. From left to right: Messy Mansion Happy Now - Mundo de Uñas Orange. They look similar in the bottle, but quite different on black.

オレンジの比較。左から、Messy Mansion Happy Now - Mundo de Uñas Orange。ボトル上ではかなり似た色ですが、黒の上ではかなり違いが出ています。

Yellow comparison. From left to right: Messy Mansion Banana Bender - Mundo de Uñas Yellow - Mundo de Uñas Mustard - Pueen Bright Yellow. My MdU Yellow separates badly, so it doesn't stamp great any more even after I shake vigorously. MM and MdU Mustard are quite similar in colour.

黄色の比較。左から、Messy Mansion Banana Bender - Mundo de Uñas Yellow - Mundo de Uñas Mustard - Pueen Bright Yellow。MdU Yellowはかなり分離が激しく、しっかりボトルを振ってももはやきちんとスタンプしなくなってしまいました。MMとMdU Mustardはdupeと言っていいぐらい似ています。

Pale blue comparison. From left to right: Messy Mansion Hydrangea Blue - Ya Qin An Pastel Blue - Pueen Baby Blue. They are all different and beautiful. MM has a slight dusty hue which I absolutely love.

水色の比較。左から、Messy Mansion Hydrangea Blue - Ya Qin An Pastel Blue - Pueen Baby Blue。どれも異なる色でいい色ですね。MMのは少しくすみがかった青で素敵です。

Pastel pink comparison. From left to right: Messy Mansion Petal - Pueen Sweet Pink. These two are very similar, almost a dupe.

パステルピンクの比較。左から、Messy Mansion Petal - Pueen Sweet Pink。この2本はdupeと言っていいぐらい似ています。

Lilac comparison. From left to right: Messy Mansion Lilac - Mundo de Uñas Lilac - Pueen Charmed Lilac. No dupes here, yay!

ライラックの比較。左から、Messy Mansion Lilac - Mundo de Uñas Lilac - Pueen Charmed Lilac。こちらもdupeなし。

Lastly, light green comparison. From left to right: Messy Mansion Spring Green - Mundo de Uñas Avocado. MdU is very vibrant whereas MM has a dusty hue. This MM is unique in my collection and it reminds me of Matcha. Yum!

最後に、薄緑の比較。左から、Messy Mansion Spring Green - Mundo de Uñas Avocado。MdUはかなり鮮やかで、MMの方はくすみが入っています。こういう色持っていなかったので嬉しい。抹茶みたいで美味しそう♡

So there you have it! I have nothing similar to Dogwood Pink (very pale pink) so I didn't do the comparison. While I see some dupes, these Messy Mansion polishes are quite unique in my collection, and I know I'll be using them a lot in the future. 

Congratulations to those who have come this far. I don't know about you but I'm super exhausted... This post took whole two days to put together with all the swatching, taking/editing pics & writing in two languages, so I really hope it helps someone. If you are interested in any of the products in this post, be sure to check out Messy Mansion website

Dogwood Pink(ごく薄いピンク)は手持ちで比べるものがなかったので比較画像はなしです。いくつかdupeはありましたが、Messy Mansionのスタンピングポリッシュは手持ちに似たものがない色が多く、使い勝手がよさそうで嬉しいです。今後たくさん使っていこうと思います。

というわけで、最後までお読みくださった方、大変お疲れ様でした。私も非っっ常に疲れました・・・・。swatchから始まって、写真撮影と編集、二か国語での執筆に丸2日費やした自分、お疲れ。どなたかの役に立てば非常に幸いです。このポストで紹介した製品に興味がある方は、Messy MansionのWebサイトを覗いてみてください。


*Products sent for honest review
*記事中の製品はレビュー目的で送っていただいたものです

Holographic Watermarble Stamping Mani

Thursday, September 15, 2016 2 Comments A+ a-

Here's another design I created using the Theme Park collection plates sent by Pueen Cosmetics. This time, I used the Marble Paradise 01, full of watermarble images.

Base is Dance Legend Steel Panther for all nails. I made a stamping decal out of one of the watermarble images on Pueen Marble Paradise 01 plate using Pueen Black Jack, and coloured in with Dance Legend Wow Prism polishes (see below for bottle shots). For pointer & pinkie, I used a different watermable image and partially used the image to place on these nails. Finished off with HK Girl topcoat.

We are having sunny warm days here in OZ, so I pulled out my beloved Dance Legend Wow Prisms that were hidden deep in my Helmer. Oh how I love these beauties! I know I'll be using them a lot for the coming warm seasons. I wasn't too excited when I first saw this watermarble plate, but so glad I have this in my collection! I see why people love this plate because it's so fun to use.

Pueen CosmeticsのTheme Parkコレクションを使った第2弾ネイル。出来上がりはこちら。
Finished product, with HK Girl topcoat

ベースは全爪 Dance Legend Steel Panther。Pueen Marble Paradise 01プレートのウォータマーブル柄をPueen Black Jackでスタンプし、Dance Legend Wow Prismポリッシュを使用して色付けしてdecal作成。人差し指と小指は同じプレートの別の柄を使用して柄の一部を切り取って爪に配置。仕上げはHK Girlトップコート。

使用ポリッシュはこちら。
Polished used. Look how low Steel Panther is getting. I need backups!

左から、

Dance Legend Steel Panther
Dance Legend Just Another Star
Dance Legend Party Time
Dance Legend Inhale
Dance Legend Holy Diver
Dance Legend Beautiful Lie
Pueen Black Jack

一番最後に買ったParty Timeを除いてだいぶ減ってきてますね。特にSteel Panther。そのうちバックアップを買わねば~!
Ok, here's the macro. Awwww they're like jewels, aren't they!? 

ちなみにマクロも撮りましたよ。春になって暖かく陽射しが強くなってきたので、約1年ぶりにWow PrismたちをHelmerから引っ張り出してきました。やっぱりいいですね~、宝石のような輝き(うっとり)。
Can you see how I changed the colour order a bit for each finger?
All the colours look so well together I reckon

各爪、色の順番を少しずつ変えています。こんなカラフルでも少しも違和感なく色の調和が取れてるのがスゴイよ。だからついつい全部一緒に使いたくなる、このWow Prismシリーズ。手に持ってるSteel Pantherのキラキラも見てくださいよ。名前もカッコいい、Steel Panther大好き。
Do you have any watermarble plate? If not, why not grab one, it's so fun!!

ウォーターマーブル プレートを初めて見たときあまり感動しなかったのですが、使ってみると本当に楽しいですね。1枚持ってて損はないです。


Blue x Red Chevron Flower Mani

Saturday, September 10, 2016 0 Comments A+ a-

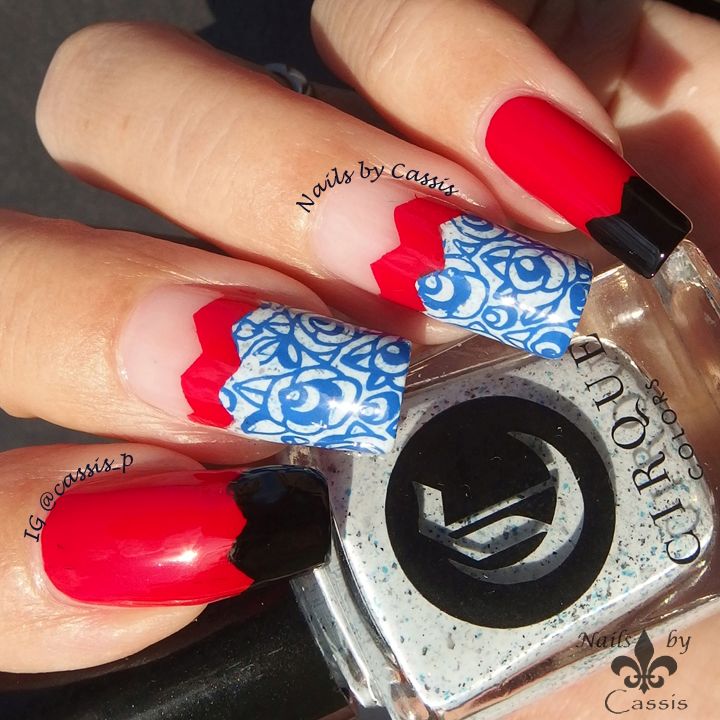
I am often asked where I get inspirations for my nail designs. My answer is, the inspiration is everywhere really. This design was actually inspired by a dress a TV host was wearing. I saw a glimpse of this TV host and her dress in a commercial, and the image stuck to my mind. I didn't see the details, but I remember it had a blue flower print on white base with one or two red lines. So I decided to create that design using one of the Pueen Theme Park plates I was sent for review.

Middle & ring finger: I started off with base coat. I placed chevron tape from What's Up Nails horizontally on nails, and painted Cirque Acid Wash on the bottom of these nails. Then I covered the bare part of my nails and skin with Simply Peel, stamped a flower image from Pueen Secret Garden 01 plate using Pueen Royal Blue, and peeled off liquid latex. Then I placed two more sets of chevron tapes just above the stamp, and painted red (JOSS Dazzling) between the tapes. I finished off with HK Girl topcoat.

Thumb, pointer & pinkie: Base is JOSS Dazzling, and I used the chevron tape to paint the nail tip black.

I hardly use red x blue together, but they make such a nice combo I reckon. The whole look is really eye-catching, and I got so many compliments on this mani.

先日ご紹介したPueen Theme Parkコレクションの1枚を使用したネイルを作成してみました。出来上がりはこちら。
Finished product with HK Girl topcoat

中指と薬指 : まずベースコートでスタート。What's Up Nailsのシェブロンテープを爪に水平に置き、爪の下半分にCirque Acid Washを塗る。乾いたらSimply Peelで素爪部分と肌を保護し、Pueen Secret Garden 01プレートの花柄をPueen Royal Blueでスタンプし、ラテックスを剥がす。次に、スタンプ部分のすぐ上にシェブロンテープを2つ置き、その間を赤(JOSS Dazzling)で塗る。仕上げはHK Girlトップコート。

親指、人差し指、小指 : ベースはJOSS Dazzling。爪先にシェブロンテープを置いて黒を塗り、HK Girlトップコートで仕上げ。

使用ポリッシュはこちら。
Polishes used

左から、

Face of Australia Don't Judge Me!
Cirque Acid Wash
JOSS Dazzling
Pueen Royal Blue
I pulled out Cirque Acid Wash for this mani again. The flakies in the polish are mostly hidden behind the stamp, but you can still see some peeping through.

よく「ネイルの柄はどうやって思い付くんですか?」と聞かれるのですが、世の中のいろんなものを参考にしています。このネイルに関して言うと、CMでちらっと映った何かの番組の女性司会者のドレスの柄がインスピレーション元。本当に数秒だったのですが、確か白地に青の花柄プリント、それに赤い線が1~2本入っていたと思います。「あ、これネイルのデザインになりそう」と思ってずっと頭に残っていました。
Tape can be a bit pain, but this was quite easily & quickly done because there's no decals involved

青と赤ってあまり一緒に使うことがなかったのですが、なかなか見栄えがする組み合わせですね。数時間外出しただけで「あら~素敵なネイルね」と複数の人から声を掛けられました。何か特別なイベントでも?と聞かれたのですが、いえいえ、ごく普通の日常ネイルですw ちと派手すぎたかな?