Showing posts with label BC Co.. Show all posts

Cupcake & Ice Cream Mani

8th of this month was Chinese New Year, and 14th is Valentine's Day. I've already done manis for each theme (here and here), so what should I create next? I'm still uninspired and couldn't think of anything, so I decided to go through my plate collection and spotted a cute plate that I've been wanting to use for a long time - hehe 055.

For this mani, I started off with 4 different colours, yellow, blue, pink & purple. Then I stamped a candy swirl pattern on MoYou London Princess 12 with Messy Mansion Chalk (white) for all nails. I used clear jelly stamper from Harunouta to stamp the swirl in the centre. Then I made stamping decals out of cupcakes & ice cream patterns on hehe 055 using Ya Qin An Chocolate (both available from Harunouta), coloured in with the same 4 colours used for base plus turquoise. Finished off with Glisten & Glow HK Girl topcoat, and mattified with Essie Matte About You afterwards.

I first tried to do the swirl using nail vinyls instead of stamps, but it got a bit lumpy and didn't like how it came out. I hardly reach for symmetric stamp like this because I suck at stamping in the centre, but clear stamper changed all that.

I don't know why though, but I really struggled in creating this mani. When I tried to stamp the swirl with clear stamper, white polish didn't adhere to my nails well. I tried MdU White, Ya Qin An White, Pueen Pure White, and finally Messy Mansion Chalk. This Messy Mansion did the best job. I painted my base colours in the morning before work, and did stamping at lunch break, so it could be because the base was really really dry. I also pressed too hard when transferring the image onto my nails, so the swirls got quite wavy. I don't know how many times I had to stop recording to redo the stamps, and felt really exhausted by the time I finish this mani. Ah well, at least it turned the way I wanted.

1週間の出張から戻り、久々のネイル作成。旧正月ネイルもバレンタインネイルもやったし、次は何しよう~?と思いつつプレートコレクションを眺めていると、ずっと前から使いたかった可愛いプレートを発見。出来上がりはこちら。
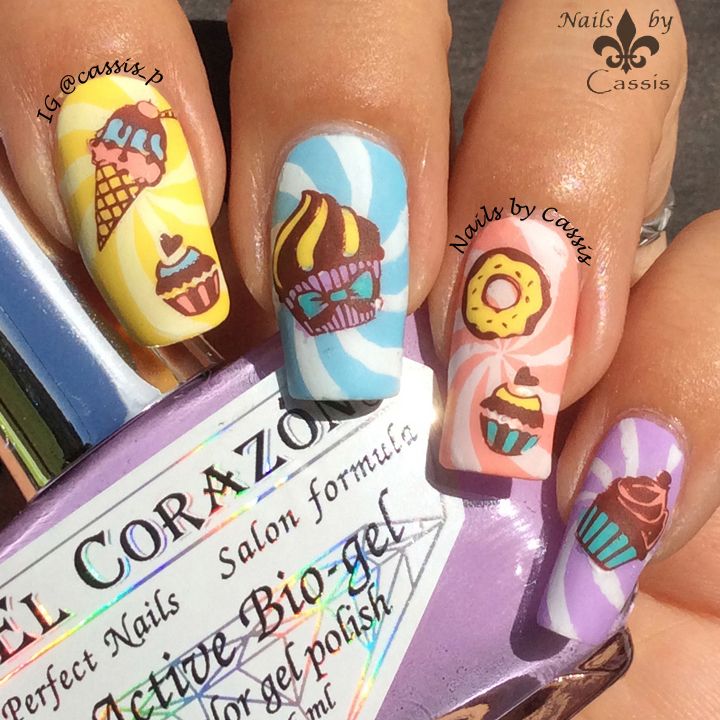
Finished product, mattified with Essie Matte About You

ベースは4色(黄色、青、ピンク、紫)。MoYou London Princess 12プレートのcandy swirl(ロリポップ柄?渦巻き柄?)をMessy Mansion Chalk(白)でスタンプ。爪の中央にスタンプするため、ここでは春の歌のクリアスタンパーを使っています。次にhehe 055プレートのカップケーキやアイスクリーム柄をYa Qin An Chocolate(どちらも春の歌より)でスタンプし、上の4色とターコイスを使って色付けしてdecal化。それぞれの爪に乗せる。Glisten & Glow HK Girlトップコートを塗ってからEssie Matte About Youでマット化。

使用ポリッシュはこちら。
Polishes used

左から、

Elcorazon No. 423/278 Cream
Elcorazon No. 423/279 Cream
Elcorazon No. 423/292 Cream
BC Co. shade #12
Sally Hansen Mellow Yellow
Messy Mansion Chalk
Ya Qin An Chocolate
It was a bit hard to stamp the full-size image with clear jelly stamper, because it's not squishy enough to accommodate my curvy nails. I didn't film the process, but I had to draw the missing lines with detail brush

このネイル、私がよくやる「ベーススタンプ+decal」の何の変哲もないネイルなのですが、何故かとても苦労しました。渦巻き柄を白でスタンプするときにポリッシュが爪に張り付いてくれず、何度やり直したことかorz・・・ MdU White、Ya Qin An White、Pueen Pure Whiteと試して、最後に使ったMessy Mansion Chalkでどうにかこうにかスタンプ出来たという感じ。ベースのポリッシュは早朝に塗っておいてスタンピングは昼休みにやったのですが、ベースが乾きすぎていたのが原因なんだろうか?そのときの爪のコンディションとクリアスタンパーとの相性なのかなぁ。しかも柄を爪全体に転写するために強く押してしまい、渦巻きが波打ってしまったよ(-_-)チーン
This hehe plate also has some cute toy images. I'll use them for another occasion :)

スタンプに失敗→カメラを止めて動画を消す→スタンプをセロテープで剥がす or ベースをやり直し・・というのを5回以上はやりました。しかも、今回はなぜかdecal化したスイーツ柄のスタンプまでてこずりました。「ピックアップできない柄はない」と思えるほど信頼している神スタンパー、Messy Mansion Soft Pinkでやってもですよ(-_-) heheプレートの彫りがやや浅めなのに加えて、Ya Qin An Chocolateの乾きが少し早いのと、40度近い気温の中扇風機をかけて作業していたという作業条件もあったのかもしれません。気温が高すぎてdecalにも気泡が入ってたしなぁ。

そんなわけで完成したときには疲労困憊。まぁまぁ、でも出来上がってホッとしましたよ。久々にマット化してみましたが、この方がなんとなく美味しそうですね。


Grey x Pink Lacey Mani

October 28th Update: I replaced the video at the end of this post with YouTube version.

I created another design using the beautiful plates Pueen Cosmetics kindly sent me, this time Celebration Lace Blossom plate. 

Thumb, middle finger & ring finger: I started off with Rimmel Grey Matter, and applied Simply Peel around cuticle area to protect my skin. I stamped a lacy pattern from Pueen Celebration Blossom plate using Mundo de Uñas Dark Gray, and topcoated. When that's dry, I placed 2 pieces of masking tape horizontally on those nails, painted MoYou London Cerise Pink between the tapes, and peeled off the tapes. I then made a stamping decal out of ribbon image on the same plate using my dear friend Coppi's franken 'Coral', and placed it on the pink part. I finished off with Glisten & Glow HK Girl topcoat.

Pointer & pinkie: Base is BC Co. shade #8, and I stamped a different lace pattern on the same plate using MdU Light Gray. I painted MoYou London Cerise Pink and Sinful Shine Steel Reserve on the stamp then Essence clear polish to make a decal, cut it to cover about 2/3 of the nails, and placed it on those nails. 

This colour scheme was totally inspired by the amazing Nina @nina_d83 on Instagram, who did a cute pink x grey mani a while back. I really loved the soft look on that mani, and decided to do my version of pink x grey mani. I'm not a girly type of girl, but I'm proud of how this turned out.

10/28更新:記事最後の動画をYouTube版に置き換えました。

Pueen Cosmeticsから送られてきたもう1つのプレート、Celebration Lace Blossomプレートを使ってネイルを1つ作成してみました。出来上がりはこちら。

Finished product, with Glisten & Glow HK Girl topcoat. In the sun

親指、中指、薬指 : ベースはRimmel Grey Matter。キューティクル周辺をSimply Peelでカバーしておく。Pueen Celebration Blossomプレートのレース柄をMundo de Uñas Dark Grayでスタンプし、トップコートして乾かす。マスキングテープを細く切って2つ爪に水平に置き、その間をMoYou London Cerise Pinkで塗ってテープをすぐ剥がす。次に、同じプレートのリボン柄をこっぴさんのフランケン'Coral'でスタンプしてdecalを作成し、ピンクの部分に乗せる。仕上げはGlisten & Glow HK Girlトップコート。

人差し指と小指 : ベースはBC Co. shade #8。同じプレートの別のレース柄をMdU Light Grayでスタンプし、MoYou London Cerise PinkとSinful Shine Steel Reserveで色付けしてdecal作成。爪の2/3ほどの大きさに切り取って爪に乗せる。

使用ポリッシュはこちら。

Polishes used

左から、

Rimmel Grey Matter
Sinful Shine Steel Reserve
BC Co. shade #8
MoYou London Cerise Pink
Coppi's franken 'Coral'
Mundo de Uñas Dark Gray
Mundo de Uñas Light Gray

I'm quite impressed with how detailed the stamping came out.
This Pueen plate is super gorgeous! 

この色合いなのですが、インスタグラムのNina @nina_d83さんのこのピンクxグレーネイルを参考にさせていただきました。ピンクとグレーって本当に合いますね~。こっぴさんのフランケンCoralがドンぴしゃりでした♡ いつもデザインの考案にひとしきり悩んで、色合わせにさらにその倍ぐらい悩むのですが、今回の色はインスパイヤ元があったので、あれよあれよという間に出来上がりました。

I got so many positive comments on Instagram. Glad they like it as much as I do :)

Pueenのこのプレート、レースと花柄が満載なので日本女子に人気が出そうな気がしますね。テストスタンプからしてかなり良かったですが、実際のネイルでも細い線がかなり鮮明に出てちょっと感激しました。今後大活躍しそうな予感。


にほんブログ村 美容ブログ 自爪ネイルへ

Autumn Argyle Mani Using Hehe Plate

October 16th Update: I replaced the video at the end of this post with YouTube version.

Seeing a lot of autumn manis lately makes me want to create one myself despite the fact that the season is completely opposite here in Australia.

Thumb, middle & ring finger: I started off with BC Co. shade #26, and made a stamping decal out of argyle pattern on hehe 017 plate using Ya Qin An Chocolate and Mundo de Uñas Mustard, coloured in with red, brown, and camel colour. I cut the decal to rectangle shape and placed it onto bottom part of the nails. I added some dots using brown polish and dotting tool, and finished off with Glisten & Glow HK Girl topcoat.

Pointer & pinkie: Pointer is painted with Dior Dune (brown) and pinkie with JOSS Dazzling (red), and some dots added.

I wanted to stay away from fallen leaves mani as I have seen lots already. This combo is not something I normally come up with, but I'm quite happy that it has a perfect autumn feel to it.

10/16更新:記事最後の動画をYouTube版に置き換えました。

オーストラリアはいま春真っ盛りですが、秋ネイルを最近よく見るようになったので私も1つ作ってみました。出来上がりはこちら。

Finished product, with HK Girl topcoat. In the sun

親指、中指、薬指: ベースはBC Co. shade #26。hehe 017プレートのアーガイル柄をYa Qin An ChocolateとMundo de Uñas Mustardでスタンプし、赤・茶・キャメル色のポリッシュで色付けしてdecal作成。decalを長方形に切り取って爪の下半分に乗せる。茶色のポリッシュとドット棒でドットを追加し、Glisten & Glow HK Girlトップコートで仕上げ。

人差し指と小指: 人差し指にはDior Dune (茶色)、小指はJOSS Dazzling (赤)を塗り、ドット棒でドットを追加。

使用ポリッシュはこちら。

Polishes used

左から、

Elcorazon Active Bio-gel 423/261 Cream
BC Co. shade #26
Dior Dune
JOSS Dazzling
Ya Qin An Chocolate
Mundo de Uñas Mustard

This argyle pattern on hehe plate was a bit too small to cover the whole nail, so I got creative
and used only part of it

秋ネイルというと落ち葉を思い浮かべますが、そこはあえて葉っぱは避けて色だけで秋を表現してみました。こんな感じのツイードスカートありそうですよね(゚∀゚) 普段使わない色合わせですが、色の組み合わせに悩んだ分なかなかよくまとまったなぁと思います。

We'll be seeing Halloween manis soon.. I gotta put the thinking cap on :D

動画撮影しながらのネイル作成、もうそろそろ慣れてもいい頃ですがまだまだですね^_^; ドットが楕円形にならなくてよかったw


にほんブログ村 美容ブログ 自爪ネイルへ

Japanesque Nail Art with MoYou London Plates

Much anticipated nail mail from my dear friend Coppi has arrived the other day and I wanted to use them immediately. She gifted me two stamping polishes, Coral and Caffe Latte which she frankened just for me, along with a bunch of Japanese treats! I was like a kid opening a Christmas present.

For this mani, I started off with BC Co. shade #24 (rusty red) for pointer and middle finger, and placed straight nail vinyls I bought from Whats Up Nail Art Store and masking tape on my nails. Then I stamped a Japanese pattern from MoYou London Suki 05 using Coppi's franken polish 'Coral' and peeled off the tapes. Then using a bird image from MoYou London Mother Nature 02 plate, I made a stamping decal, coloured in with OPI Love.Angel.Music.Baby and placed it onto my middle finger.

For ring finger, I started off with OPI Uh-oh Roll Down the Window, stamped the same pattern from Suki 05 with 'Caffe Latte' and made a stamping decal with flower image from Suki 02 using 'Coral' again, coloured in with BC Co. shade #24.

I'm super impressed with Coppi's stamping polishes! They equal the quality with my much loved Mundo de Uñas stamping polishes. She has no intention to sell them or disclose the recipe though. She is such a clever & talented lady, and I'm so honoured to be friend with her!

今日は楽しみにしていたあるものを使ったネイル。いつも仲良くさせていただいているこっぴさんが最近スタンピングポリッシュの作成に成功されて、ありがたいことにカシスにも送っていただけるということでわくわくしながら待つこと数週間。やっと届いた~!\(^o^)/ \(^o^)/ 事前にこっぴさんから、既に持っている色を教えてくださいとのご連絡があって、私が持っていない色味をわざわざカスタムメイドしてくださいました。ありがたやありがたや~(;▽;)

ちなみに不都合があるといけないのでお名前を伏せようかとも思ったのですが、今回こっぴさんにも事前にご相談させていただいた上でブログにもインスタにも「こっぴさんからの贈り物」と明記しています。2本送っていただいたので今回のネイルで両方使ってみました。出来上がりがこちら。

Finished product. I used Glisten & Glow HK Girl Top coat first, but the decals looked too thick,
so I applied Seche Vite to hide the gap

人差し指と中指のベースはBC Co. shade #24。マスキングテープとWhats Up Nail Art Storeで買ったnail vinylを水平に爪に置いて、その上からMoYou London Suki 05の和柄をスタンプしてテープを剥がす。このときに使ったのがこっぴさんのフランケン「Coral」。その後、MoYou London Mother Nature 02から不死鳥のような鳥をMundo黒でスタンプし、OPI Love.Angel.Music.Babyで色付けしてdecalを作成し、中指に置いています。

薬指と小指のベースはOPI Uh-oh Roll Down the Window。Suki 05の和柄を同じ要領でスタンプ。ここではこっぴさんのフランケン「Caffe Latte」を使用しています。 Suki 02の花を「Coral」でスタンプし、BC Co. shade #24で色付けして薬指に配置。ちなみにこっぴさんからいただいたフランケンがこちら。

Coppi's frankens - Coral and Caffe Latte. See how they stamp over black? Impressive!

左が「Coral」、右が「Caffe Latte」。なんというおいしそうな色合い!(゚∀゚) カフェラテとかそのまま飲めそうなぐらい(笑。そしてほのかにショウガのような匂いがするのです、これが。見た目も色も匂いも美味しいってレアすぎませんか?w そしてこんなに柔らかい色なのにしっかり黒ベースで発色してますね。素晴らしい、素晴らしいよ・・・こっぴさんは天才!(σ´∀`)σ そして画像にはないですがお菓子も大量にいただきました\(^o^)/ 海外住みの人間としては、こんなにありがたい贈り物はないです(;▽;) 日本に帰りたくなってきた~(涙。こちらは旦那と争うようにいただいています(笑。

そして使用ポリッシュの全体像がこちら。

Polishes used

左から、

BC Co. shade #24
OPI Uh-oh Roll Down the Window
OPI Love.Angel.Music.Baby
Coppi's franken polish "Coral"
Coppi's franken polish "Caffe Latte"
Mundo de Uñas Black

I thought this bird from Mother Nature plate would go well with the Japanese theme mani,
so I had a go!

このMother Nature 02の鳥のなんとなく神々しい姿が不死鳥のように見えて、和風ネイルで使ってやろうと機会を狙っていました。本当は何の鳥なんでしょうか。七面鳥?w

ちなみに今回使ったテープの上からスタンプして剥がすトリックなんですが、Mundoだとあまり上手くいかないかもしれません。テープで剥がれやすいMundoなので、剥がす時に爪に付いている部分も一緒に持っていかれる可能性があります。こっぴさんのフランケンはそういうことは一切なく、しっかり貼りついてくれました。

Do you like the colour combination? I do!

今回こっぴさんのフランケンに合わせて今まであまり使ったことのなかったくすみ系の色を選んでみたのですが、なかなか気に入りました♪ 和風ネイルに合った渋い感じが好きです。

ちなみに今回の仕上げはGlisten & Glow HK Girlトップコートを使ってみました。が!decalの厚みがモロに出てしまったので、Seche Viteをさらに重ね塗りして段差隠ししています。キューティクル周りのボテッとした感じはそのせいです・・・。HK Girl、まだ使い慣れません。

そんな感じでこっぴさんからいただいたフランケンポリッシュを使った和風ネイルでした。こっぴさん、本当に素敵な贈り物をどうもありがとうございましたm(_ _)m 大切に使っていきます♪


にほんブログ村 美容ブログ 自爪ネイルへ

Semi-Circle Stamping Nail Art with YouTube tutorial!

Guess what? I made another YouTube tutorial. Crazy, right? I decided to make one just because my short Instagram version couldn't cover the whole process. The video is embedded at the end of this post.

Only a week ago, I did my first mani swap with Elle @with2l on Instagram, and since then I got 3 more requests about doing either mani swap/bestie twin nails. How wonderful is it that there are ladies out there wanting to do that with me!

This time I did bestie twin nails with Jae @jae_nails. I got to know her on facebook but since we learned that she lives in Japan and I'm a Japanese, we chat in Japanese for hours over the internet. I really love her nail arts and have been admiring her work even before we got to know each other. 

This time I designed the mani first and showed her if she's interested to recreate. She liked it and she recreated with different colours. Love her choice of colours!

For this mani, I started off with MoYou London Palatinate Purple, then covered the upper part and the lower part of each nail with french guide tips. I then used two Mundo de Uñas colours to stamp a design from Pueen Encore SE03A. 

I'm quite happy with how this mani looks! I like using tapes and french guide tips with stamping, because they give an interesting look. :)

今日のネイルはまたコラボネイルです。そしてまたYouTube動画を作りました。1週間ほど前にMani swapをやったばかりですが、それから3人ほどお誘いをいただきまして。今回はMani swapじゃなくBestie twin nailsです。Mani swapはお互いの過去のネイルアートを自分なりに再現するものでしたが、Bestieは同じデザインを2人で同時にやるというもの。同じデザインといってもいろいろと調整が必要なので、今回は私が先にデザインして相手に見せ、相手がそれを再現する形になりました。

今回のお相手はJaeさん(@jae_nails)。フィリピン出身で日本に住んでいます。Facebookで数か月前に知り合って意気投合し、連日何時間も日本語でチャットしています。気さくなお姉さんなので勝手に「stamping sister」と呼んでいます(笑。ではまず出来上がりはこちら。

Finished product with Seche Vite

ベースはMoYou London Palatinate Purple。フレンチガイドで爪の上下を隠し、Mundo de Uñasの2色とPueen Encore SE03Aを使用してスタンプ。その後2mmのシルバースタッズを追加。Bestieの画像がこちら。

Bestie pic with Jae. She used different colours. Looking great! <3

私の方はちょっと色がまたファンキーになってしまいましたが、Jaeさんのは落ち着いた素敵な色合いですね(゚∀゚) ちなみに使用ポリッシュはこちら。

Polish used (names written below)

左から、

Mundo de Uñas Orange
Mundo de Uñas Avocado
MoYou London Platinate Purple
Ciate hopscotch
BC Co. Shade 17

I added the 2mm silver studs

スタンプ後、何となく物足りなかったのでスタッズを追加しました。ところでこのスタンプ柄、なんていうんでしょう?和柄の一種みたいですね。

I called this mani 'Semi-circle stamping nail art'. It doesn't really look semi-circle,
but if you watch YouTube tutorial, you'll see what I mean ;)

いつも動画作成するときは中指でデモをするので、中指の失敗率が高いです(汗。カメラ止めたりモタモタしてるからね。タイトルのSemi-Circleとは「半円」の意味なのですが、全然半円に見えてないっつー。。。

それでは興味がある方はYouTubeのチュートリアルをどうぞ。特に目を見張るテクニックというのはありません。秒数制限の関係上インスタ用の動画でカットした手順があったので単に長いバージョンを作ってみただけです(笑)。


にほんブログ村 美容ブログ 自爪ネイルへ

Roses on wire stamping using Mundo de Uñas

I'm back from Kangaroo Island! We had so much fun being among nature and wild animals. I had a bit of a neck sore from trying to spot wild Koalas up on the trees but well worth it :) I will probably write a blog post about this trip later.

Today I'm showing you a nail stamping I did before the trip. I started off with my one coat black franken and stamped wire pattern from Bundle Monster BM-323 using Mundo de Uñas stamping polish, 17 Gold. I then added roses from BuNa-A using Mundo 32 Reddish, and leaves using 8 Green.

I love this mani so much - the black base with gold and red really pops! I'm so happy with Mundos, they stamp so perfectly. I also included a test stamp of stamping red over green per reader request.

カンガルー島から帰還しました\(^o^)/ 自然いっぱい、野生動物いっぱいのところでゆっくり羽を伸ばしてきました。野生のコアラにも会えたし大満足!そのうち記事にしようと思います(゚∀゚)

さて、今日のネイルは旅行前にしていたものです。Mundo de Uñasが届いたのでさっそく使ってみたの巻。出来上がりはこちら。

Finished product - this is without topcoat, but all other photos are with Seche Vite

ベースはone coatブラックフランケン、その上にBundle MonsterのBM-323のワイヤー柄をMundo de Uñasの#17 Goldでスタンプ。その上にBuNa-Aの薔薇を同じくMundoの#32 Reddishでスタンプしてから葉っぱを#8 Greenで書き足しています。この写真だけトップコートなし、後の写真はセシェ仕上げ。

Thumb and pinkie is painted with BC Co. #31

親指と小指は手に持っているBC Co. #31を2度塗り。使用ポリッシュはこちら。

Polish used

左から

one coatブラックフランケン
BC Co. #31
Mundo de Uñas Reddish
Mundo de Uñas Green
Mundo de Uñas Gold

Don't you just love the wire and rose combination?

色の組み合わせが和風っぽいですね(゚∀゚;) 着物に合いそう?それにしてもMundoの威力は凄いですよ。ベースの黒に負けない金と赤の存在感・・・。こういうコントラストがはっきりしたネイル、好きです。

ちなみに「スキホウダイ」のシイキさんからリクエストいただいた「緑の上から赤スタンプでどうなるか」をテストしてみました。まずは白ベース。

Reader request - stamping Reddish over Green on white base

Greenの上にReddishでスタンプ。下の緑が透けて見えていますが、汚い感じはないですね。次に黒ベース。

stamping Reddish over Green on black base

こっちも綺麗ですね(゚∀゚) 白ベースに比べて下の緑の透け感が不思議とないです。どっちも発色抜群ですがお互いの色を邪魔している感じはありません。ご参考まで♪

そんなわけでMundo初使用、非常に満足です\(^o^)/ 今後無駄に黒ベースのネイルが増える予感がしますよw

にほんブログ村 美容ブログ 自爪ネイルへ

Colourful Skittle mani

My franken adventure continues. I recently frankened 2 creme polishes and was wondering what mani to create with them. I came up with the colourful skittle mani I'm showing you today.

As I was looking through my stash, I noticed I'm totally lacking periwinkle colour, so this is franken #1.

I also realized I only had one yellow polish (Sinful Colors Unicorn). This is a pastel yellow creme, and I wanted a brighter yellow - this is franken #2.

I really love the look of this mani, it certainly brightens me up! I use all different brands of nail polishes, but I'm proud that it has a uniform look. Recipes and other details are shown as a caption of each pic below.

ハッピーイースター!この記事がアップされる頃、こちらではイースター休暇、4連休です。またアデレードかメルボルンに行こうかな?まだ何するか決めてません(゚∀゚;)

さて、前回の記事でお知らせしたとおり、クリーム系のフランケンを2つほど作成したのでご紹介♪色をたくさん使いたい!ということでSkittleネイルにしました。Skittleというのは、それぞれの爪に違う色を塗っていくネイルを指します。まず出来上がり(第1形態)はこちら。

1st stage of this mani, with the same colour family at the tips

柔らかい色合いのポリッシュを各爪に塗り、同じ色系統のポリッシュを爪先に塗っています。

Reminds me of chocolate, blueberry, starawberry, grape, and lemon... Yum!

親指も入れるとこんな。チョコ、ブルーベリー、いちご、ぶどう、レモン・・・って感じじゃないですか?(@ ̄ρ ̄@)ジュル

使ったポリッシュはこちら。

Polish used - the far right and 3rd from the left is my frankens

左から、

BC Co. shade 26
Dior Dune
Franken #1 - 菫(すみれ)
ATネイルエナメル 92
BC Co. shade 8
BC Co. shade 24
Sinful Colors Mauve
Nfu Oh 520
Sinful Colors Unicorn
Franken #2 - 藤黄 (とうおう)

フランケンのレシピはこちら。

Recipe for franken #1. The franken bottle is Dior mini bottle, 7.5ml

自分の手持ちポリッシュにパステル寄りの青がないことに気付いたので製作してみました。ベースは上のEssie2本。この2本は非常にシアーで個人的に使い道がほとんどないので、Suspension Baseの代わりに使用しました。

Diorのこのミニボトルは7.5mlです。この大きさ、フランケンにちょうどよくて嬉しい(゚∀゚)。このチョウチョネイルで使ったDiorがほぼなくなりかけていたので、同じ色系統の別のポリッシュに移し変えてアセトンで洗浄して空ボトルとしました。

作り方は、ボトルにEssie 2本から液を投入して8割ほど埋め、ATネイルエナメル青10滴とSinful白を5滴ほど投入。フランケンの名前は「菫」(すみれ)です。

Recipe for franken #2

フランケンその2はピグメントを使用。驚いたことに黄色系のポリッシュは1本しか持っていませんでした(汗)。それもパステルイエローだったので、もっとパキっとした黄色が欲しいと思い製作。

Essenceの8mlのベースコートが空になったのでこちらも洗浄して使用。Suspension Baseをボトル半分投入し、TKB Tradingの基本13色のパックからYellow Oxideをストローの先に3-4杯?(失念)乗せて投入。かなり濃い黄色だったので、Sinful白を数滴混ぜています。こちらのフランケンの名前は「藤黄」(とうおう)。

Franken #1 on the pointer, #2 on the ring finger at the tips

以上を踏まえて再度ご覧ください♪菫は人差し指、藤黄は小指の先に塗っています。

これだけでも十分満足だったんですが、爪先にスタンピングを追加してみました。

Stamping added on the tips using Bundle Monster BM20

Bundle Monster BM20のプレートから謎の波型の柄を使用。Bundle Monsterの柄はどれも私の爪には小さすぎて、こういう部分使いしかできません。素敵な柄たくさんあるのに残念!

Pity the patterns on BM plates are too small to use as a full design

色んな色を使って楽しげで美味しそうな(?)ネイルに仕上がり満足です\(^o^)/ いろんなブランドのポリッシュやフランケンを使った割には色の統一感もあるなぁと自画自賛(笑)。暇を見てまたクリームフランケンやってみたいと思います(o^∇^o)ノ

にほんブログ村 美容ブログ 自爪ネイルへ

Black veil and rose mani

I love browsing through pinterests and instagram for nail art inspiration. I saw a lot of nail enthusiasts doing nude mani using sheer black, and I couldn't resist creating my own.

First, I needed to make a sheer black. My Sinful Colors Black on Black was almost empty, so I decanted what's left into OPI Black Onyx and poured Revlon topcoat which was also near-empty. It still looked quite opaque, so I added some thinner and suspension base to get the sheerness I liked.

For thumb, accent, and pinkie, I put on sheer black and drew outlines with Essie Licorice. I then added polka dots.

For index and middle fingers, I painted with BC Co. shade 26 and added rose stamping using Bundle Monster BM-323.

I really loved the look! I then added China Glaze Matte Magic to see what it's like. WRONG. It not only smeared the design, but it gave shine to it. Duh! I think I need to buy Essie Matte About You soon...

ポリッシュよりも大量の空ボトルが欲しいカシスです、こんにちわ(o^∇^o)ノ 自分の手持ちポリッシュを眺めては、もうすぐなくなりそうなポリッシュを別の似たポリッシュに投入して空ボトルを作り、それで好きな色を調合したりしています。今まではホロやDuochromeが多かったのですが、最近はクリーム系をフランケンしているので今後ボチボチ紹介していくと思います♪

さて、今日はシックな感じのネイルを。最近PinterestやInstagramで毎日のようにシアーブラックを使ったネイルをよく見ます。世界的な流行なんでしょうかね?ならば私も!ということでやってみました。出来上がりはこちら。

Outdoor shot, no top coat

屋外にて。トップコート前。使用したポリッシュはこちら。

Polish used
左から

Essie Licorice
Sinful Colors Black on Black (のフランケン)
BC Co. shade 26
China Glaze Matte Magic
Konad スタンピングポリッシュ黒

Sheer black in Sinful Colors bottle

まず、このネイルをするにあたってシアーなブラックが必要でした。Sinful Colors Black on Blackがかなり減ってきたので、これをOPI Black Onyxに移し替えて、これまたなくなりかけのRevlonトップコートを注ぎ入れました。それでもまだ濃かったので、好みの薄さになるまで薄め液やらSuspension baseやらを投入しています。

This is with matte topcoat. WTF!? So shiny :(

人差し指と中指はBC Co.の上にBundle Monster BM-323の薔薇をスタンピング。残りの指はシアーブラックを塗った後、Licoriceで縁取り&ドット追加。

BC Co. #26はミルクたっぷりのカフェオレ色。肌馴染みがよくて色もしっかり乗るし、超絶使いやすいです。通常2ドルのものが1ドルになっていたので2本目を買い足しました。プチプラポリッシュとは思えない品質(゚∀゚) OPIのボトルに入ってたとしたら、「さすがOPIだね~」と絶賛されるぐらいのシロモノですよ。

Hate the smearing but love the big polka dots

で、これなんですが・・・China Glazeのマットトップコート塗った後なんです(。-_-。) なんでこんなツヤツヤなの?塗る前の方がよっぽどマットだよ!ヽ(`Д´)ノウワァン しかも引きずってるし・・・。捨てたいぐらい使えない子。EssieのMatte About You買うわ、もー。

Thanks for naming this mani!
(Shout out to girls at Adventures in Stamping group)

タイトルのBlack veilは「黒のベール」です♪FBのネイルグループにこのネイルの画像を投稿して「名前なんて付けたらいいかな?」と聞いたところ、この名前を考えてくれた人がいて気に入ったので採用(゚∀゚) ずっと「黒ストッキング・・」と頭にあったので、いい名前付けられてよかったですw

シンプルで大人っぽい今回のネイル、気に入りました♪フリーハンドの縁取りとかドットは改良の余地ありですが(゚∀゚;)

「シアーな黒って需要あるの?」とどこの誰かさんが先日のたまっていましたが、しっかりありました、どうもすみません(笑)。まだまだこのシアーブラックを使ったネイルで温めているアイデアがあるので、そのうちお見せできればと思います(o^∇^o)ノ

にほんブログ村 美容ブログ 自爪ネイルへ

Cherry Tree Stamping with MoYou London Suki 01 plate

Since my first purchase of MoYou London plates, I've been having a very good use out of them. There's one plate though that has been neglected by me - Suki 01.

This plate is a collage one and has Japanese-themed patterns. I was going to give it a try around New Year's day but totally forgot. As the spring is approaching in Japan (autumn here in Australia), I think it's a good time to pull the plate out and give it a shot.

This is the mani I created. I have seen so many beautiful stamping using this plate, and I couldn't help doing similar. I did the gradient using Dior Addict 123 and Sinful Colors Cinderella then stamped the cherry tree patterns using stamping decal technique. I used two colours - pink and red - to colour the cherry flowers. I only use 4 colours along with Konad black for stamping, but I just love that it looks so complicated and dimensional. So in love.

最近カメラの調子が悪いです。爪の撮影にはPanasonicのDMC-TZ7という動画に強い名機を使用しているのですが、液晶画面がイカれてしまったようです。。もう5年以上前のモデルだから仕方ないですね。早く日本に帰って新しいカメラ買いたい(;▽;)

さて、今回のネイルはまたMoYou Londonのスタンピングです。プレートを初購入したときから何度もここのプレートを使ってきましたが、4枚中1枚だけまだ使ったことがないSuki 01というプレートがありまして。

春を思わせる柄が多いので後回しにしていたのですが、3月に入ったことでそろそろ使ってみようかと。あ、オーストラリアはもうすぐ秋ですが、日本人ですもの。3月4月と言ったらわたし的には永遠に「梅・桜の季節」ですよ。

そんなわけで出来上がったのがこちら。

P1030745.jpg

使ったポリッシュはこちら。

P1030746.jpg

左から

Dior Addict 123
Sinful Colors Cinderella
BC Co. Shade #8
BC Co. Shade #24
Konad 黒


DiorとCinderellaでまずベースをグラデーションにしています。どちらもシマーなのでグラデーションが楽なこと!このとき危うくトラウマになるところだったからね、グラデーション。

P1030752.jpg

このDiorは10年以上前のものです。もう半分以上消費しているので早く空にしてFranken用ボトルとして使いたいという不純な動機で今回選定w

花の色づけにはBC Co.という激安ポリッシュを使用。どちらもクリアランスで1ドル。激安なのに塗りやすくて優秀。しかもこの赤はスタンピングポリッシュとしても使えることを確認(゚∀゚)

P1030744.jpg

色はベース2色、色づけ2色、スタンピングの黒の5つしか使っていませんが、黒だけのスタンピングより華やかで奥行きが出ますね♪

さて、このStamping Decalテクニック(Reverse stamping=反転スタンピングと呼んでいる方もいます)なのですが、3つほどやり方があります。既に2つは紹介済みなのでおさらいのみ。

方法1:スタンパーに柄を転写して色付けし、トップコートを塗って剥がして爪に乗せる。詳しくはこちら。

方法2:トップコートを塗ったクッキングシートに柄を転写して色付けし、乾いたら剥がして爪に乗せる。詳しくはこちら。

方法3:スタンパーに柄を転写して色付けしておく。爪にトップコートを塗り、完全に乾ききる前(30秒~1分)にスタンパーの柄を爪に転写。

今回はこの「方法3」を初めて試してみました。方法1と2の難点は、Decalとして爪に乗せることで少し厚みが出てしまうこと。今回実はクッキングシート方式でまたやろうとしたのですが、CSに塗っておいたトップコートが薄かったためか、きちんと剥がれずイライラ・・・。

P1030743.jpg

この左手の薬指と中指は方法2、人差し指で初めて方法3をやってみました。薬指と中指の先端部分、よ~く見ると「何か乗っかってる感」が分かりますでしょうか?

方法3は途中まで方法1と同じ。色づけはスタンパー上で済ませておきます。ただしトップコートはスタンパーには塗りません。ベースカラーを塗っておいた爪にトップコートを塗り、約1分ほど待ちます。セシェなど速乾タイプの場合は30秒かそれより短く。とにかく乾ききる前にスタンパーの柄を爪に転写します。この方法だと通常のスタンピング同様「乗っかってる感」が出ずフラットな出来になります。

P1030748.jpg

人によってやりやすさが変わると思うのでお好きな方法でどうぞ♪( ´▽`) カシスはこの方法3がなかなか気に入りました。今後もちょくちょくこのテクニック使っていこうと思います\(^o^)/

にほんブログ村 美容ブログ 自爪ネイルへ