Triangle Mosaic Mani using DRK XL Designer 2

Friday, February 27, 2015 4 Comments A+ a-

March 14th Update: I replaced the video at the end of this post with YouTube version.

I had another play with my DRK plate. The pattern I used here is also the one I fell in love with during test stamps on paper.

I started off with Impala Festa, and stamped a triangle mosaic pattern from DRK XL Designer 2 plate using Mundo de Uñas Black. I coloured in those small triangles using 4 Dance Legend polishes from Wow Prism collection, and applied Essence clear polish to make a decal. Once that's dry (45min-1hr), I peeled it off from stamper and cut into half to make a sharp triangle shape, and put it onto nail. I added rhinestones I bought in Japan and finished off with Glisten & Glow HK Girl topcoat.

This time I used one of the colourful stamper heads I bought from AliExpress (review post here) to make decals, and it worked the way I wanted. I used the clear (translucent) one, and I totally forgot that that was the one I had a bit trouble picking up image during test stamps, but it stamped real well. Phew!

Because I used Dance Legend Wow Prism polishes, they coloured part is so sparkly under the sun, but in the shade the colourful look sort of reminds me of a pop art mani. It took a while to colour in those tiny parts, but I'm glad it came out pretty!

3/14更新:記事最後の動画をYouTube版に置き換えました。

またDRKプレートで遊んでみたの巻。まず出来上がりはこちら。

Finished product, with Glisten & Glow HK Girl topcoat. Outdoor shot

ベースはImpala Festa。DRK XL Designer 2の三角モザイクのような柄をMundo de Uñas Blackでスタンパーにピックアップ。Dance Legend Wow Prismコレクションの4本を使って色付けし、Essenceクリアポリッシュを塗ってdecal作成。45分~1時間ほど待ってスタンパーから剥がし、半分に切って尖がり三角形の形にして爪に載せる。こちらのお店で買ったSS5のラインストーンを載せてGlisten & Glow HK Girlトップコートで仕上げ。

ちなみに今回使ったスタンパーはAliExpressで買った中の1つです(レビュー記事はこちら)。半透明のヘッドを使ったのですが、前回のテストスタンプで問題があるやつだったことをすっかり忘れていました。特に問題なくスタンプできたので一安心。

使用ポリッシュはこちら。

Polishes used

左から、

Impala Festa
Dance Legend Holy Diver
Dance Legend Last Serenade
Dance Legend Inhale
Dance Legend Just Another Star
Mundo de Uñas Black

Every time I use these Dance Legends, I get asked where I bought these.
I bought mine directly here and from Llarowe

このDance Legendたち、夏の間は本当によく使いました。もうそろそろ秋の足音が聞こえてきそうですが、日差しが強いうちはまだまだ使っていきます。最近よくいただく質問のナンバーワンは「このDance Legendどこで買えるの?」なんです。いつも私のIGアカウントに遊びに来てくれる愉快な仲間たちには「欲しくなるからもう使わないで!」と冗談で言われますが、皆さん我慢しないでどんどん買ったらいいと思うの。

It took a while to colour in those tiny parts, but luckily I could get 2 pieces out of one decal.
For colouring, I used this detail brush from Born Pretty Store

この色付けする部分、かなり小さく数が多いので、やり始めは余裕こいていましたが終わる頃には薄ら汗が出てました。1つのdecalから2ピース取れるので、両手合わせて5回で済みます。いや、これを10個分作る気にはまったくならんからorz  ちなみに色付けには春の歌さんから送っていただいたこちらのブラシセットの1本を使っています。屋外だとDLがキラキラできれい、屋内だとカラフルなポップアートネイルみたいな感じでなかなか見てて飽きないです。


にほんブログ村 美容ブログ 自爪ネイルへ

First Use of DRK XL Designer Plate

Tuesday, February 24, 2015 4 Comments A+ a-

March 6th Update: I replaced the video at the end of this post with YouTube version.

With 2 gorgeous XL plates from DRK Nails in front of me, I didn't know where to start. While I was doing test stamps, I saw some gorgeous designs and I decided to use one of them.

For this mani, I started off with Face of Australia Scream (black), and stamped an ornamental pattern at the top left of DRK XL Designer 2 plate with Mundo de Uñas Gold onto about 2/3 of middle and ring finger. Then I placed a french tip tape from What's Up Nail Store at the tip of these nails, and painted Mundo de Uñas Reddish at the tips. I added a red rhinestone from MoYou London on these nails and finished off with Glisten & Glow HK Girl top coat. For other fingers, I added the same red rhinestone and some gold square studs I bought from eBay.

For stamping, I used rectangle stamper from MoYou London (review post here). For this type of stamping that needs to be centred (this time horizontally), I line up the stamper near cuticle and simply press down. It's much easier using this marshmallow stamper for this technique, and I'm glad it came out the way I wanted. 

I love this colour scheme and combined with this ornamental stamp, this mani reminds me of ancient China somehow. I don't have any red polishes that go so vibrant against black, so I painted Mundo de Uñas Reddish (at least I didn't paint directly on my nails so it should be ok). This red is so striking and really makes the whole mani pop. I love this look, but the only problem is that I don't know what to name this mani :P

3/6更新:記事最後の動画をYouTube版に置き換えました。

先日届いた2枚のDRKデザイナープレートを前に、どれから手を付けようかひとしきり悩んでみました。テストスタンプでいくつかゴージャスな柄を見つけたので、その1つを使おうと思って出来たのがこちら。

Finished product, with Glisten & Glow HK Girl topcoat

ベースは全爪ともFace of Australia Scream (黒)。DRK XLデザイナー2の左上の豪奢な柄をMundo de Uñas Goldで中指と薬指の上2/3ほどにスタンプ。その上にWhat's Up Nail Storeのフレンチテープを置いて爪先数ミリをMundo de Uñas Reddishで塗る。MoYou Londonからもらった赤のラインストーンを1つずつ置き、仕上げはGlisten & Glow HK Girlトップコート。他の爪は赤のラインストーンの他にeBayで買った金の四角スタッズを配置。

ちなみに今回、MoYou Londonの長方形スタンパー(レビューはこちら)を使ってみました。今回の柄のように真ん中(水平方向)にスタンプする必要があるものは、スタンパーをキューティクルの位置に合わせて柄が真ん中に来ていることを確認してから押し込んでスタンプしています。このやり方にはマシュマロスタンパーがやはりやりやすいのでMoYouのを使ってみたのですが、狙った通りに真ん中にスタンプできました。

Polishes used. MdU Gold is half the bottle now, but I have a full size bottle as a backup :)

Face of Australia Scream
Mundo de Uñas Reddish
Mundo de Uñas Gold

Mundo Goldは散々使ってきましたがようやくミニボトルの半分消費。結構持つもんですね。フルボトルは既に購入済みです。

See what I mean by MdU Reddish? I tried with different regular red polish,
but the result was just meh

爪先に塗った赤はMundo Reddishです。他の赤ポリッシュを使ってみたんですが、ここまで黒の上で綺麗に発色するのはやっぱりReddishだけ。爪に直接塗ったわけじゃないのでセーフかと。

I don't know whether you notice or not, but I have a big crack at the side of my pointer,
and I repaired it with tea bag for the first time. Hope it grows out soon :(

この黒と赤と金の組み合わせ好きです。和風ネイルでもよく使う色合わせですが、今回は柄が完全に中華ですね。ところでこのネイル、なんと名前を付けるか非常に悩んでいます。「黒赤金ネイル」じゃ締まらないし、「中華スタイルネイル」もなんだかなぁ。YouTubeの動画作るときに名前を付けなきゃいけないのでそれまで悩んでみます。

ちなみに人差し指なんですが、サイドに大きな亀裂が入ったのでティーバッグ方式で初めて補修してみました。表面がぼこっとして見えるのはそのせいです。昨日やって既に綻びが出てきているので、次のネイルチェンジの時にまたやらなければ・・・。早く伸びるといいなぁ。


にほんブログ村 美容ブログ 自爪ネイルへ

DRK Nails Haul and Plate Review

Sunday, February 22, 2015 4 Comments A+ a-

On the same day I received my colourful stamper heads from AliExpress, I also received my first order from DRK Nails. DRK Nails is a Brazillian based stamping plate company which also sells polishes and stamping accessories. I have been keeping my eyes on this brand for quite a while now, but as soon as they showed the sneak peek of the new XL Designer plates late January, I was completely sold and decided to order.

Before I made an order, I asked a question on their Instagram account. Because this was my first purchase, I wanted to have an idea of what the image size is like on their XL plates. I asked "what is the size of the dragon at the top right corner of XL Designer 2 plate?" on their IG account. No reply. So I asked the same question again. Yet no reply. OK, I'm seriously considering purchasing and asking a genuine question, but no reply?? You may say "Relax, they don't monitor every comment on IG", but what confused me was that they replied to everyone on that post, but completely ignored mine. 

AliExpressからのカラフルなスタンパーヘッドが届いた日に、もう1つDRK Nailsからの初オーダーも届きました。DRK Nailsはブラジルベースのプレート会社でポリッシュやスタンピングツール類も販売しています。かなり前から目を付けていた会社なのですが、1月末にリリースされたXLデザイナープレートを見た瞬間「これは買わねば」と思い、初オーダーに至ります。

実際にオーダーする前に、インスタグラムで質問をしてみました。初オーダーになるので、このXLプレート上の柄のサイズがどんな感じなのかを知りたいと思い、「XLデザイナー2プレートの右上のドラゴンの大きさを教えてもらえますか?」とコメントを残しました。返事なし。見逃したかな?と思い同じ質問を再度投げる。やっぱり返事なし。んんん・・・真剣に購入を考えた上での質問なんだけど返事がないとはこれいかに??「IGでのコメントを全部確認できるわけじゃないでしょ」と言う人もいるかもしれませんが、腑に落ちないのがそのポストの他のコメントにはすべて返信しているのに、私の2回の質問は完全スルー。

So I went to their website and contacted from there, asking the same question. I also added that I wasn't happy that my questions were ignored on IG. I got prompt reply from the owner Katia with the answer to my question (the dragon is 1 x 1 inch) and an apology. She told me she would make sure that no questions are left unanswered on their account. I was so relieved to get a reply! I was so desperate to get their plates, but wouldn't want to if customer service is not great. As I said before, I get lots of comments from my readers and YouTube subscribers that they bought those plates I use after watching my videos. I certainly don't want to use a plate when the plate company doesn't care about their customers. 

Anyway, this is how the order went:
  • Jan 29th : Paid
  • Feb 6th : Dispatched with tracking
  • Feb 20th : Arrived
Because I placed an order as soon as the new Designer plates were released, they must have had a massive order as it took a week for them to actually ship. After dispatch, it took 2 weeks to reach me. Let's have a look at what I've got.

そこでWebサイトに行ってそこからメールを送り、同じ質問をしました。同時に、IGで質問を無視されたんですがいただけないですね、という点も付け加えました。するとオーナーのKatiaさんからすばやい返信があり、ドラゴンは1x1インチであることとお詫びの言葉が付け加えられていました。IGを管理しているのは見習いの人だそうで、質問は見逃さないよう指導するとおっしゃっていました。 返事が来て本当にホッとしましたよ。。。プレートはどうしても欲しい、でもカスタマーサービスが悪ければ買いたくないと思っていたので。前にも言ったと思いますが、「動画見て同じプレート買ったよ!」と言われることが多いので、お客さんを大事にしない会社のプレートは使いたくないですからね。

まあそんなことがありつつ、注文から到着まではこんな感じ。
  • 1/29 : 支払い
  • 2/6 : 追跡番号付きで発送
  • 2/20 : 到着
新しいデザイナープレートのリリースとほぼ同時に買ったこともあり、注文が殺到したんでしょう。支払いから発送までに1週間かかっています。発送から到着までは2週間。そして届いたのがこちら。


This is how the order came in. Actual plates wrapped in decorative wrapping, business cards and invoice.

こんな感じで届きました。綺麗な包装紙にくるまれたプレートと名詞とインボイス。


Inside the decorative wrapping, my plates were sandwiched between thin cardboard papers.

綺麗な包装紙の中身はこんな感じ。薄い段ボール紙でプレートが挟まれています。


I bought 2 XL Designer plates, Designer 1 and 2. Each has plastic backing, and the plate size (not including the plastic part) is 20.9cm x 16.5cm. 

今回、XL Designerプレート2枚(Designer 1と2)を買いました。プレートはプラスチックの台が付いており、台を含まないプレートのみのサイズは20.9cm x 16.5cm。


I heard some girls saying their plates came bent. I looked at mine carefully and noticed that the bottom corner of one plate is slightly bent and lifted from plastic backing. It doesn't affect the stamp so I wouldn't worry, but I feel they should protect the plates with thicker cardboard papers.

プレートが折れ曲がって届いた!と聞いたことがあったので、私の2枚をじっくり見てみました。すると、1枚のプレートの左下部分がかすかに曲がっていて、プラスチックの台から浮き上がっていました。スタンプには影響なので気にしませんが、もう少し厚めの段ボールでくるんだ方がいいんじゃないかと。


This is XL Designer 1. Sorry the photo is on a bit of an angle. I love this buffet type plate that gives you endless possibilities.

これがXL Designer 1。写真撮るのが難しくてちょっと斜めっててすみません。こういう無限の可能性が広がるバフェットタイプのプレート好きです。


And here is XL Designer 2. See the dragon at the right corner? You can see bigger stamps and smaller stamps in between - the plate is so full of images and no vacant space. LOVE!


そしてこちらが新発売のXL Designer 2。右上にあるのが例のドラゴン。大き目の柄の間に隙間なく敷き詰められた小さめの柄。所狭しと柄が盛り込まれているこのプレート。いいよいいよ~(゚∀゚)


Test stamp on XL Designer 1. Polishes are Mundo de Uñas Orange, Mexican Pink, Purple, and Blue. I used my beloved discontinued MoYou London XL round stamper, but with MdU Mexican Pink I switched to my pink stamper head from AliExpress because it's a stamper stainer.

You can see that I did the top left image twice. It looks patchy, so I'll come back to that image and two bottom left images later.

XL Designer 1のテストスタンプ。使用ポリッシュはMundo de Uñas Orange、Mexican Pink、Purple、Blue。スタンパーはMoYou London XL丸スタンパー(廃盤)ですが、Mexican Pinkだけはスタンパーに染みが付くのでAliExpressのピンクスタンパーヘッドを使用。

左上の柄がちょっと微妙だったので2回スタンプしました。左下の2つもかすれているので、後ほど再スタンプしたものを載せます。


Look at the fine line flowers near the centre! Impressive.

中央付近の細い線のお花なんてよく線が拾えてますね。


So the bottom row is the repetition of some of the images that didn't stamp well at my first attempt. They look great now except for the far left and far right (same image). Not the fault on the plate, I just have to adjust the way I scrape on this one.

一番下の行は最初のテストできちんとスタンプされなかった柄を色を変えてやってみたもの。右端と左端(同じ柄)以外は良好。この手の柄、他のプレートでも持っていますがいつもちょっと苦労します。プレートのせいというよりも、スクレイプの仕方を変えて調整する必要がある柄です。


Onto XL Designer 2. Yeeees! Look at the ornamental images on the first row. And the dragon...such detail!

お次はXL Designer 2。上段の柄とかもう鼻血出るわ(*´д`*)ドラゴンのディテールも凄いよ~!


Those aztec images are unique in my collection, and I'm so excited about those hypnotic stamps.

アステカ風の柄もユニークだし、目の錯覚系(上段右から2つ目と中段右端)なんかもずっと欲しかったので嬉しい。


Another winners at the bottom row! Those birds, flowers, and the ornamental image are just so beautiful.

下段の柄、全部好き(*´д`*)。鳥もお花も一番左の柄も豪奢でありますなぁ。


Their geometric stamps are simply superb. I don't know why but my MdU Mexical Pink doesn't stamp very well compared to other colours, so I repeated the same image with Purple (far right at the bottom row).

このブランドの幾何学模様系のスタンプは本当に秀逸。なぜかMundoのMexican Pinkが他のと比べてかすれやすいので、一番右下の柄はPurpleでやり直しています。

My thought on these plates? I'm so glad I got these. The quality is superb and they have beautiful images including both basic and unique. One plate cost me $22, and the shipping for 2 XL plates is $13.60. So all up the order cost me $57.60. My Paypal account is Japanese and the conversion rate between US dollar and Japanese yen wasn't great for me at that time, so it ended up with a bit expensive purchase. But I know I will make good use out of these plates. I can't wait to use them!

さて購入の感想。いろいろありましたがやっぱり買ってよかったです。彫りのミスなんかも見当たらず、品質は良好。柄が所狭しとプレートに敷き詰められていて、ベーシックな柄もあればユニークなものもありバランスが良い。プレート1枚$22で2枚の送料は$13.60でした。なので合計$57.60。私のPaypalアカウントは日本のものなのですが、そのときの米ドル⇔日本円の為替レートがかなり悪かったので6937円という高めの買い物になってしまいました。それでもプレート見たらそんなことどうでもいいと思えましたね。使うのが楽しみです。

にほんブログ村 美容ブログ 自爪ネイルへ

AliExpress Haul and Review - Stampers & Plate Storage

Friday, February 20, 2015 18 Comments A+ a-

I've got few nail mails for the last few days, and would like to share them in separate posts. First up is the AliExpress haul. Yep, AliExpress. I think I said on this post depicting my disastrous experience with one seller on this site, that I would never buy from this site again. I broke my rule and bought again. It's a different seller this time, and let me tell you, I'm a happy customer now.

The main reason I came back to this site is because of the stampers. I'm so determined to get every stamper with high reputations, and I heard few people on a Facebook stamping group were talking about these stampers on AE. Also, Silvia @esmalterapia4me showed the swatches using those stampers here, and I was completely sold. 

By the way, here are the links to my recent stamper review posts in case you're interested:


I also bought a plate storage I've been wanting for my Messy Mansion and Emily de Molly plates. They are bigger than Konad and Bundle Monsters and they don't fit in the business card holder I use for smaller plates.

ここ数日でいくつかnail mailが届いたので別々にご紹介します。まずはAliExpress haul。そうです、AliExpressこの記事で悲惨な体験をご紹介して「もうAEでは買わんわ!」と言ったと思いますが、その言を破ってまた買ってしまいました。しかし、今回は別のセラーです。そして結果的に買ってよかったと思える内容でした。

またAEに舞い戻った理由はスタンパーを買うためです。評判のいいスタンパーは片っ端から買って行こうと決めたので、今回はセラーが違うこともあり迷うことなくAEに戻りました。今回買ったスタンパーヘッドはFacebookのグループでちらっと耳にし、その後IGでSilvia @esmalterapia4meのSwatchをここで見て「もう買うわこれ」となったもの。

ちなみに最近スタンパーのレビューをいくつかしたので、一応まとめがてらリンクを貼っておきます。

  • Creative Shopスタンパーレビューはこちら
  • Creative Shopスタンパー第2弾レビューはこちら
  • MoYou長方形スタンパーレビューはこちら

スタンパーヘッドを買うついでにプレートホルダーも購入。Messy MansionとEmily de MollyプレートはKonadやBundle Monsterより大きいので、収納に困っていました。同じセラーがホルダーを売っていたので一緒に購入。

The seller I bought these items from : click here
Stamper heads I bought : click here ($10.44 when I bought it)
Plate storage I bought : click here ($5.51 when I bought it)

This is how the order went:

  • Paid : 1st Feb
  • Dispatched with tracking : 3rd Feb
  • Arrived : 20th Feb

2 and a half weeks since dispatch. I think it's not bad as most nail mails from China arrive in 10 days up to 4 weeks. Now, onto what I received.

今回利用したセラーはこちら
購入したスタンパーヘッドはこちら (購入時価格$10.44)
購入したプレートホルダーはこちら (購入時価格$5.51)

注文から到着まではこんな。

  • 支払い : 2/1
  • 発送(追跡番号発行) : 2/3
  • 到着 : 2/20

発送から到着まで2週間半。中国から来るものはだいたい10日から1か月かかるので、悪くないと思います。では届いたのがこちら。


This is how the order came in. Pretty simple packaging but no damage at all.

品物はこんな感じで届きました。簡易包装ですが破損などはなし。


I'll show you the plate storage first. This has 32 slots and came in 4 different colours (blue, pink, white & black). You can specify which colour you want when you check out. Note that it has 2 buttons, which you can choose from depending on how full your storage is.

まずプレートホルダー。32枚収容可能で、色は水色、ピンク、黒、白の4色から選んで会計時に指定できます。画像を見るとお分かりのようにボタンが2つ付いているので、中身の入り具合によって使い分けられるようになっています。


Both Messy Mansion and Emily de Molly plates are 7cm in diameter, and you can see that each slot still has space for the plates to move around a bit. Also, the plates don't go deep in the slots, so it's easy to take them out. They found a happy home now :)

Messy MansionとEmily de Mollyのプレートは直径7cmです。ご覧のように収納したときにキツキツではなくまだ余裕があります。 そしてスロットが深すぎずプレートの一部がスロットからはみ出る形になっているので、出し入れがしやすいです。今度は別の色も買ってみようかな。


And here are the colourful stamper heads I've been waiting for. They come in 10 different colours, and the size is the same as normal XL round stamper head (2.7cm in diameter).

そしてこちらがお待ちかねのスタンパーヘッド。カラフルな10色(゚∀゚) 大きさは通常のXL丸スタンパーと同じく直径2.7cm。


As you can see, the height of each stamper is not consistent. The listing page also mentions this, and it doesn't really bother me at all.

スタンパーの高さは見ての通り一定ではありません。これは商品ページにも説明があります。品質とは関係ない部分なのでこの点はまったく気になりません。


One thing I was disappointed about is that they aren't as squishy as I thought. The item is called 'Marshmallow Candy Refill', so I thought they are marshmallow but they aren't. I have to ask my fellow stampers who have this set if theirs is marshmallow or not, because I'm pretty sure I heard they are quite squishy. The squishness of these stampers isn't consistent either, and this black stamper head happened to be the most squishy of all, maybe fall into semi-marshmallow category or a bit firmer.

1つがっかりした点が、マシュマロではなかったこと。商品名は「Marshmallow Candy Refill」なので、てっきりマシュマロだと思ってました(´・ω・`)。確かにsquishyなタイプだと聞いていたので、持っている人に尋ねてみます。10個あるうち硬さは一定ではなく、この黒スタンパーが体感的に一番柔らかかったです。カテゴリ的には半マシュマロと呼べるぐらいか、それよりやや硬いかぐらい。


Other than the black one I showed you above, they are pretty much the same squishness (a bit firmer than black). They are still squishier than my beloved discontinued MoYou XL round squishy firm, but not fit to use on my long curvy nails. As much as I feel bummered about it, I can still use them for decals if they pick up images well. As for stickiness, they are sticky but not as sticky as most marshmallows (like MoYou London rectangle).

上の黒スタンパー以外はどれも似たような硬さです(黒よりやや硬め)。decalスタンパーとして愛用中のMoYou XL丸スタンパー(廃盤)よりも柔らかいですが、私のCカーブのキツイ長めの爪に直接使うのは無理です。この点は非常に残念ですが、品質さえよければdecalに使えるのでまだ希望は捨てていません。ベタつきは多少ありますが、MoYou London長方形スタンパーなどマシュマロタイプほどのベタつきはありません。


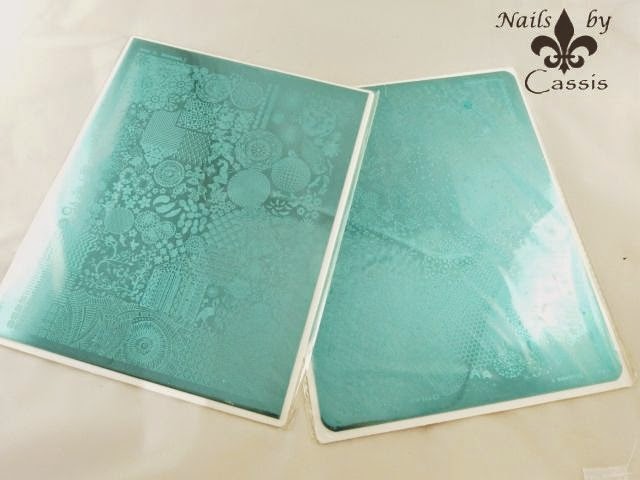
Soooooo, do they stamp? Let's see. I popped these heads into black holder and tried out of the box (no priming). Wow... I didn't expect this. I'm quite impressed! They have shines to the heads, so I didn't think they would stamp well without priming. All the swatches are done using Mundo de Uñas White and MoYou London Bridal 07, with my usual library card as a scraper and a rolling pickup motion. I'm glad to have colour heads I can see white on!

さて、テストスタンプ。ヘッドを黒のホルダーに詰めてそのまま(Primeなしで)ピックアップしてみました。思わず「おお~!」と声が漏れる。ヘッドはテカテカ状態なので正直きちんとスタンプするとは思いませんでした。SwatchはMundo de Uñas WhiteとMoYou London Bridal 07を使用し、スクレイパーはいつもの図書カードで転がしピックアップ。白スタンプが見えるっていいね~(゚∀゚)


Keep trying with other heads. Only the top right red stamper didn't pick up well, so I went ahead and primed that one.

他のヘッドも試してみる。右上の赤スタンパーがイマイチだったので、primeしてみることに。


This is what I used for priming. I bought this at Daiso in Japan for 100 yen ($1). It's melamine foam sponge and is known as Magic Eraser in U.S.

Primeに使ったのがこちら。日本のダイソーで100円で買いました。アメリカではMagic Eraserという名前で知られているメラミンスポンジ。日本だと激落ちくんが有名ですよね。


What you do is lightly buff the stamper head with this melamine foam until you get the shine off the head. Don't go too crazy with it, just lightly.

Primeとはこのメラミンスポンジで軽くヘッドをなでることです。ヘッドのテカりが落ちるまであくまでも軽くです。以前はバッファーを使う方法が主流だったのですが、最近はこれを使うのが流行っています。


So here is the result before priming (left) and after priming (right). You can see the image is picked up better after priming. I still see bald patches but I can live with one faulty stamper head out of 10.

そして結果。左がPrime前、右がPrime後。Prime後の方が線がきちんと拾えてますが、完璧ではないですね。とはいえ、10個中の1個なので他を使えばいいかって感じです。


For lighter colour heads, I switched to Mundo de Uñas Blue. The clear one at the bottom left has some bald patch, so I primed that one also.


The left is the same stamper head after priming, but I can still see a bit of bald patch. Right is my beloved Messy Mansion rectangle which is also discontinued. I stamped with this Messy Mansion right after I stamped the left one, without cleaning the plate in between stamps. It still picks up image very well.

左がPrime後。線のかすれがまだ残ってますね。参考までに、右は最愛のMessy Mansion長方形スタンパー(廃盤)。左のスタンパーで最初にスタンプし、プレートをアセトンで掃除せずそのままMundoを塗ってMMスタンパーでピックアップしていますが、それでもこのクオリティです。

My final thought? I'm quite happy with my purchase. For $1 a head, I didn't expect they would perform as they did. Those swatches were done before priming except for 2 heads (red & clear). Few things you should note though, are 1) They are not marshmallow (at least mine aren't), 2) They are not consistent in squishness and quality. Even though mine happened to perform great, that doesn't ensure your purchase will be the same. I still need marshmallow colour heads I can use directly on my nails, and I shall get them as soon as Messy Mansion restock them (I've been waiting for ages!).

今回の購入の感想としては、「買ってよかったなぁ」の一言です。スタンパーヘッド1つ1ドル程度なので、正直クオリティは期待していませんでした。2つを除いてはPrimeしないでこのクオリティです。ただし、注意点としては、1) マシュマロではないこと(少なくとも私のは)、2) 品質や柔らかさが一定ではないこと、でしょうか。なので私のが良いクオリティでも、次に買ったときに同じクオリティのものが届くとは限りません。その辺がややギャンブル的ではあります。でも有名ブランドのスタンパーは1個10ドルぐらいで売られていることを考えると、10個で10ドル程度(しかも送料無料)というのは試してもいいかな、という気持ちにさせてくれる値段設定だと思います。直接爪に使える柔らかさのスタンパーは引き続き必要なので、大本命のMessy Mansionのカラーヘッドが再入荷したらそちらも買ってレポートします。

にほんブログ村 美容ブログ 自爪ネイルへ

Monochrome Bamboo Mani

Thursday, February 19, 2015 5 Comments A+ a-

Feb 28th Update: I replaced the video at the end of this post with YouTube version.

When I showed the video on my last mani, some girls noticed that I had a different design on my right hand. I wasn't 100% happy with that design, but I changed the stamp and the base effect a bit, and it turned out to my satisfaction, which I'm showing you today.

For this mani, I started off with white base for thumb, middle finger, and ring finger, then placed striping tapes vertically. I took a piece of makeup sponge, painted black on it, dabbed on paper towel to take excess polish off, and lightly sponged on nails. I peeled off the tapes and stamped bamboo pattern from Born Pretty Store BP-L001 plate with Mundo de Uñas Black. I finished off with Essie Matte About You, but it smeared the stamp on middle finger and pinkie, so I changed and applied Glisten & Glow HK Girl topcoat before mattifying. For other fingers, I simply reversed the colours (black base, sponge white, then stamp white). 

I'm quite thrilled about how it turned out. The base looks intricate as if I did something difficult, but it's actually easy to create. One thing you should be careful with is not to go overboard with sponging, as you are going to stamp the image with the same colour. Subtle and random sponging is the way to go. 

Few girls have already expressed interest in recreating this mani, so I'm looking forward to seeing different variations :) Just remember, if you're on Instagram and show a mani inspired by me, please use hashtag #look_cassis so I can see!

2/28更新:記事最後の動画をYouTube版に置き換えました。

前回のネイルの動画をアップしたときに「右手のデザインも見たい!」と何人かにリクエストされました。そうなんです、前回のネイルは左手と右手が違うデザインだったんです。皆さんよく見てますね。直前までまったく違うモノクロネイルをする予定が、あまり気に入らず左手だけ別のデザインに変えてアップしたのでした。右手のデザインはお蔵入りにする予定だったのですが、エフェクトとスタンプを変えたらかなりいい出来になったので今回ご披露。出来上がりはこちら。

Finished product, with Essie Matte About You

親指、中指、薬指のベースは白。垂直にラインテープをいくつか配置しておき、メークアップスポンジに黒を塗る。ペーパータオルに軽くスポンジして余分なポリッシュを落としてから爪に軽くランダムにスポンジ。テープを剥がし、Born Pretty Store BP-L001の竹柄をMundo de Uñas Blackでスタンプ。仕上げはEssie Matte About Youなのですが、直接塗ったらスタンプを引きずったので(中指と小指)、他の指はGlisten & Glow HK Girlトップコートを塗ってからマット化。人差し指と小指は色を反転しています(黒ベース、白でスポンジ、白スタンプ)。使用ポリッシュはこちら。

Polishes used. Hard to photograph MdU White. lol

左から、

Face of Australia Scream
Sally Hansen White On
Mundo de Uñas Black
Mundo de Uñas White

I was so bummered that the matte topcoat smeared the stamp.. If it wasn't for the fuzzy base effect,
I would have redone those fingers :(

ベースがちょっと複雑に見えるので、「どうやってやるの?」と興味を持ってくださった方が多かったようです。種明かししてしまうと意外と簡単なのが分かると思います。しかしマットトップコートを直接塗ったのは大変迂闊でした・・・。ベースがこんなモヤモヤエフェクトじゃなかったらやり直していたと思います。

I quite like both white version and black version.
I'm glad I tried both :D

このスポンジでポンポンするエフェクトなのですが、あくまでも軽めにやった方がよいです。黒スポンジの上に黒スタンプ、または白スポンジの上に白スタンプなので、あまりスポンジをやりすぎるとスタンプが分かりにくくなります。今回ラインテープを縦に置きましたが、横に置いたり色やスタンプを変えたりしても面白そうですね。やってみたいという声もいただいているので、色んなバリエーションが見られるかと今から楽しみです。decalに飽きてきたので、個人的にもいい気分転換になりました。

ちなみに1つ業務報告。インスタで私にインスパイヤされたネイルをアップされるときは、是非 #look_cassis のハッシュタグをお使いください。インスパイヤネイルじゃなくても、単に私の気を惹きたいとき(プレゼント企画の品届いたよーとかでも)に使っていただいても結構です。@cassis_p とタグしていただくだけだと、通知が多いときはすぐ流れて届かないことが多いです(速いときだと10分ぐらいで通知が埋まります)。タグしていただいたのに無視状態になってるのも多いんだろうなぁ・・と思うとちょっとショボンです。#look_cassis のハッシュタグを使っていただければ、後で見に行くことができるのでお願いします。


にほんブログ村 美容ブログ 自爪ネイルへ

Pink Rose Stamping Mani

Monday, February 16, 2015 2 Comments A+ a-

Feb 25th Update: I replaced the video at the end of this post with YouTube version.

I have been drooling over Lacquistry Amazeballz and Cirque Mirror Mirror, but I totally forgot that I have a similar pure-silver flakie polish - TiNS Photogénne. I picked up this polish while I was in Japan, and have only used once before. I decided to use this as a base for this mani.

For this mani, I started off with 3 coats of TiNS Photogénne, and stamped a rose pattern from Born Pretty Store BP-L001 plate sent by Harunouta using Mundo de Uñas Black. Then on stamper, I painted MoYou London Cerise Pink over the rose stamp and made a stamping decal. Once that's dry, I peeled it off and cut it, and placed it onto thumb, middle and ring finger. I added dots with the MoYou polish and finished off with Glisten & Glow HK Girl topcoat. For other nails, I simply added pink studs from MoYou London.

I went outside and took photos in the sun, but alas, my iPad mini didn't want to capture the sparkles of this pure-silver flakie very well! It actually looks much better in the shade, unlike holographic polishes. Although the photos don't show it's true beauty, I felt like a royalty having such gorgeous sparkles on my fingertips.

2/25更新:記事最後の動画をYouTube版に置き換えました。

インディーズブランド好きな方だったらLacquistry Amazeballz と Cirque Mirror Mirrorの名前を聞いたことがあると思いますが、結構前からこの2本は「欲しいな~(でも高いな~)」と思って指をくわえてSwatchを眺めておりました。しかしあるときふと気付いた。そういえば似たようなコンセプトのポリッシュ持ってるじゃん!!

TiNS Photogénne。TiNSの純銀シリーズの1本です。ややゴールド寄りなので上記2本とは色味が違うのと、純銀の密度や大きさも同じではありませんが、一度しか使ったことがないのでとりあえずどんな感じか思い出すために使ってみた。出来上がりはこちら。

Finished product, with Glisten & Glow HK Girl topcoat. Outdoor shot

ベースはTiNS Photogénne 3度塗り。春の歌さんからいただいたBorn Pretty BP-L001の薔薇柄をMundo de Uñas Blackでスタンプ。スタンパー上でMoYou London Cerise Pinkを塗り、decal作成。乾いたら剥がして切って親指と中指と薬指に配置。ドット棒でドットをスタンプの周りに追加し、Glisten & Glow HK Girlトップコートで仕上げ。他の指はMoYou Londonからもらったピンクのスタッズを追加。使用ポリッシュはこちら。

Polishes used

左から、

TiNS Photogénne
MoYou London Cerise Pink
Mundo de Uñas Black

This photo shows the sparkles a bit better than the first one.
Still not as good as I see in real life though!

この純銀、いつもの要領で外に出て自然光で写真を撮ってみたんですが・・・。なかなか良さが伝わらないですねー!ホロと違って太陽下で撮るよりも日陰で目視の方が断然綺麗。

I like this shot where the pink dots flow from one finger to another :D
The rose stamp on this Born Pretty plate is 1.5cm x 1.4cm, meaning it's quite small for my nails,
but it's too pretty not to use!
このショット、ピンクのドットが指から指へと流れる感じがちょっと好きです(゚∀゚) このBP-L001のプレート、ほとんどの柄は1.8cm x 1.4cm、この薔薇柄は1.5cm x 1.4cmなので私の爪にはやや小さいのですが、工夫次第でなんとでもなりますね。薔薇スタンプはいろいろ持っていますがこの柄は1,2を争うカッコいい薔薇柄だと思います。

では動画をどうぞ。ちなみに、直前までまったく違う黒白ネイルを作成する予定だったので、右手はデザインが違いますがお気になさらず(笑。


にほんブログ村 美容ブログ 自爪ネイルへ

Sparkly Butterfly Mani

Tuesday, February 10, 2015 2 Comments A+ a-


Feb 21st Update: I replaced the video at the end of this post with YouTube version.

With so many goodies sent from Harunouta (see previous post for details), I was at a loss where to start. Then I remembered I have been wanting to do a butterfly mani, so I picked up a plate that has different butterfly images, which is BP-34.

For this mani, I started off with China Glaze HeliYum for thumb, middle finger, and ring finger. I stamped a flower image from BP-34 with Mundo de Uñas Cream & my friend Coppi's franken 'Coral', then made a decal out of butterfly image using Mundo de Uñas Black. I used 4 different Dance Legend Wow Prism polishes (names and bottle shots below) to colour in the butterflies, using this detail brush. For other fingers, I simply painted 3 coats of Dance Legend Steel Panther (just love this polish so much) and all nails topcoated with Glisten & Glow HK Girl topcoat.

I love the happy tropical look of this mani. This butterfly image is such a nice size, not too big, not too small, and is perfect for colouring in. Any butterfly lover should really have this plate!

2/21更新:記事最後の動画をYouTube版に置き換えました。

さて、春の歌さんから大量にいただいたプレートたちを前にまずどんなネイルを作ろうかとひとしきり悩んでみる。そういえば、前からチョウチョネイルをやりたかったことを思い出して手に取ったのがBP-34というプレート。出来上がりはこちら。

Finished product with Glisten & Glow HK Girl topcoat. Photo taken in the sun

親指、中指、薬指のベースはChina Glaze HeliYum。BP-34プレートの花柄をMundo de Uñas Creamとこっぴさんからいただいたフランケン'Coral'でそれぞれスタンプ。さらにチョウチョ柄をMundo de Uñas Blackでスタンプしてdecal作成。色付けにはDance Legend Wow Prismコレクションの4本のポリッシュを使用しています。かなり細かい色分けになるので、同じく春の歌さんのこちらの極細ブラシを使って色付けしました。他の指は好き過ぎてしょうがないDance Legend Steel Pantherを3度塗り、仕上げはGlisten & Glow HK Girlトップコート。使用ポリッシュはこちら。

Polishes used

上段左から、

China Glaze HeliYum
Dance Legend Steel Panther
Dance Legend Holy Diver
Dance Legend Inhale
Dance Legend Last Serenade
Dance Legend Just Another Star

下段左から、

Mundo de Uñas Black
Mundo de Uñas Cream
Coppi's franken 'Coral'

I was going to stamp the same flower on pointer and pinkie as well. I tried that on my right hand
but it turned out so 'noisy', so I kept it simply on my left hand

本当は人差し指と小指も同じ花柄でスタンプしようとしたのですが、まず右手で試したところかなりウルサイ感じに仕上がってしまったので、左手は作戦変更でSteel Pantherでシンプルにしてみました。

I like that this butterfly is a good size, yet not too big to cover up
the flower stamp in the background :)

ベースを濃いピンクにしたので、こっぴさんの薄ピンクフランケン「Coral」がまた活躍しました(゚∀゚)。今回みたいにスタンプをさらに重ねるときは、ベースのスタンプは同系色にして目立ち過ぎないようにすると上のスタンプ(チョウチョ)が際立つんじゃないかと。このチョウチョスタンプ、大きすぎず小さすぎず、色付けも楽しめて背景のスタンプもガッツリ隠すこともなく絶妙な大きさで気に入りました。これからたくさん活躍しそうな予感。

ところで今回のdecal作成、いつも厚めに塗るEssenceクリアポリッシュを薄目に塗って切らないでそのまま載せる作戦で行きました。クリアを塗った範囲が少し大きかったので結局切ることになってしまいましたが、塗って20分ほどで剥がして爪に載せて問題なかったです(いつもは1時間ほどたっぷり待ちます)。ただ、decalが薄いとハサミで切りにくいのと、Tweezerでつまんだときに傷ができやすいしTweezer使わないで直接指でつかんだりすると溶けたりするので、やはり少し厚めに塗って長く待った方が扱いやすいことは確かです。しかしあまり厚いと今度は段差が目立ったりして、なかなかそのバランスが難しいですね。最近トップコート後にdecalの段差がくっきり出てしまうのが気になるので、もう少しその辺模索していきます。


にほんブログ村 美容ブログ 自爪ネイルへ