Colourful Tribal Mani

Friday, January 30, 2015 2 Comments A+ a-

Feb 6th Update: I replaced the video at the end of this post with YouTube version.

I'm having a break from wearing holos and decided to go for something different from usual. I have so many untried plates, among which are my Dashica Infinity plates (haul post here), and was so eager to use them.

For this mani, I started off with Sinful Shine Pragmatic (which is also an untried), and picked up a tribal-ish pattern from Dashica Infinity 70 on my stamper with Mundo de Uñas Reddish. I applied Sally Hansen Mellow Yellow on stamper relatively thick, then peeled off, cut it in triangle shape, and put it onto my nails. I added pastel green studs I bought from eBay and finished off with Essence Better than Gelnails topcoat.

I looked at my finished mani and paused for a while. I couldn't decide whether I liked it or not, but it started to grow on me after a while. I love those bright colours that are perfect for the sunny weather here. I'm so curious to see this design in other colour schemes also!

1/31更新:記事最後の動画をYouTube版に置き換えました。

先日、旦那殿が2週間の出張に旅立っていきました。私は車を運転しないのと、バスや電車がすぐ近くを通っているわけでもないので2週間籠城作戦を敢行します(笑。トイレットペーパーも食べ物も豊富に買ってあるのでなんとかなるさね。

さて、最近ホロが続いたので久々にクリーム系を塗ろうかな~となんとなく考えて作った今日のネイル。出来上がりはこちら。

Finished product, with Essence Better than Gelnails topcoat

ベースはSinful Shine Pragmatic。まだ一度も本番ネイルには使ったことのなかったDashica Infinity 70のトライバルっぽい柄をMundo de Uñas Reddishでスタンパーにピックアップし、その上からSally Hansen Mellow Yellowを厚めに塗る。1時間乾かしてから剥がして三角形になるよう切って爪に乗せる。eBayで買ったパステルグリーンのスタッズを斜めに置いてEssence Better than Gelnailsトップコートでフィニッシュ。使用ポリッシュはこちら。

polishes used

左から、

Sally Hansen Mellow Yellow
Sinful Shine Pragmatic
Mundo de Uñas Reddish

I didn't use clear coat this time for decals to avoid getting too thick

スタンパーにポリッシュを塗るタイプのdecalを作るときはいつもクリアーも上から塗るんですが、今回試しにポリッシュだけでやってみました。decalを貼り付けたときに下の紫が透けないようにMellow Yellowを割と厚めに塗っておいたので、クリアーはなくても扱いやすかったです。薄めにするとヘナヘナになって切るのが大変になるかと。

What do you think of the way I placed those studs?
Dunno why but this design reminds me of bandana :P

このパステルスタッズ、色が6種類あるんですが、どれがいいかな?と1つずつ爪に置いて色を確認しました。意外や意外、この色が一番しっくりきましたね。最初は1つずつの予定だったのですが、遊び心を出してもう1つずつ斜め方向に置いてみました。なんかバンダナみたいって思ったの私だけ?(゚∀゚)

いつも使う色合いとはだいぶ違うので、出来上がりを眺めてしばらく思考停止してました。とりあえず写真撮るか・・と外に出てパシャパシャ撮っているうちに、なかなかいいじゃない?!と少しずつ好きになってきました。こういう冒険ネイルもたまにはいいですね。


にほんブログ村 美容ブログ 自爪ネイルへ

Holographic Flower Mani for Luda's Birthday

Sunday, January 25, 2015 4 Comments A+ a-

Jan 31st Update: I replaced the video at the end of this post with YouTube version.

I was so thrilled to be invited by Galina @yagala to be part of birthday collage for Ludmila @lisionok2004. I only discovered Luda's account recently, but glad I did because she has so many beautiful manis and helpful tutorials. Adi @adibuki organised this and she, Galina @yagala, Elle @with2l, Cristina @crisalvarado17 and I @cassis_p decided to recreate one of Luda's manis.

I chose to recreate this mani she did long time ago. It's a pretty floral mani but with a punk feel to it with random studs, and I really love it. Luda's work is freehand, but mine has to be a stamping (at least the flowers anyway).

For this mani I started off with Color Club Harp On It and, and drew stripes diagonally using orange (KIKO Melon), copper (Kleancolor Coffee Addict), and red (Ciate boudoir) with a detail brush sent for review by Harunouta (aka Born Pretty Store. Item is shown here). For flowers, I made a stamping decal using MoYou London Pro XL 03 with Mundo de Uñas Cafe, and coloured in with red mixed with Dance Legend Steel Panther & orange. I topped with black, orange, and clear round studs and finished off with Glisten & Glow HK Girl topcoat.

I'm so excited with this look. This colour combo is something I don't normally come up with, and I got to do a little bit of freehand also (yes, it's a big improvement for me!). Luda used white for base, but I changed it to silver holographic which is Color Club Harp On It. I couldn't resist it because it's such a perfect sunny season to wear holos. Wishing Luda a very happy birthday!

1/31更新:記事最後の動画をYouTube版に置き換えました。

今回のネイルはいつもと趣向が違ったネイルです。インスタのLudmila @lisionok2004 が1/24に誕生日を迎えるにあたって、何人かで彼女のために誕生日コラージュをやろうということになりました。Ludaのアカウントは実は最近知ったのですが、Galina @yagala から声を掛けてもらったときは二つ返事で承諾しました。企画人でLudaの友達のAdi @adibuki、Galina @yagala、Elle @with2l、Cristina @crisalvarado17、そして私 @cassis_p の5人によるコラージュです。そうそうたるメンバーに混じったしがないスタンパー1人・・・(笑。

どういうコラージュにしようかね?という話になり、色々案は出ましたが最終的に「Ludaの過去ネイルを再現」という内容に落ち着きました。彼女は膨大な数のネイルを披露しているので、あれこれ目移りしながら選んだのがこちらのネイル。そして私の出来上がりはこちら。

Finished product in the sun, with Glisten & Glow HK Girl topcoat

ベースはColor Club Harp On It。春の歌さんから送っていただいた極細ブラシ(写真はこちら)を使ってオレンジ(KIKO Melon)、コッパー(Kleancolor Coffee Addict)、および赤(Ciate boudoir)の3色を対角線上に塗る。次に、MoYou London Pro XL 03の花をMundo de Uñas Cafeでスタンプしてdecal作成。色付けには同じ赤にDance Legend Steel Pantherを混ぜたものとオレンジを使用。黒、オレンジ、クリアの丸スタッズを乗せてGlisten & Glow HK Girlトップコートで仕上げ。

使用ポリッシュはこちら。

polish used

Kleancolor Coffee Addict
KIKO Melon
Ciate boudoir
Color Club Harp On It
Dance Legend Steel Panther

Here is the birthday collage done for Luda (in the middle). So many pretties!

こちらがAdiが作ってくれた誕生日コラージュ。真ん中の人がバースデーガールのLuda。こんな素敵なアーティストさんたちに混じれたことに大興奮!

I think my camera (iPad mini) freaked out trying to capture this amazing holo.
Almost blinding!

赤・コッパー・オレンジというのは私自身思いつかない組み合わせでちょっと新鮮でした。それから、お花をフィーチャーしつつ、ランダム感のあるスタッズがちょっとパンクな感じがあってカッコいいなぁと。Ludaのお花は手描きですが、私はもちろんスタンプ(笑。ちょっと大振りなお花が気に入っています。ストライプはやや曲線にしたのでテープを使わず手描きにしました。ちょっと雑な線ですがそれも味があっていいじゃない?(笑。オレンジのKIKOはChiroさんが送ってくださったものを初使用♪ 手持ちにオレンジが少ないのですが、これは蜜柑のような柔らかい色で使いやすいです。

I wish I had fancy studs and big hex glitter like Luda used. That would have been perfect! 

Ludaはベースに白を使っていますが、ちょっと考えてシルバーホロのHarp On Itにしました。夏の間は積極的にホロを塗っていきたいので。あまりのギラギラぶりにカメラ(iPad mini)が驚いて所どころ白くなってますがw

そんなわけでLudaの誕生日おめでとうネイルでした。おめでたいイベントに参加でき、素晴らしいアーティストさんたちと交流できて非常に楽しい時を過ごしました。Luda、お誕生日おめでとう!!


にほんブログ村 美容ブログ 自爪ネイルへ

Peacock Stained Glass Mani

Tuesday, January 20, 2015 13 Comments A+ a-

Jan 27th Update: I replaced the video at the end of this post with YouTube version.

Another stained glass mani for you, again using Dance Legend Wow Prism polish and MoYou London plates. You can see my last stained glass mani on this post. That one was done with reverse stamping, but this time I used leadlight technique.

For this mani, I started off with Dance Legend Steel Panther for pointer, middle, and ring fingers. Then I stamped a peacock pattern and the feathers from MoYou London Gothic 10 with Mundo de Uñas Black. I filled in unwanted lines with black polish to make the peacock stand out, then started leadlighting (i.e. colouring in) using 7 of my homemade jellies and a dotting tool. I have a Youtube tutorial on how to make your own jelly polishes.

For pointer, I used the far left image of MoYou London Gothic 09, filled in unwanted part with black, then leadlighted. Thumb and pinkie were painted with black then topped with diamond holo glitters sent for review by Harunouta. You can see the pic here. I finished off with Glisten & Glow HK Girl topcoat.

I couldn't sleep that day and started creating this mani about 4 o'clock in the morning. Took photo around 10 o'clock then posted on Instagram. I really wished I waited till lunch time when the sun is higher, to show the awesome holos underneath those colours. It looks pretty none the less in the photo and I got overwhelming number of great responses. I also posted the tutorial before bed, and woke up to find out that I gained about 400 followers overnight. Something that never happened to me before. I'm so stunned!

1/27更新:記事最後の動画をYouTube版に置き換えました。

ちょっと前にDance LegendのWow PrismコレクションとMoYou Londonのプレートを使ったステンドグラスネイルをご紹介しましたが、今回もこの組み合わせで同じくステンドグラスネイルを作成してみました。前回はdecal (reverse stampingとも言います)方式でしたが、今回はleadlight方式です。leadlight(レッドライトと読む)テクニックの説明はこちらの記事を参照してください。まず出来上がりがこちら。

Finished product in the sun, with G & G HK Girl topcoat

人差し指、中指、薬指のベースは(またもや)Dance Legend Steel Panther。MoYou London Gothic 10の孔雀とその羽をMundo de Uñas Blackでスタンプ。要らない線は黒ポリッシュで塗りつぶして孔雀が際立つようにし、7本のお手製ジェリーを使用してドット棒で色付け(leadlight)。お手製ジェリーの作り方はこちらのYoutube動画にまとめてあります。

人差し指はMoYou London Gothic 09の左端の柄を使用し、同じく要らない線を黒で塗りつぶしてからleadlight。親指と小指は黒で塗り、春の歌さんから送っていただいたひし形ホログリッター(写真はこちら)を並べる。仕上げはGlisten & Glow HK Girlトップコート。

使用ポリッシュはこちら。

Polish used

上段左から、

Homemade jelly - Blue
Homemade jelly - Purple
Homemade jelly - Forest Green
Homemade jelly - Lime Green
Homemade jelly - Orange
Homemade jelly - Yellow
Homemade jelly - Red

下段左から、

Face of Australia Scream
Dance Legend Steel Panther
Mundo de Uñas Black

This pic was taken when the sun is higher. I leadlighted each part twice to make the colours bolder.
I'm thinking I shouldn't have done that because the holos look subdued a bit. It's a trade-off!

この日はあまり眠れなくて朝4時ぐらいには目が覚めてしまっていました。仕方がないので起きて早朝からこのネイルの作成に取り掛かり、朝10時ごろ太陽がやや強くなってきたときに写真を撮ってIGに投稿。それが最初に載せた写真です。こちらの写真は太陽が一番強くなる昼頃撮ったのですが、こちらの方がキラキラがよく見えるかな?

Here's the macro of the pic above. Oh those sparkles! *drools*

上の写真のマクロがこちら。キラキラに萌えますな(*´д`*)ハァハァ。はっきりカラーが好きなもんで、同じ箇所を2回ずつ色付けして色を濃くしています。1回にすれば下のSteel Pantherのホロがもう少し見えたと思いますね。濃い色を取るか、ホロを取るかのトレードオフ。

This Steel Panther is pretty new in my stash but I can see that it's getting a bit low!
I need a backup :P

それにしても・・おお、Steel Pantherよ、お前は何故こんなにも使いやすいのだ?買ったばかりなのに使いすぎてもうだいぶ減りが目立つようになってきたよ(汗。小指のひし形グリッターもキラキラして今回のネイルによくマッチしているんじゃないかと。

今回のネイル、IGでの反応がもの凄かったです。寝る前に動画をアップして朝起きてみたらフォロワーが400名ぐらい増えていました。どこかのアカウントでフィーチャーされたのかも知れませんが、通知は100件(?)前ぐらいまでしか遡れないので確認できず。ここまで反応が凄いと自分の作品なのになんだか遠い存在のように思えます。でも多くの人に愛でていただいて嬉しい限りです。これも一重に素晴らしいデザインを作ってくれたMoYou Londonと、アルコールインク技を披露してくださったシイキさんのおかげです。Gothicプレート、もっと増やしてくれないかなぁ。


にほんブログ村 美容ブログ 自爪ネイルへ

Colourful Kaleidoscope Mani using Creative Shop Stamper

Thursday, January 15, 2015 4 Comments A+ a-

Jan 23th Update: I replaced the video at the end of this post with YouTube version.

I wrote about Creative Shop stamper on my last post, and I used it for the first time on this mani. I'm still trying to get this stamper to work, but I knew this type of stamping would be difficult with my other stampers. Glad I used it, because it worked like a charm.

For this mani, I started off with Dance Legend Steel Panther on my thumb, middle finger & ring finger. Then I randomly spotted 4 colours from Dance Legend Wow Prism collection on my nails; Last Serenade, Beautiful Lie, Holy Diver & Inhale, and squashed them with a piece of plastic bag lightly (the technique inspired by sloteazzy). I topcoated (in case stamping didn't turn out right) and stamped a kaleidoscope pattern from MoYou London Kaleidoscope 04 using Creative Shop stamper and Mundo de Uñas Black. I placed a rhinestone in the middle of each nail and finished off with Glisten & Glow HK Girl topcoat. For my pointer and pinkie, I painted 3 coats of Last Serenade and Beautiful Lie respectively, topped with some rhinestones.

I was so relieved the stamped pattern came out great, not to mention it was centred! (At least my middle finger anyway.) You can see in my video that I scraped very slowly at low angle and picked up the image very slowly, just as I suggested in my last post. I was so nervous and trembling a bit when I filmed the process. New plate and my new tricky stamper, and new stamping technique, but it worked!

I'm not very good at centring images, and this pattern - perfectly symmetric horizontally and vertically - is the most difficult kind of stamps for me. So I took a different stamping approach to this than usual, i.e, lineup the stamper at the free edge, make sure the pattern on the stamper is properly in line with your nail, and simply press down onto nail. This technique is impossible on my long curvy nails without a big squishy stamper. My beloved Messy Mansion rectangle is also squishy (semi-marshmallow) but because of its small round head, I can't press it down on my nails without this full-size pattern getting crooked. My new stamper opened up a new stamping possibility for me. All I hope is that I tame it as much as possible!

1/20更新:記事最後の動画をYouTube版に置き換えました。

前回の記事でCreative Shopスタンパーについて書きました。今日はそのスタンパーを初めて爪に使ってみたの巻。出来上がりはこちら。

Finished product in the sun, with G & G HK Girl topcoat

親指、中指、薬指のベースはDance Legend Steel Panther。同じくDance Legend Wow Prismの4本(Last Serenade、Beautiful Lie、Holy Diver、Inhale)を使ってブラシで爪にランダムにポリッシュを置いていき、 ジップロックの切れ端で軽く押さえて潰す。このテクニックはsloteazzyさんがインスパイヤ元。スタンプが失敗したときのためにここでいったんトップコートを塗り、MoYou London Kaleidoscope 04の万華鏡柄をCreative ShopスタンパーとMundo de Uñas Blackを使用してスタンプ。爪の中央にラインストーンを置き、Glisten & Glow HK Girlトップコートで仕上げ。人差し指と小指はそれぞれLast SerenadeとBeautiful Lieを3度塗りした後でラインストーンを配置。

使用ポリッシュはこちら。

polishes used

左から、

Dance Legend Steel Panther
Dance Legend Last Serenade
Dance Legend Inhale
Dance Legend Holy Diver
Dance Legend Beautiful Lie
Mundo de Uñas Black

Here's the macro - you can really see the sparkles here!
And note the stamping came out crisp and centred also :D

マクロショット。こうして見ると本物の万華鏡みたいですね(゚∀゚) ←自画自賛
Creative Shopのスタンパーを使っても柄がかすれなかったこと、きちんと中央にスタンプできたこと(中指は)がなんだかとても奇跡です。前回の記事に書いたとおり、スクレイプは低い角度でゆっくり、ピックアップもゆっくり行いました。

I filed down a bit to match the stamp size. This stamp is 2.1cm in length and this type of stamp
wouldn't look nice if my nails are longer than that

このスタンプをするにあたって爪を少しだけ短くしました。この柄は2.1cmあります。こういうタイプのフルサイズの柄って、爪より短いとスタンプしたときにカッコ悪いですからね。ちなみにMoYouのXL柄ってずっと2.0cmだと思っていましたが、いつから2.1cmに変わったのかな??

I used the 'squash' technique for the first time. You better not go wild with squashing,
just lightly tap. Otherwise the colours blend too much and go yucky

色をランダムに置いて押し付けるテクニックは初めてやってみました。4色使ったこともあって、あまり押し付けず軽くぽんぽんと潰す方がいいです。あまりやりすぎると色が混ざって汚い色になります。(←1回やり直した)

ちなみに、今回新しいスタンプ方法を試してみました。スタンパーを爪先に揃えて柄を爪に押し付けるやり方です。いつもは爪を目の前に持ってきてスタンパーを転がすやり方ですが、今回のように左右対称柄をその方法でやると私の場合大体曲がります。そしてこの新しい方法を私のCカーブのきつい長目の爪でやるには、このヘッドが大きく柔らかいCreative Shopスタンパーでないとほぼ不可能です。いつも愛用しているMessy Mansionの四角スタンパーはsquishyではありますが、ヘッドが小さく丸みを帯びているので、このようにフルサイズの柄を爪に押し付けると柄がたいてい歪みます。このCreative Shopのスタンパーのおかげで新しいスタンプ方法を試すことができました。後はもう少し手なずけてすべての柄で使えるようにしたいものです。

というわけで新しいプレート、新しいトリッキーなスタンパー、新しいテクニックを使ったネイルでした。あまりにも不安要素が多すぎて撮影中、正直手が震えていました。そんな感動的な(?)場面を映した動画をどうぞ。


にほんブログ村 美容ブログ 自爪ネイルへ

Creative Shop Stamper Review - Follow Up

Wednesday, January 14, 2015 20 Comments A+ a-

After I did my first review on the Creative Shop stamper on this post, I almost gave up on this stamper. Then my friend Coppi received her stamper I gifted and she did a massive experiment on it. You can see her post here. It's in Japanese but you'll get an idea with the pics.

Coppi spent half a day trying everything and noticed one thing that makes a difference - the way she scrapes. That's what I didn't mention in my first post so I thought I'd do some more experiments and do the follow-up. I'm still experimenting, so this is just an interim report.

I made few hypotheses and assumptions before going into this experiment:

1. This stamper has a flat head unlike most others on the market. Does that affect the way it's picking up images?

2. It sometimes leaves bold spots when picking up images. Does it make a difference if you fill in with more polish on patterns than usual?

今日はここで紹介したCreative Shopスタンパーの補足記事を書きたいと思います。最初のレビュー後、このスタンパーについては正直諦めかけていました。しかし程なくして、こっぴさんにお贈りしたスタンパーが届き、その日のうちに素晴らしい大実験を行ってくださいました。その模様はこちらの記事に書かれています。こっぴさんの熱心さには本当に頭が下がります(T_T)。

記事のアップの前に私信もいただき、スクレイプの方法を変えたらうまく行くようになったことを教えていただきました。スクレイプ・・・正直まったく盲点でした!というわけで私ももう一度このスタンパーと向き合う決意をして、こっぴさんの助言を胸に再実験してみることにしました。まだまだ完全版とは言えないので、途中経過の中間報告ぐらいの位置付けです。

実験にあたって立てた仮設は以下のとおり。

1. このスタンパーは他の多くのスタンパーと違ってヘッドが平ら。これが柄を拾うときに影響を与えているのか?

2. 柄がかすれるということは、通常よりも多くのポリッシュがプレートの柄に流れ込むようにすれば良い結果が出るか?

To address the hypothesis #1, I pushed the edge of this stamper right in the holder to make the head round a bit. I didn't check to see if it makes a difference just by doing this, as I tried lots of different things at the same time. Definitely worth a try because the round head should ensure each part of a image be equally picked up by rolling motion.

仮説その1のヘッドの形状問題に対処すべく、まずヘッドの淵をスタンパーにグイグイ押し込んでヘッドが丸みを帯びるようにしてみました。以前のやり方を変えずにこの状態だけで違いが出るかは確認しなかったので、これだけで効果が出るかは分かりません。ただ、論理上は丸みを帯びることで転がしピックアップのときに柄が均等にスタンパーに乗っていくのではと思われます。


Now onto hypothesis #2. This is where Coppi's advice comes into play - scraping. By the way, the experiment on my first post was done by my good ole' library card, not the scraper that comes with the stamper. I didn't mention it because I didn't think it would make a difference. To be honest, I didn't like this Creative Shop scraper that's thinner and more flexible than my library card. Harder to work with after getting used to my library card. But then, I tried it in this experiment and it gave me a better result. 

Coppi suggested in her post to scrape slowly and very lightly at a low angle once (sort of smearing the polish onto the plate), then scrape again with the same motion to take the polish excess off the plate. She uses a plastic card in her post. I found this very useful. It ensures that every little gap on the image is properly filled with stamping polish. My usual scraping is pretty fast with 45 degrees angle, but you need a different strategy with this stamper. 

そして仮説その2。ここでスクレイプが肝というこっぴさんの助言が活かされます。ちなみに最初のレビューなのですが、Creative Shopのスクレイパーではなくいつもの図書カード(クレジットカードと同じ硬さのもの)を使用しています。スクレイプに問題があるとはまったく思わなかったので、その点記載しませんでした。正直、このCreative Shopのスクレイパーはあまり好きではありませんでした。私の図書カードより薄く柔軟なので、硬いカードに慣れた私としては使いにくいと感じていました。しかし、今回の実験でこのCreativeスクレイパーを使うことで良い結果が出ました。

こっぴさんはゆっくりと軽いタッチで、低い角度で一度スクレイプし(プレートにポリッシュを塗りつける要領で)、再度同じ動きでスクレイプして余分なポリッシュを掃き取る、という方法を提案されています。こっぴさんはこのときいつものプラスチックカードを利用されています。この方法、「なるほど!」と非常に納得しました。プレートの溝の隅々までしっかりとポリッシュを流し込むことができるからです。私の通常のスクレイプは素早くシュッとそこそこの力を込めて行い、角度は45度です。しかし、このスタンパーでは別のスクレイプ戦略が必要です。


This the library card I normally use. I scrape at this 45 degrees angle. 

これがいつも私が使っている図書カード。いつもはこの45度の角度でスクレイプしています。


This is the Creative Shop scraper. You can see that it's flexible and bendable. This 'warp' when scraping forms lower angle than usual. I scrape very slowly, making sure every little gap is filled with polish. One scrape is enough, but if polish looks overflown, scrape twice.

Also, I roll the stamper very slowly when picking up images, again, to ensure that the stamper picks up every little detail. I don't roll too hard, but not too soft.

そしてこれがCreative Shopのスクレイパー。薄く柔らかいのでスクレイプする際にこのようにたわんで通常より低い角度になります。スクレイプはこっぴさんの助言のとおり、非常にゆっくりといつもより軽めに、あらゆる溝にポリッシュを埋めていく要領で。ポリッシュが綺麗にはけたら1度だけ、溢れているようなら2度スクレイプ。

また、柄をスタンパーで転がして拾うときもゆっくり動作で。5秒ぐらいかけてスタンパーに細かい箇所まで転写されていくイメージで。転がすときの力の入れ具合は強すぎず、弱すぎず。この辺は慣れです^_^;


And here is one of the results. Only minor bold spots compared to my first result. I have to adjust the pressure when I scrape because the polish is overflown a bit on the right bottom of each image. Otherwise it looks good!

そして以上を試した結果がこちら。同じ柄を使った最初の結果と比べてどうでしょうか?かすれがだいぶなくなっていますね(゚∀゚) ただ、スクレイプの力の掛け具合にまだ課題が残ります。柄の右下あたり、ポリッシュが溢れていますね。それ以外はかなりいいんじゃないでしょうか。


Better pic of the image above. Only minor bold spots. I think I'm in the right direction now, but I know this isn't the end of this journey. I'm still having trouble with some of the other images even with this method. I will keep trying to get the best result!

上の画像を拡大したもの。ポリッシュが溢れているのを除けば、前回のときのようなドット内の欠けやかすれが大分解消されているのが見て取れるかと思います。ただ、まだ同じ方法で試してもうまくピックアップされない柄もあります。なのでこれで実験は終わりではありません。最適な結果を得るための実験はまだまだ続けていきます。

にほんブログ村 美容ブログ 自爪ネイルへ

Review on W Series Plate Set from AliExpress

Saturday, January 10, 2015 14 Comments A+ a-

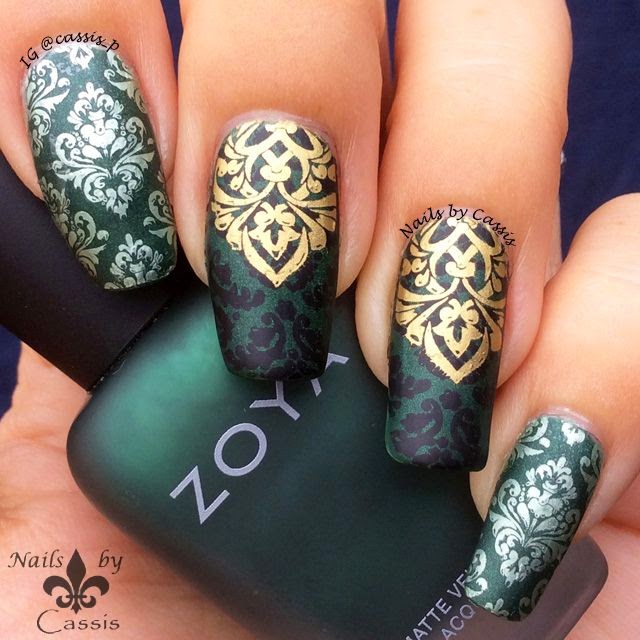
Today's post focuses on reviewing W series plate set I bought from AliExpress. I used one plate from this set on this mani. You can see the product listing here. This was on sale for $13.52 when I bought it. I kept stalling to write about this plate set because it was such a painful process to get it. I have never bought from AliExpress but when I saw this plate set, I felt I needed it in my life. BTW, this site doesn't offer Paypal payment, so you need a credit card to buy products here. This is how the order process went:

May 27th : Placed order and paid
June 5th: Order dispatched and tracking number issued
July 8th: I checked the tracking and noticed my order was sent back to the seller and inquired about it.
July 16th: The seller replied that the parcel was returned back to them and they would resend it.
August 27th: After few more emails back and forth, order arrived.

Yes, I received my order three months after I paid. Not impressed, but China Post is to blame for this, not the seller. The seller was quite responsive to my inquires.

前回のネイルで使ったWシリーズプレートのレビュー。AliExpressという中国版ebayのようなサイトで買いました。買ったのはこちらの商品。正直、AliExpressにはあまりいい印象を持っていませんでした。Dashicaのプレートのコピー商品を売って訴えられたセラーが居たり、MoYouのまんまコピーを厚かましくも売り続けるセラーがいたり。そんな怪しげなコピー商品がひしめくこのサイトで見つけた今回のWシリーズというプレートセット。どこかのコピーというわけでもないオリジナルなデザインと、20枚で13.52ドル(購入当時の価格)という格安さに惹かれました。誰か使っている人はいないか?と調べて参考になったのがこちらの記事。うん、品質もよさそうと思い購入。(なお、このAliExpressはPaypal支払いはできません。クレジットカードが必要です。)

ところがこれが面倒の始まりだった。。。。これを注文したのはもう半年も前のことです。今まで記事にしてこなかったのはあまりにもやり取りに疲れてしまい、記事にする気力がなかったから。注文から商品受け取りまでの経緯は以下の通り。

5/27 : 注文と支払
6/5 : 発送。追跡番号発行
7/8 : なかなか届かないので追跡を確認。なぜかセラーに戻ってしまっていることが分かり問い合わせ
7/16 : 小包が戻ってきた旨と、再送するとの返事あり
8/27 : さらに何回かのメールのやり取りの末、商品到着

注文してから到着まで丸3か月。しかしセラーは問い合わせには真摯に対応してくれました。郵便事情はセラーのせいではなく、China Postのせいですし。

Then, more disappointing thing happened. While I did test stamp, I found obvious defects on 4 of the plates, 2 of which (W205 and W218) are quite bad. I contacted the seller with the pics of the defects (shown later), asking for replacements.

The seller replied, 'Because the plates are produced in mass, some images may not be very clear. Next time you place the order again, I will resend you those ones. The first package is still not found and I don't know where it is. Wish you understand.'

Wait....WHAT!?!? Didn't they say the first packaged was returned back? Also, why do I have to make another order when we both know it's the fault on their side??

I sent another message, almost BEGGING to get replacements even just for W205. This particular plate is the reason I bought this set and I was so sad that it has defects. 

The seller replied, 'How about such and such plate set, do you like it? It's better than W series' (Pushing me to buy another plate set).

NO! I'M NOT GOING TO BUY ANY MORE PLATES! All I want is a replacement for W205!!! My mind shouted but this was the actual message I sent 'I would just like one W205 plate. I'm not asking for any other plate, because that's what I paid for. Resending me one W205 will be greatly appreciated.'

The seller replied, 'Do you have friends buying plates so I can send together? Only one plate really can't ship.'

...................I gave up. You win. I will not buy from this seller EVER AGAIN. I don't even want to look at AliExpress. This is the full story of what happened. I will show you the pics now.

ところが、テストスタンプして2度ガックシ。20枚中4枚に不具合があり、そのうちの2枚(W205とW218)が特に酷い。セラーに写真を送って(後で載せます)、この2枚の再送をお願いしました。

セラーから返事。「プレートは大量生産されているため、柄が鮮明ではないものもあります。次回注文される際にこの2枚を再送します。最初のパッケージはまだ行方不明ですし。ご理解のほどを。」

ちょ、、、、、え!?!?最初のパッケージ戻ってきたって言わなかった??しかも、そちらの不手際と分かっているのになぜ私が追加オーダーしないといけないの??

そこで私も返信。W205だけでもいいから送ってくださいと、ほぼ懇願するような感じで。このプレートセットを買った理由がこのW205だったのに、欠陥があるなんて悲しすぎ。

セラーから返事。「こちらのセットなんかどうですか?お気に召しませんか?Wシリーズより好評ですよ」(つまり別のセットをオーダーせよとの暗示)。

いいえ、他のセットは買いません!!欲しいのはW205だけ!!!と心の中で怒りに震えながらも、実際の文面は「W205プレート1枚だけ欲しいのです、これにお金を払ったのですから。他のプレートは要りません。W205を再送していただけると非常にありがたいです」。

セラーから返事。「お友達にプレートを買いたい人はいませんか?一緒にお送りします。プレート1枚じゃちょっと送れませんね」。

...................白旗。あなたの勝ち。もうあなたからは買いません。というか、AliExpressから買うこともないでしょう。以上のドラマチックな背景を念頭に置いて写真をご覧ください。

This set includes 20 plates, individually wrapped. I'm not going to waste my time going through
each plate, sorry. Eleonora has a great review post here. Mine are from W201 to W220.

注文から3か月して届いたプレートがこちら。全20枚。1枚ずつ包装されています。すみません、1枚ずつここで紹介する気力はありません。写真はEleonora @Nail Art Stamping Maniaのこちらの記事をどうぞ。私が買ったセットはW201からW220です。

Size comparison. W series plate is the same size with Messy Mansion plate (7cm in diameter).
Bigger than Bundle Monster plate (bottom). Individual images vary in size

大きさ比較。Wシリーズのプレートの大きさは7cm。Messy Mansionと同じ大きさです。下のBundle Monsterよりも大きいことが分かります。柄の大きさはプレートによってまちまち。

And here's W218. You see what I mean? :(
At least with this one, I can use the left image which is mirrored

そして問題の不具合があるプレート。こちらはW218。右の柄を見てくださいよ(-_-)。でもこれはまだいい、左の柄を反転したものだから、左のをどうにか使いますよ。

W205. This is the plate I desperately wanted replacement for. Compare this with this pic by
Eleonora. Her set is obviously a good batch

そしてW205。このセットを購入した理由と言っても過言ではないこのプレート。そのプレートにまさかの不具合(-_-)。ちなみにEleonoraのプレート写真がこちら。彼女のセットは状態がかなりいいです。

Close shot of the defect. The lines are obviously thinner than what they should be and
they don't transfer well when I stamp. BTW, black circle is my camera lense

大写しにしたところ。この柄、綺麗でしょう?でもこんなんじゃ使い物になりません。先ほどのEleonoraの写真と比べてみてください。スタンプしても線がきちんと転写されません。

Poor Micky :( At least I wouldn't use this stamp. But I'm so sad 2 images have
defects on my favourite plate

潰れたミッキーかわいそ(-_-)。少なくともこの柄は使わないとは思うけど、これが一番気に入ったプレートなのに2つも問題があるなんて。

These 2 plates have obvious defects you can notice even before you stamp, and I had 2 more plates that I had trouble stamping. I half expected that the quality wouldn't be that superb like big name plate companies, but didn't expect that I would never get replacements for these obvious defective plates. 

I have been so reluctant to use this set because whenever I make a mani tutorial, I get comments like 'I bought such and such plate because you used it'. I don't want to feature a plate that I'm not happy with. But I paid for it, you know... I gotta make the most of it. Oh the dilemma...

この2枚がスタンプしなくても分かる明らかな不具合プレート。他にも彫りの問題できちんとスタンプされないプレートが2枚ほどありました。他の有名どころのプレート会社みたいな品質はもともと期待していませんでしたが、明らかに不具合が見て取れるプレートを交換してもらえないなんて思ってもみませんでした。

半年近く経ってもこのセットをなかなか使えなかった理由。以前にも書きましたが、動画を作るようになってから「この前使ってたプレート、私も買ったよ!」と言われることが多いんです。そうするとやはり、お勧めしにくいプレートを使うのは気が引けるわけで。事後報告してこない人だっているでしょうしね。でもお金出して買ったものだし、いつかは使わねばと思っていました。柄は悪くないし安いので、もし購入されたい方がいたらこうしたトラブル覚悟の上でどうぞ。

にほんブログ村 美容ブログ 自爪ネイルへ

Kimono Style Stamping Mani

Friday, January 09, 2015 10 Comments A+ a-

Jan 20th Update: I replaced the video at the end of this post with YouTube version.

I'm not sure if it's a widely known fact or not, but New Year is much more celebrated than Christmas in Japan, and we usually take a week or so off as a New Year's holiday. Some boys and girls dress up in kimonos and visit temples and shrines to pray for happiness throughout the year. When you watch TV, you see TV hosts and guests dress up in kimonos also.

So, around this time of the year, I feel itching to do some Japanese nail art and this is what I created.

For this mani, I started off with A-England Her Rose Adagio for middle finger and ring finger. Then using a kimono-ish pattern from W205 plate I bought at AliExpress and Mundo de Uñas Black, I made a stamping decal and coloured in with BC Co. 24 (red) and OPI Love.Angel.Music.Baby (gold satin). For other nails, I painted black as a base and placed flower and hex glitters taken out of a home polish kindly gifted by my dear friend Coppi. I applied HK Girl topcoat, but the edge of the decals looked too obvious, so I applied Seche Vite on top of it to hide the gap. Also, when I applied HK Girl TC, the decals started curling a bit. This happened before on this stained glass mani, but I have no idea why. Hmm...

Anyway, I adore this look. Black, gold, and red is a traditional Japanese colour combo which I absolutely love. This homei glitter polish has cute cherry looking flower that's also perfect for the theme.

For the stamping plates I used, I haven't posted a review yet. I will do so on my next post, and will provide link to the seller. I highly recommend reading my review first before deciding to buy this set. That's why I don't provide a link to the seller on this post.

1/20更新:記事最後の動画をYouTube版に置き換えました。

正月気分が完全に抜け切る前にやりたかったネイル。今回はそんなネイルです。まず出来上がりがこちら。

Finished product, with HK Girl topcoat & Seche Vite

中指と薬指のベースはA-England Her Rose Adagio。AliExpressで買ったW205プレートの着物のような柄をMundo de Uñas Blackでスタンプ。BC Co. shade #24 (赤)とOPI Love.Angel.Music.Baby (ゴールドサテン)で色付けしてdecalを作成。他の爪は黒ベースでこっぴさんからいただいたhomei「妄想ブーケ」からグリッターを取り出して爪に流れるように配置。仕上げとしてHK Girlトップコートを塗ったのですが、decalの段差がくっきり出てしまったので上からSeche Viteを二度塗り。しかも、HK Girl塗った時にdecalがまたカールした。。。「decalカール事件」はこのステンドグラスネイルでも発生したのですが(このときはSeche Vite)、今回2度目です。暑さが原因なんでしょうか・・・むむ。。。

使用ポリッシュはこちら。

Polish used

左から、

OPI Love.Angel.Music.Baby
BC Co. shade #24
A-England Her Rose Adagio
Homei 「妄想ブーケ」
Face of Australia Scream
Mundo de Uñas Black

It was a rainy day when I took this pic, pity the A-England doesn't show the holos well

こっぴさんからいただいたこのhomei、見た瞬間「絶対和ネイルに使う!」と思いました。だって赤と金のHexグリッターに梅のようなお花のグリッターですよ?(゚∀゚) 黒に合わせたら完璧に和です。ハートも入っていますが、ハートは親指にこっそり乗せています。

Not sure which side of this stamp should be up,
so I did both ways on middle finger and ring finger :D

この柄、どっちを上にしていいか迷ったので両バージョン作ってみましたよ(゚∀゚) 中指はまんま着物みたいですが、薬指もイケる感じ。色も一応反転しています。

なお、このネイルに使ったプレートですが、まだレビューをしていません。事情があって別記事として次回紹介させていただきます。大切なこっぴさんからいただいた大切なポリッシュを使ったこのネイルにケチをつけたくないので。

Just for your viewing pleasure, these are some of the sample decals I wasted
before I settled on this design. I was going for completely different designs but none I didn't like :(
Oh boy, I'm getting picky! These are not all, mind you. Some got blown away somewhere. lol

最後に、このネイルのデザインに決めるまでに無駄にしたdecalの数々。これで全部じゃありません。いくつかはどこかに吹き飛んでいきましたw homeiのポリッシュを使うことと赤金黒の日本の伝統色を使うことは決めていたものの、当初はまったく違うデザインを考えていました。が!いくつdecalを作ってもどれも気に入らない。。。毎回じゃありませんが、たまにこうやってデザインを考えるのに苦労することがあります。好き嫌いが激しいのも考えものですね^_^;


にほんブログ村 美容ブログ 自爪ネイルへ

Green Damask Stamping Mani

Wednesday, January 07, 2015 16 Comments A+ a-

Jan 16th Update: I replaced the video at the end of this post with YouTube version.

This is my first mani in 2015. (The New Year's Sunrise mani was actually created last year). I started off with something simple yet classy.

For this mani, I started off with Zoya Veruschka and stamped a damask pattern from MoYou London Fashionista 07 with Mundo de Uñas Black for middle and ring finger. Then I double stamped with a pattern from Gothic 11 with Mundo de Uñas Gold. For other fingers I stamped a different damask pattern from Fashionista 07 with KIKO 626 from Mirror collection that my friend Chiro @Nail of This Week kindly sent me. I first topcoated with Essence topcoat then decided to mattify with Essie Matte About You.

That's it! Wow, it's simple, right? But I didn't think these gorgeous patterns needed some elaborate stamping. I always thought this matte green would match so well with those damask images and I'm so happy with the result. The problem was thought that this Zoya is quite a stainer. After three days of wear, my nails looked like mandarin skins! I got rid of some stains using baking soda and lemon juice but not completely. Grrr....

1/16更新:記事最後の動画をYouTube版に置き換えました。

前回の春の歌さんのプレゼント企画にはたくさんのご応募をいただきどうもありがとうございます。半日も経たずに締め切ることになってしまい、間に合わなかった方には申し訳ありません。当選者の皆様には既にご連絡済みです。

さて今日のネイルは新年初ネイルです。出来上がりはこちら。

Finished product, mattified with Essie Matte About You

全指ともベースはZoya Veruschka。中指と薬指はMoYou London Fashionista 07のダマスク柄をMundo de Uñas Blackでスタンプ。その上にMoYou London Gothic 11のケルト文様のような柄をMundo de Uñas Goldでスタンプ。他の指にはFashionista 07の別のダマスク柄をKIKO Mirrorコレクション626でスタンプ。このKIKOは「Nail of This Week」のChiroさんが送ってくださったもの。仕上げにEssence Better than Gelnailsトップコートを塗り、やっぱりマットがいいかな?ということでEssie Matte About Youでフィニッシュ。使用ポリッシュはこちら。

Polish used

左から、

Zoya Veruschka
KIKO Mirror 626
Mundo de Uñas Black
Mundo de Uñas Gold

By the way, this is what it looks like before mattifying. The base and the black stamp
looked too assimilated and I didn't like it

これがマットにする前。トップコートする前はベースのZoyaと黒スタンプが渋いコントラストを成していたのですが、トップコートしたらのっぺりとしてしまい、う~んと思ってマットにしました。

This was my first use of this KIKO. It looks silvery in photo,
but it's a beautiful light green and looks pretty on this dark green Zoya

KIKO 626は初使用でした。写真ではシルバーっぽく見えて残念なのですが、このZoyaの上にスタンプしたときに思わず「はっ・・・!」と息を飲んでしまったほど美麗な色の組み合わせ。ダブルスタンプしたゴールドと言い、全体的にデザインも色も気に入ったネイルです。

気に入ったとは言っても、「ちょっと新年からシンプルすぎるかな・・・(反省)」という気持ちがありつつインスタにアップしたネイルでした。しかし何か小難しいテクニックでも使ったと思われた方が多かったようで意外でした。期待外れですみませんが単なるダブルスタンプなんです(笑。動画もまぁ需要はないだろうけど一応編集したから・・・と夜寝る前にアップして、朝起きて見たら「いいね」が800件。

・・・こういうシンプルなの皆さんお好きなんでしょうか?どなたか教えてくださいw いろんな小難しいやり方をお見せしようと日々頭を悩ませている本人としては軽くショックです(笑。ちなみにさらにショックだったこと。3日経ってさっきオフしたら爪が大いに黄変していた!蜜柑の皮ぐらいの色に・・・。ベーキングソーダとレモンの果汁混ぜてゴシゴシこすりましたが、まだ残っています。シクシク。


にほんブログ村 美容ブログ 自爪ネイルへ

[終了] 春の歌 プレゼント企画 (Sorry Japanese Only Post!)

Monday, January 05, 2015 48 Comments A+ a-

Sorry this is Japanese only post. Harunouta (aka Japanese Born Pretty Store) contacted me if I would like to host a giveaway for my Japanese readers. Hope I can do international giveaway one day!

1/6更新:20名様に達しましたので締め切ります。たくさんのご応募をありがとうございました!

当選者の皆様へ。春の歌ご担当者様とご本人様双方に「メールアドレスと希望セット」を知らせるメールを送信しましたのでご確認ください。

当ブログで何度も登場している「春の歌」さんからご連絡をいただき、この度Nails by Cassisの日本人読者様向けにプレゼント企画を開催させていただくことになりました。

◆企画内容◆

春の歌のWebサイトからカシスが読者の皆さま向けにプレゼントを選ばせていただきました。私も持っているもの、これから買おうと思っているものを選定しています。

プレゼントはAセットとBセット、2種類用意しています(下記画像参照)。各セット10名様ずつ、合計20名様に進呈いたします。

◆応募方法◆

  • AセットとBセットのどちらがよいか(またはどちらでもよいか)希望を添えて、この記事の下の「Post a comment」からコメントをくださった先着順にプレゼントを進呈いたします。
  • 長いコメントは不要です。メールアドレスの入力も不要です。
  • 各セット10名様ですので、片方のセットが10名に達した時点で、それ以降コメントをいただいた方には、自動的にもう片方のセットをプレゼントということになります。
  • お一人様1回の応募でお願いします。

◆プレゼント内容◆

Aセット (先着10名様): 
  1. Born Pretty BP-L007プレート (リンク)
  2. Born Pretty BP-28プレート (リンク)
  3. Born Pretty BP-33プレート (リンク)
  4. XLスタンパー(リンク

Bセット (先着10名様): 
  1. Born Pretty BP-L008プレート  (リンク)
  2. Born Pretty BP-02プレート (リンク)
  3. Born Pretty BP-09プレート (リンク)
  4. XLスタンパー (リンク)


◆応募期間◆

2015年1月5日~1月12日午前9時(日本時間)まで。ただし、締め切り前に20名様に達した場合は、そこで終了させていただきます。

◆当選者様へのご連絡◆

コメントをいただいた順に返信を付けていきます。「確定です」という旨の返信が私から付いた時点でプレゼント確定です。返信が付いた方は、ブログ右側の「Contact Me」のフォームから私宛に、当選した旨のメッセージをメールアドレスと共にお知らせください。そのメールアドレスを私から春の歌の担当者様に連絡して、以降の住所などのやり取りは両者間でお願いいたします。

-------------------

スタンピングが初めての方も経験がある方も、どうぞお気軽にご応募ください。今回のプレゼントをご提供いただいた「春の歌」さんでお買い物の際は、以下の10%オフコード「CPM10」をご利用いただけます(セール品は除く)。送料はいつでも無料です。

春の歌

にほんブログ村 美容ブログ 自爪ネイルへ