Showing posts with label DRK Nails. Show all posts

DRK Stamping Mat Review

On the week I was back from Japan, the much waited DRK Stamping Mat restock happened, so I quickly placed an order. Stamping Mat is getting very popular among stamping addicts, and few stamping brands have released their own mat already. I don't have any other mats to compare, but I'll show you what this DRK Stamping Mat can do.

I bought 2 mats, clear and black, and they arrived a week and a half after they were shipped. Let's have a look.

日本から帰った週に、ちょうど待ちに待ったDRKスタンピングマットの再入荷のお知らせが入ってきたので、すぐさまオーダーしました。スタンピングマットはスタンパーさんたちの間で今非常に人気が高く、各スタンピングブランドが次々と独自のマットをリリースしているので皆さん聞いたことがあるかと思います。私はDRKのマット以外は持っていないので比較はできませんが、この記事ではDRKマットの印象と使い方をご紹介したいと思います。

購入したのはクリアと黒のマット2枚。発送から約1週間半で到着。では早速モノを見てみましょう。


These are what I bought. DRK has 4 colours to choose from, clear, pink, turquoise, and black. One mat is sold for $9.70, which I think is reasonable.

こちらが買った2点。DRKのマットは4色(クリア、ピンク、ターコイス、黒)から選べるようになっていて、1枚9.7ドル。かなり魅力的な値段設定です。


I'll focus on the clear mat for the purpose of this review, as the functionality is the same with both mats. DRK Mat is made of silicone, and is roughly 40cm x 30cm. Top part of the mat has coloured splashes where you can test different colour combos, and the right part has drawing of hands and nails. Left part has DRK logo and some patterns.

2枚とも機能は同じなので、このレビューではクリアのマットを中心にご紹介します。DRKマットはシリコンでできており、大きさは約40cm x 30cm。マットの上部は絵の具がはねたような形のカラーチャートとなっており、色の組み合わせをテストできるようになっています。右側は人の手と爪の絵、左側はDRKのロゴと花柄の模様が描かれています。


Better view of each part. As of this writing, DRK Stamping Mat is the only mat which has colour chart like this. I really love the idea, and one big reason that I went for this mat.

各パートをズームインしたもの。執筆時点で、このようなカラーチャートがあるマットはDRKスタンピングマットのみです。これが購入した一因でもあります。


Comparison with my real fingers. Those nails are much bigger than mine.

私の爪との大きさ比較。やや大きめサイズであることが分かるかと思います。


Oil Slick Butterfly Stamping Mani

August 31st Update: I replaced the video at the end of this post with YouTube version.

I've had few more nail mails coming in that's waiting for my review, but before I do that let me share one more mani using Hit the Bottle stamping polishes.

Thumb, middle finger & ring finger: Base is Picture Polish darcy, and I applied Simply Peel by Bliss Kiss around my cuticles for easy cleanup. I placed 4 or 5 drops of Hit the Bottle polishes ('I wish I was a Mermaid', 'Blue-tiful', 'Paint the Town Violet', and 'Poison Apple') randomly on swirly pattern on DRK XL Designer 1 plate, scraped just once and stamped on those nails. I peeled off Simply Peel, then I made a decal using butterfly pattern on the same plate and Hit the Bottle 'To Have an to Gold', coloured in with the same HTB polishes above and placed them on those nails. Finished off with Glisten & Glow HK Girl topcoat.

Pointer & pinkie: Same process except that I didn't place butterfly decals.

I can't tell you how much I love the result! Pity the day I took the photos was pretty cloudy. The first time I saw this mani in the sun, I thought 'Oh wow, this looks like oil slick!', hence the name. I used this stamping technique long time ago for this mani, but the blend of these metallic polishes give such a mesmerising look. 

As I mentioned in my Hit the Bottle review post, these polishes dry rather fast, so you might want to plan beforehand exactly what part of the design you want it on your nails. If you pick up unwanted parts on your stamper, you don't have time to remove it with your finger or sticky tape before stamping on your nails. Nothing difficult once you get used to it. I always plan and scrape to the direction where I don't pick up unwanted image anyway. I just don't want my fellow stampers to feel hesitant about getting these HTB polishes just because they dry fast, because I absolutely love them!

8/31更新:記事最後の動画をYouTube版に置き換えました。

レビュー案件があと2件ほど控えているのですが、ちょっと一呼吸おいてHit the Bottleスタンピングポリッシュを使ったネイルをもう1つ作ってみました。出来上がりはこちら。

Finished product, with Glisten & Glow HK Girl topcoat. Cloudy shot

親指、中指、薬指 : ベースはPicture Polish darcy。事前にキューティクル周辺にBliss KissのSimply Peelを塗っておく(あとでクリーンアップを楽にするため)。Hit the Bottleの各ポリッシュ ('I wish I was a Mermaid'、'Blue-tiful'、'Paint the Town Violet'、'Poison Apple')をDRK XL Designer 1 プレートの渦巻き模様に4-5滴ほどランダムに垂らし、1回だけスクレイプしてこの3本の爪にスタンプ。Simply Peelを剥がしたら、今度は同じプレートのチョウチョ柄をHit the Bottle 'To Have an to Gold'でスタンプ。上記のHTBポリッシュで色付けしてdecal化し、爪に乗せる。仕上げはGlisten & Glow HK Girlトップコート。

人差し指と小指: チョウチョdecalを乗せなかっただけでプロセスは同じ。

使用ポリッシュはこちら。

Polishes used

左から、

Picture Polish darcy
Hit the Bottle I wish I was a Mermaid
Hit the Bottle Blue-tiful
Hit the Bottle Paint the Town Violet
Hit the Bottle Poison Apple
Hit the Bottle To Have and to Gold

This is the first time in a long time I used DRK plate. I only have 2 of their plates,
but I really adore them. This swirl pattern was just perfect for this oil slick look

このネイル、個人的にものすごく気に入りました。ちょうど写真を撮った時は曇りだったので写りはイマイチですが、太陽光下で初めて見た瞬間、「わぁ~oil slickみたい!」と思いました。oil slickというのは水面や道路に浮いた油の色が混ざり合って虹みたいになっているアレです(Googleの画像検索はこちら)。なので、ネイルの名前もOil Slick Butterflyとしてみました。この「複数のポリッシュを垂らしてスクレイプ」する手法、以前1回やっていますが、メタリックだとまた混ざり具合が格別ですね(゚∀゚) ベースのPicture Polishの黒ホロのキラキラとメタリックなスタンプが相まって、この日は爪を何度も見てはその輝く様子に見とれていました。

I only recently created a butterfly mani, but couldn't resist creating another.
What do you think?

DRKのプレートを使うのは本当に久しぶりです。新しく入手したプレートにどうしても目が行きがちになるのですが、以前から持っているプレートもどんどん活用していかねば。

ところで今回使ったHit the Bottleスタンピングポリッシュ、レビューにも書いたようにかなり乾きが早いです。なので、柄をピックアップしてから迷わないように事前に柄のどの部分を使うかよく計画しておくのが吉です。特に今回使ったような一続き柄のプレートを使う場合、どんな感じでポリッシュを垂らし、どの方向にスクレイプすれば不要な柄をピックアップしなくて済むかをよく考えます。不要な柄をピックアップしてしまった場合、爪に転写する前に指やセロテープで取り除いている暇はありません。私は乾きの遅いMundoでも上記のことを念頭に置いて作業しているのでほとんど気にならないのですが、スタンパーさんたちの中にはHit the Bottleの乾きの早さがネックになって購入をためらっている方もいらっしゃるようで。非常にいいポリッシュなのに多くの人に使ってもらえないのは残念。工夫と使い方次第で克服できるよ、ということを声を大にして伝えたいです。


にほんブログ村 美容ブログ 自爪ネイルへ

Gold x Blue Ornate Stamping Mani

May 3rd Update: I replaced the video at the end of this post with YouTube version.

I'm having a break from cleaning and packing for the house move next week, because I'm 600km away from home at the moment. My husband is going away on his business trip, and he asked if I would like to come with him. Hummm, not really, but he convinced me that all the meals are supplied and the accommodation is nice, and also he assured that I could take my nail art stuff with me. Ummm, OK then! LOL. Lucky me, I can still do my work wherever I am, as long as I have internet. 

I brought about 3 bags worth of nail art essentials with me. I left half of my stamping plates and most of my polishes behind, but at least I can create some simple manis while I'm away. So we checked in the hotel and I set up my nail station at the hotel balcony and created this mani.

For this mani, I started off with JOSS More Nail Gold for thumb, middle finger, and ring finger. I stamped a ornate circular pattern from DRK XL Designer 2 using Mundo de Uñas Gold, painted Revlon Royal over it to make a stamping decal. I peeled it off from stamper, cut to nail size and placed on those nails. I added some dots with same Revlon Royal around the semi-circle and finished off with Glisten & Glow HK Girl topcoat. For other nails, I simply painted Revlon Royal and added some gold rounds studs I bought from eBay.

It's a simple 2 colour mani, but because of this gorgeous pattern and this glowy gold x Revlon Royal combo, it has such a lush look. I'm so glad I brought Revlon Royal with me, I think it surely added some 'royal' look to the mani :)

5/3更新:記事最後の動画をYouTube版に置き換えました。

引っ越しを来週に控えたこのタイミングで旦那の出張が入りました。「一緒に来る?」と言われてもあまり気乗りがしませんでしたが、食事も全部出るしいいホテルだよ~という甘い言葉に乗せられて私も出張に付いてきてしまいました。もちろんネイルグッズも持ってきましたが、スタンピングプレートは半分程度、ポリッシュも20本ほどしかないので、出張中のネイルはシンプルになりそうです。私自身も普通に仕事があるので、どのみち2回ぐらいしか塗り替えはできないと思いますが。

というわけでホテルにチェックインしてバルコニーにネイルステーションをこしらえ、土曜の朝方に作ったネイルがこちら。

Finished product, with Glisten & Glow HK Girl topcoat. In the sun

親指、中指、薬指のベースはJOSS More Nail Gold。DRK XL Designer 2から豪奢な円状の柄をMundo de Uñas Goldでスタンプし、スタンパー上でRevlon Royalを塗ってdecal作成。よく乾かしてからスタンパーから剥がし、爪のサイズに切ってこの3本の爪に乗せる。その後、同じくRevlon Royalで半円部分にドットを追加し、Glisten & Glow HK Girlトップコートで仕上げ。他のネイルはRevlon Royalを塗ってeBayで買った金の丸スタッズを追加。

使用ポリッシュはこちら。

Polishes used

左から、

Revlon Royal
JOSS More Nail Gold
Mundo de Uñas Gold

This lush pattern doesn't really need difficult technique.
Just stamp away and it will come out gorgeous!

持ってきたポリッシュも少ないしあまり凝ったネイルをやる気がしなくて、とりあえずスタンプしとけばカッコよく決まる系の柄を使ってみました。このDRKのプレート、本当にカッコいい&ユニークな柄が多くて非常に重宝してます。

I wish I could have dotted more consistently, but oh well.
Doesn't look bad in real life but at a closeup shot like this, it looks meh :'(

普段と違う場所で動画を撮りながらネイルをするのはなかなか大変でした。動画の最初の方、陽が当たって見にくいかもしれませんがご容赦を。


にほんブログ村 美容ブログ 自爪ネイルへ

Retro Spring Mani Using DRK XL Designer 1


March 28th Update: I replaced the video at the end of this post with YouTube version.

I couldn't have much time for nail arts for the last couple of weeks, but finally sit down to create one the other day. I decided to use few of my untried, DRK XL Designer 1 plate, new Mundo de Uñas stamping polishes, and a Face of Australia polish.

For this mani, I started off with one coat of Sally Hansen Mint Sorbet, and stamped a floral/leaf pattern from DRK XL Designer 1 with Mundo de Uñas Light Gray on half of each nail. I then stamped another floral pattern from the same plate with Mundo de Uñas Purple on the other half of each nail. It doesn't really matter if the first and the second stamp overlap or not. Then, using the rose pattern from the same plate with Mundo de Uñas Dark Gray, I made a stamping decal and coloured in with Face of Australia Show Off (neon pink) and BC Co. shade 8 (soft pink), and placed on the random position of each nail. I finished off with Glisten & Glow HK Girl topcoat.


I actually got inspiration from a Google pic, but it ended up completely different both colour and design-wise. This colour scheme is out of my comfort zone, but this somehow retro & springy look started to grow on me. I had a short hospital visit yesterday, and all the nurses who treated me complimented my nails and that put smile on my face!


3/28更新:記事最後の動画をYouTube版に置き換えました。

ここ数週間忙しくてネイルの時間が取れませんでしたが、先日無理やり時間を作って1つ仕上げました。出来上がりはこちら。

Finished product, with Glisten & Glow HK Girl topcoat

ベースは全爪Sally Hansen Mint Sorbet。DRK XL Designer 1から葉っぱのようなお花のような柄をMundo de Uñas Light Grayで爪の半分ほどにスタンプ。次に同じプレートのお花柄をMundo de Uñas Purpleで爪の残り半分ほどにスタンプ。この第1と第2のスタンプは重なっても重ならなくてもどちらでもかまいません。次に、同じプレートの薔薇柄をMundo de Uñas Dark Grayでスタンプし、decalを作成。色付けにはFace of Australia Show Off (ネオンピンク)とBC Co. shade 8 (柔らかいピンク)を使用し、各爪のランダムな位置に配置。仕上げはGlisten & Glow HK Girlトップコート。

使用ポリッシュはこちら。

Polished used

左から、

Sally Hansen Mint Sorbet
Face of Australia Show Off
BC Co. shade 8
Mundo de Uñas Purple
Mundo de Uñas Light Gray
Mundo de Uñas Dark Gray

I picked up this neon pink for only a $1. I hardly wear neons,
but I know I should do so more often

今回初使用のものがいろいろあります。DRKのプレート、Mundoグレー2本、それからこの手に持っているFace of Australia。セールで1ドルだったので買ってみました。ネオンってあまり塗らないのですが、元気な感じになっていいですね~。今回のネイルはちょっと色あせたレトロのような雰囲気もあり、お花満載で春っぽさもあり、いつも使わない色の組み合わせがなかなか気に入りました。

What do you think of the colour combo? Definitely not 'me' colours, but I'm surprisingly liking them!

実は昨日の午前中、全身麻酔を伴う簡単な手術があったのですが、入れ替わり立ち替わりやってくるナースたちが皆「素敵なネイルね!」と誉めてくれて心が和みました。左手の甲に麻酔用注射針を入れられ、口にも麻酔用マスクを装着されて、麻酔でコテンと寝る直前までナースたちに「どうやってやったの?」「どうしたらそんな長く爪伸ばせるの?」と質問攻めされる私w また別の機会があったらゆっくり教えますのでww

そんなわけでナースたちにも大好評のこのネイル、ご興味がある方は動画をどうぞ。


にほんブログ村 美容ブログ 自爪ネイルへ

Blue x White Leaf Stamping Mani

March 19th Update: I replaced the video at the end of this post with YouTube version.

Another DRK stamping mani today. Seriously, I can't take my eyes off their plates, especially XL Designer 2. I've been wanting to wear Revlon Royal (I did swatch here) for a while, so I decided to pair up the DRK plate with this polish.

I started off with Revlon Royal for all nails and stamped a leafy pattern from DRK XL Designer 2 plate using Mundo de Uñas White for middle finger, ring finger, and thumb. I topcoated then placed a straight tape from What's Up Nail Art Store near the tip of those nails, and painted white. Once that's dry, I placed 2 sets of thinner straight tape on the white part, and painted black in between. I added a white triangle stud on the black part and finished off with Glisten & Glow HK Girl topcoat. For other nails, I simply added 2 triangle studs. I bought those studs from an online shop in Japan.

This is the second time I wore this Revlon Royal, and it didn't disappoint at all! Combined with this leafy white stamp, it has such a refreshing look. I decided to go with simple white & black colour combo, and I'm so happy with how it turned out.

3/19更新:記事最後の動画をYouTube版に置き換えました。

少し前からRevlon Royalを塗りたくてうずうずしていました。Royalはここで初めて塗って以来2回目です。このポリッシュをメインディッシュにするため、色合わせはシンプルにしました。まず出来上がりはこちら。

Finished product, with Glisten & Glow HK Girl topcoat. Outdoor shot.
3 coats of Revlon Royal on pointer and pinkie. Such a deep blue!

ベースは全爪Revlon Royal。 DRK XL Designer 2プレートから葉っぱのような柄をMundo de Uñas Whiteで中指、薬指、親指にスタンプ。いったんトップコートを塗り、What's Up Nail Art Store で買ったストレートテープをこの3本の指の爪先付近に置き、白を塗る。乾いたら少し細いストレートテープを2つ白い部分に置き、その間を黒で塗る。黒の部分に白の三角スタッズを置いて仕上げはGlisten & Glow HK Girlトップコート。他の爪は白の三角スタッズを2つ逆向きに配置。スタッズはこちらのお店から。 使用ポリッシュはこちら。

Polishes used

左から、

Revlon Royal
Sally Hansen White On
Face of Australia Scream
Mundo de Uñas White

I wish I could freehand those stripes, but nah, didn't want to take a chance and ruin it

人差し指と小指はRoyal3度塗りです。今回はRoyalを使いたかっただけなので正直スタンプは何でもいいや~という感じでしたが、意外にこのスタンプが一番シックリきました。もうちょっとベースのRoyalの色が見えるスタンプも試したのですが、そちらはイマイチでした。

I didn't want to cover up Royal too much, but this stamp was the best match out of all I tried

最近は本当によくテープを使いますね。スタンプオンリーだとなかなかマンネリになりがちなので、ちょっとしたアレンジを加えたいときにテープは最適です。ストライプ部分がもう少し均等な幅になればよかったんですが、贅沢は言わない。

青と白とちょっと黒という色の組み合わせがなかなか爽やかで気に入りました。なんとなく雰囲気は「ギリシャ」です。ちなみにこの白の三角スタッズは初めて使いましたが、50個しか入ってないので右手には黒の三角スタッズを白ポリッシュで塗ったものを貼り付けていますw あんまり見えないとは思いますが、雑な仕上がりの右手にもご注目ください(爆。


にほんブログ村 美容ブログ 自爪ネイルへ

Triangle Mosaic Mani using DRK XL Designer 2

March 14th Update: I replaced the video at the end of this post with YouTube version.

I had another play with my DRK plate. The pattern I used here is also the one I fell in love with during test stamps on paper.

I started off with Impala Festa, and stamped a triangle mosaic pattern from DRK XL Designer 2 plate using Mundo de Uñas Black. I coloured in those small triangles using 4 Dance Legend polishes from Wow Prism collection, and applied Essence clear polish to make a decal. Once that's dry (45min-1hr), I peeled it off from stamper and cut into half to make a sharp triangle shape, and put it onto nail. I added rhinestones I bought in Japan and finished off with Glisten & Glow HK Girl topcoat.

This time I used one of the colourful stamper heads I bought from AliExpress (review post here) to make decals, and it worked the way I wanted. I used the clear (translucent) one, and I totally forgot that that was the one I had a bit trouble picking up image during test stamps, but it stamped real well. Phew!

Because I used Dance Legend Wow Prism polishes, they coloured part is so sparkly under the sun, but in the shade the colourful look sort of reminds me of a pop art mani. It took a while to colour in those tiny parts, but I'm glad it came out pretty!

3/14更新:記事最後の動画をYouTube版に置き換えました。

またDRKプレートで遊んでみたの巻。まず出来上がりはこちら。

Finished product, with Glisten & Glow HK Girl topcoat. Outdoor shot

ベースはImpala Festa。DRK XL Designer 2の三角モザイクのような柄をMundo de Uñas Blackでスタンパーにピックアップ。Dance Legend Wow Prismコレクションの4本を使って色付けし、Essenceクリアポリッシュを塗ってdecal作成。45分~1時間ほど待ってスタンパーから剥がし、半分に切って尖がり三角形の形にして爪に載せる。こちらのお店で買ったSS5のラインストーンを載せてGlisten & Glow HK Girlトップコートで仕上げ。

ちなみに今回使ったスタンパーはAliExpressで買った中の1つです(レビュー記事はこちら)。半透明のヘッドを使ったのですが、前回のテストスタンプで問題があるやつだったことをすっかり忘れていました。特に問題なくスタンプできたので一安心。

使用ポリッシュはこちら。

Polishes used

左から、

Impala Festa
Dance Legend Holy Diver
Dance Legend Last Serenade
Dance Legend Inhale
Dance Legend Just Another Star
Mundo de Uñas Black

Every time I use these Dance Legends, I get asked where I bought these.
I bought mine directly here and from Llarowe

このDance Legendたち、夏の間は本当によく使いました。もうそろそろ秋の足音が聞こえてきそうですが、日差しが強いうちはまだまだ使っていきます。最近よくいただく質問のナンバーワンは「このDance Legendどこで買えるの?」なんです。いつも私のIGアカウントに遊びに来てくれる愉快な仲間たちには「欲しくなるからもう使わないで!」と冗談で言われますが、皆さん我慢しないでどんどん買ったらいいと思うの。

It took a while to colour in those tiny parts, but luckily I could get 2 pieces out of one decal.
For colouring, I used this detail brush from Born Pretty Store

この色付けする部分、かなり小さく数が多いので、やり始めは余裕こいていましたが終わる頃には薄ら汗が出てました。1つのdecalから2ピース取れるので、両手合わせて5回で済みます。いや、これを10個分作る気にはまったくならんからorz  ちなみに色付けには春の歌さんから送っていただいたこちらのブラシセットの1本を使っています。屋外だとDLがキラキラできれい、屋内だとカラフルなポップアートネイルみたいな感じでなかなか見てて飽きないです。


にほんブログ村 美容ブログ 自爪ネイルへ

First Use of DRK XL Designer Plate

March 6th Update: I replaced the video at the end of this post with YouTube version.

With 2 gorgeous XL plates from DRK Nails in front of me, I didn't know where to start. While I was doing test stamps, I saw some gorgeous designs and I decided to use one of them.

For this mani, I started off with Face of Australia Scream (black), and stamped an ornamental pattern at the top left of DRK XL Designer 2 plate with Mundo de Uñas Gold onto about 2/3 of middle and ring finger. Then I placed a french tip tape from What's Up Nail Store at the tip of these nails, and painted Mundo de Uñas Reddish at the tips. I added a red rhinestone from MoYou London on these nails and finished off with Glisten & Glow HK Girl top coat. For other fingers, I added the same red rhinestone and some gold square studs I bought from eBay.

For stamping, I used rectangle stamper from MoYou London (review post here). For this type of stamping that needs to be centred (this time horizontally), I line up the stamper near cuticle and simply press down. It's much easier using this marshmallow stamper for this technique, and I'm glad it came out the way I wanted. 

I love this colour scheme and combined with this ornamental stamp, this mani reminds me of ancient China somehow. I don't have any red polishes that go so vibrant against black, so I painted Mundo de Uñas Reddish (at least I didn't paint directly on my nails so it should be ok). This red is so striking and really makes the whole mani pop. I love this look, but the only problem is that I don't know what to name this mani :P

3/6更新:記事最後の動画をYouTube版に置き換えました。

先日届いた2枚のDRKデザイナープレートを前に、どれから手を付けようかひとしきり悩んでみました。テストスタンプでいくつかゴージャスな柄を見つけたので、その1つを使おうと思って出来たのがこちら。

Finished product, with Glisten & Glow HK Girl topcoat

ベースは全爪ともFace of Australia Scream (黒)。DRK XLデザイナー2の左上の豪奢な柄をMundo de Uñas Goldで中指と薬指の上2/3ほどにスタンプ。その上にWhat's Up Nail Storeのフレンチテープを置いて爪先数ミリをMundo de Uñas Reddishで塗る。MoYou Londonからもらった赤のラインストーンを1つずつ置き、仕上げはGlisten & Glow HK Girlトップコート。他の爪は赤のラインストーンの他にeBayで買った金の四角スタッズを配置。

ちなみに今回、MoYou Londonの長方形スタンパー(レビューはこちら)を使ってみました。今回の柄のように真ん中(水平方向)にスタンプする必要があるものは、スタンパーをキューティクルの位置に合わせて柄が真ん中に来ていることを確認してから押し込んでスタンプしています。このやり方にはマシュマロスタンパーがやはりやりやすいのでMoYouのを使ってみたのですが、狙った通りに真ん中にスタンプできました。

Polishes used. MdU Gold is half the bottle now, but I have a full size bottle as a backup :)

Face of Australia Scream
Mundo de Uñas Reddish
Mundo de Uñas Gold

Mundo Goldは散々使ってきましたがようやくミニボトルの半分消費。結構持つもんですね。フルボトルは既に購入済みです。

See what I mean by MdU Reddish? I tried with different regular red polish,
but the result was just meh

爪先に塗った赤はMundo Reddishです。他の赤ポリッシュを使ってみたんですが、ここまで黒の上で綺麗に発色するのはやっぱりReddishだけ。爪に直接塗ったわけじゃないのでセーフかと。

I don't know whether you notice or not, but I have a big crack at the side of my pointer,
and I repaired it with tea bag for the first time. Hope it grows out soon :(

この黒と赤と金の組み合わせ好きです。和風ネイルでもよく使う色合わせですが、今回は柄が完全に中華ですね。ところでこのネイル、なんと名前を付けるか非常に悩んでいます。「黒赤金ネイル」じゃ締まらないし、「中華スタイルネイル」もなんだかなぁ。YouTubeの動画作るときに名前を付けなきゃいけないのでそれまで悩んでみます。

ちなみに人差し指なんですが、サイドに大きな亀裂が入ったのでティーバッグ方式で初めて補修してみました。表面がぼこっとして見えるのはそのせいです。昨日やって既に綻びが出てきているので、次のネイルチェンジの時にまたやらなければ・・・。早く伸びるといいなぁ。


にほんブログ村 美容ブログ 自爪ネイルへ

DRK Nails Haul and Plate Review

On the same day I received my colourful stamper heads from AliExpress, I also received my first order from DRK Nails. DRK Nails is a Brazillian based stamping plate company which also sells polishes and stamping accessories. I have been keeping my eyes on this brand for quite a while now, but as soon as they showed the sneak peek of the new XL Designer plates late January, I was completely sold and decided to order.

Before I made an order, I asked a question on their Instagram account. Because this was my first purchase, I wanted to have an idea of what the image size is like on their XL plates. I asked "what is the size of the dragon at the top right corner of XL Designer 2 plate?" on their IG account. No reply. So I asked the same question again. Yet no reply. OK, I'm seriously considering purchasing and asking a genuine question, but no reply?? You may say "Relax, they don't monitor every comment on IG", but what confused me was that they replied to everyone on that post, but completely ignored mine. 

AliExpressからのカラフルなスタンパーヘッドが届いた日に、もう1つDRK Nailsからの初オーダーも届きました。DRK Nailsはブラジルベースのプレート会社でポリッシュやスタンピングツール類も販売しています。かなり前から目を付けていた会社なのですが、1月末にリリースされたXLデザイナープレートを見た瞬間「これは買わねば」と思い、初オーダーに至ります。

実際にオーダーする前に、インスタグラムで質問をしてみました。初オーダーになるので、このXLプレート上の柄のサイズがどんな感じなのかを知りたいと思い、「XLデザイナー2プレートの右上のドラゴンの大きさを教えてもらえますか?」とコメントを残しました。返事なし。見逃したかな?と思い同じ質問を再度投げる。やっぱり返事なし。んんん・・・真剣に購入を考えた上での質問なんだけど返事がないとはこれいかに??「IGでのコメントを全部確認できるわけじゃないでしょ」と言う人もいるかもしれませんが、腑に落ちないのがそのポストの他のコメントにはすべて返信しているのに、私の2回の質問は完全スルー。

So I went to their website and contacted from there, asking the same question. I also added that I wasn't happy that my questions were ignored on IG. I got prompt reply from the owner Katia with the answer to my question (the dragon is 1 x 1 inch) and an apology. She told me she would make sure that no questions are left unanswered on their account. I was so relieved to get a reply! I was so desperate to get their plates, but wouldn't want to if customer service is not great. As I said before, I get lots of comments from my readers and YouTube subscribers that they bought those plates I use after watching my videos. I certainly don't want to use a plate when the plate company doesn't care about their customers. 

Anyway, this is how the order went:
  • Jan 29th : Paid
  • Feb 6th : Dispatched with tracking
  • Feb 20th : Arrived
Because I placed an order as soon as the new Designer plates were released, they must have had a massive order as it took a week for them to actually ship. After dispatch, it took 2 weeks to reach me. Let's have a look at what I've got.

そこでWebサイトに行ってそこからメールを送り、同じ質問をしました。同時に、IGで質問を無視されたんですがいただけないですね、という点も付け加えました。するとオーナーのKatiaさんからすばやい返信があり、ドラゴンは1x1インチであることとお詫びの言葉が付け加えられていました。IGを管理しているのは見習いの人だそうで、質問は見逃さないよう指導するとおっしゃっていました。 返事が来て本当にホッとしましたよ。。。プレートはどうしても欲しい、でもカスタマーサービスが悪ければ買いたくないと思っていたので。前にも言ったと思いますが、「動画見て同じプレート買ったよ!」と言われることが多いので、お客さんを大事にしない会社のプレートは使いたくないですからね。

まあそんなことがありつつ、注文から到着まではこんな感じ。
  • 1/29 : 支払い
  • 2/6 : 追跡番号付きで発送
  • 2/20 : 到着
新しいデザイナープレートのリリースとほぼ同時に買ったこともあり、注文が殺到したんでしょう。支払いから発送までに1週間かかっています。発送から到着までは2週間。そして届いたのがこちら。


This is how the order came in. Actual plates wrapped in decorative wrapping, business cards and invoice.

こんな感じで届きました。綺麗な包装紙にくるまれたプレートと名詞とインボイス。


Inside the decorative wrapping, my plates were sandwiched between thin cardboard papers.

綺麗な包装紙の中身はこんな感じ。薄い段ボール紙でプレートが挟まれています。


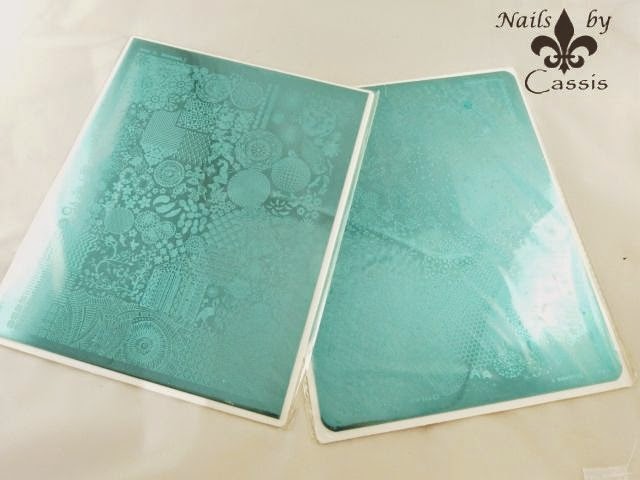
I bought 2 XL Designer plates, Designer 1 and 2. Each has plastic backing, and the plate size (not including the plastic part) is 20.9cm x 16.5cm. 

今回、XL Designerプレート2枚(Designer 1と2)を買いました。プレートはプラスチックの台が付いており、台を含まないプレートのみのサイズは20.9cm x 16.5cm。


I heard some girls saying their plates came bent. I looked at mine carefully and noticed that the bottom corner of one plate is slightly bent and lifted from plastic backing. It doesn't affect the stamp so I wouldn't worry, but I feel they should protect the plates with thicker cardboard papers.

プレートが折れ曲がって届いた!と聞いたことがあったので、私の2枚をじっくり見てみました。すると、1枚のプレートの左下部分がかすかに曲がっていて、プラスチックの台から浮き上がっていました。スタンプには影響なので気にしませんが、もう少し厚めの段ボールでくるんだ方がいいんじゃないかと。


This is XL Designer 1. Sorry the photo is on a bit of an angle. I love this buffet type plate that gives you endless possibilities.

これがXL Designer 1。写真撮るのが難しくてちょっと斜めっててすみません。こういう無限の可能性が広がるバフェットタイプのプレート好きです。


And here is XL Designer 2. See the dragon at the right corner? You can see bigger stamps and smaller stamps in between - the plate is so full of images and no vacant space. LOVE!


そしてこちらが新発売のXL Designer 2。右上にあるのが例のドラゴン。大き目の柄の間に隙間なく敷き詰められた小さめの柄。所狭しと柄が盛り込まれているこのプレート。いいよいいよ~(゚∀゚)


Test stamp on XL Designer 1. Polishes are Mundo de Uñas Orange, Mexican Pink, Purple, and Blue. I used my beloved discontinued MoYou London XL round stamper, but with MdU Mexican Pink I switched to my pink stamper head from AliExpress because it's a stamper stainer.

You can see that I did the top left image twice. It looks patchy, so I'll come back to that image and two bottom left images later.

XL Designer 1のテストスタンプ。使用ポリッシュはMundo de Uñas Orange、Mexican Pink、Purple、Blue。スタンパーはMoYou London XL丸スタンパー(廃盤)ですが、Mexican Pinkだけはスタンパーに染みが付くのでAliExpressのピンクスタンパーヘッドを使用。

左上の柄がちょっと微妙だったので2回スタンプしました。左下の2つもかすれているので、後ほど再スタンプしたものを載せます。


Look at the fine line flowers near the centre! Impressive.

中央付近の細い線のお花なんてよく線が拾えてますね。


So the bottom row is the repetition of some of the images that didn't stamp well at my first attempt. They look great now except for the far left and far right (same image). Not the fault on the plate, I just have to adjust the way I scrape on this one.

一番下の行は最初のテストできちんとスタンプされなかった柄を色を変えてやってみたもの。右端と左端(同じ柄)以外は良好。この手の柄、他のプレートでも持っていますがいつもちょっと苦労します。プレートのせいというよりも、スクレイプの仕方を変えて調整する必要がある柄です。


Onto XL Designer 2. Yeeees! Look at the ornamental images on the first row. And the dragon...such detail!

お次はXL Designer 2。上段の柄とかもう鼻血出るわ(*´д`*)ドラゴンのディテールも凄いよ~!


Those aztec images are unique in my collection, and I'm so excited about those hypnotic stamps.

アステカ風の柄もユニークだし、目の錯覚系(上段右から2つ目と中段右端)なんかもずっと欲しかったので嬉しい。


Another winners at the bottom row! Those birds, flowers, and the ornamental image are just so beautiful.

下段の柄、全部好き(*´д`*)。鳥もお花も一番左の柄も豪奢でありますなぁ。


Their geometric stamps are simply superb. I don't know why but my MdU Mexical Pink doesn't stamp very well compared to other colours, so I repeated the same image with Purple (far right at the bottom row).

このブランドの幾何学模様系のスタンプは本当に秀逸。なぜかMundoのMexican Pinkが他のと比べてかすれやすいので、一番右下の柄はPurpleでやり直しています。

My thought on these plates? I'm so glad I got these. The quality is superb and they have beautiful images including both basic and unique. One plate cost me $22, and the shipping for 2 XL plates is $13.60. So all up the order cost me $57.60. My Paypal account is Japanese and the conversion rate between US dollar and Japanese yen wasn't great for me at that time, so it ended up with a bit expensive purchase. But I know I will make good use out of these plates. I can't wait to use them!

さて購入の感想。いろいろありましたがやっぱり買ってよかったです。彫りのミスなんかも見当たらず、品質は良好。柄が所狭しとプレートに敷き詰められていて、ベーシックな柄もあればユニークなものもありバランスが良い。プレート1枚$22で2枚の送料は$13.60でした。なので合計$57.60。私のPaypalアカウントは日本のものなのですが、そのときの米ドル⇔日本円の為替レートがかなり悪かったので6937円という高めの買い物になってしまいました。それでもプレート見たらそんなことどうでもいいと思えましたね。使うのが楽しみです。

にほんブログ村 美容ブログ 自爪ネイルへ