
Reverse Leadlight Stamping with EdM 05
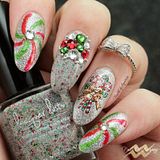
Have you heard of 'reverse leadlight' technique? Not sure if this is a proper term but I know some stampers use this for the technique where you start with black base and stamp with white, then use sheer jelly polishes to colour the white part.For today's mani, I started off with one coat black franken and stamped with Sinful Colors Snow Me White using EdM 05 plate. Then using a dotting tool, I coloured the white parts with the jellies I made in this post. I finished off with Seche Vite. I have a short Instagram video to show you how.
I used the dotting tool for the video, but it's totally ok to use the polish brush. It was actually quicker that way! I like the colourful look of this mani, but next time I will probably add some sparkles.
以前Leadlightテクニックについて説明したと思いますが、今回はその変形版をご紹介。Reverse Leadlightと呼んでいる人もいますが、確立した名前は今のところありません。一般的なLeadlightは白ベースで開始、黒でスタンプして色付け、という手順ですが、このReverse Leadlightは黒ベースで開始、白でスタンプして色付けです。まず出来上がりはこちら。
 |
| Finished product with Seche Vite |
ベースはone coatブラック。Sinful Colors Snow Me Whiteを使用してEdM 05プレートの薔薇柄をスタンプ。その後、ここで作ったジェリーを使って色付けし、Seche Viteでフィニッシュ。例のごとくインスタグラム用動画も付けましたのでご興味があれば。
 |
| This time I didn't add any sparkles. I really should have! |
今回はキラキラグリッターを足しませんでした。なのでちょっと物足りないですかね(;▽;)
 |
| I mixed the colours too much on the middle finger |
インスタ動画は中指でデモをしたのですが、色が混ざりすぎてしまってちょっと汚い印象ですね。。。動画ではドット棒を使っていますが、ブラシでやった方が普通に速いし綺麗に仕上がる気がします。
 |
| My leadlight skills need more improvement! |
そんなわけで色々と反省点の多いネイルとなってしまいました。Reverse Leadlight、もうちょっと修業します(`・ω・´)キリッ
それではインスタ動画をどうぞ。最近はネイルが仕上がってから動画を改めて撮るのではなく、最初から動画を撮るようにしています。ネイル画像アップしてから「チュートリアル!」とか言われるともう一度やるのが面倒なのでね・・・^_^;


8 comments
Write commentsThis is GORGEOUS! You are too hard on yourself sweetie! The thing that makes LeadLighting great, IMHO, is that you can't mess it up. The blending of the colors just adds to the beauty!
ReplyAww you're far too kind, Karolyn! You're totally right about colours blending too, that makes leadlighting unique and beautiful <3 Thank you for your sweet and encouraging comment, lovely!
ReplyLove the look ! It is really pretty :)
ReplyThanks sweetie! So glad you like it ^_^
Replyはじめまして キャサリンと申します
Reply時どき拝見させていただいておりました
初めてのコメントです
とても素敵なネイルですね
最近めっきりポリッシュ派なので
このスタンプ気になります!!
ただ海外サイトだし
英語は読み書きできないので
ちょっと尻込みしています
東京の新大久保には
韓国製のが店舗販売しているようですが
MoYouの方がオシャレなプレートが
ありそうです!!
キャサリンさん、はじめまして!コメントありがとうございます^_^
Replyスタンプ興味持ってくださって嬉しいです!最近はポリッシュ派とのことですが、ジェルでもスタンプしている方たくさんいますよ(゚∀゚) ジェルの方がスタンプ失敗したときにやり直しやすいかもしれません♪
新大久保のお店はKonadだと思いますが、Konadはスタンピング発祥の会社なんですよ♪ でも今一番人気なのはやっぱりMoYou Londonです(MoYou Nailsという会社もありますが別会社です)。プレートの種類が圧倒的でクオリティは最高レベルです。
最近、15ポンド(2600円ぐらい)で送料無料(たぶん期間限定)というのを始めたのでためしにやってみては ^_^ アカウントを作成すると1回限り利用できる15%オフのコードがもらえるそうなので、そちらも合わせるとお得かと♪
This is stunning. I have a hard time with making decals, etc. I am going to try this method. Thanks for the video. it was extremely helpful.
ReplyGlad the video was helpful, Debra! Decal making is a bit tricky till you get the hang of it, but this leadlight is quick & easy and still gives a nice effect ^_^
Reply