Showing posts with label Sally Hansen. Show all posts

Cupcake & Ice Cream Mani

8th of this month was Chinese New Year, and 14th is Valentine's Day. I've already done manis for each theme (here and here), so what should I create next? I'm still uninspired and couldn't think of anything, so I decided to go through my plate collection and spotted a cute plate that I've been wanting to use for a long time - hehe 055.

For this mani, I started off with 4 different colours, yellow, blue, pink & purple. Then I stamped a candy swirl pattern on MoYou London Princess 12 with Messy Mansion Chalk (white) for all nails. I used clear jelly stamper from Harunouta to stamp the swirl in the centre. Then I made stamping decals out of cupcakes & ice cream patterns on hehe 055 using Ya Qin An Chocolate (both available from Harunouta), coloured in with the same 4 colours used for base plus turquoise. Finished off with Glisten & Glow HK Girl topcoat, and mattified with Essie Matte About You afterwards.

I first tried to do the swirl using nail vinyls instead of stamps, but it got a bit lumpy and didn't like how it came out. I hardly reach for symmetric stamp like this because I suck at stamping in the centre, but clear stamper changed all that.

I don't know why though, but I really struggled in creating this mani. When I tried to stamp the swirl with clear stamper, white polish didn't adhere to my nails well. I tried MdU White, Ya Qin An White, Pueen Pure White, and finally Messy Mansion Chalk. This Messy Mansion did the best job. I painted my base colours in the morning before work, and did stamping at lunch break, so it could be because the base was really really dry. I also pressed too hard when transferring the image onto my nails, so the swirls got quite wavy. I don't know how many times I had to stop recording to redo the stamps, and felt really exhausted by the time I finish this mani. Ah well, at least it turned the way I wanted.

1週間の出張から戻り、久々のネイル作成。旧正月ネイルバレンタインネイルもやったし、次は何しよう~?と思いつつプレートコレクションを眺めていると、ずっと前から使いたかった可愛いプレートを発見。出来上がりはこちら。
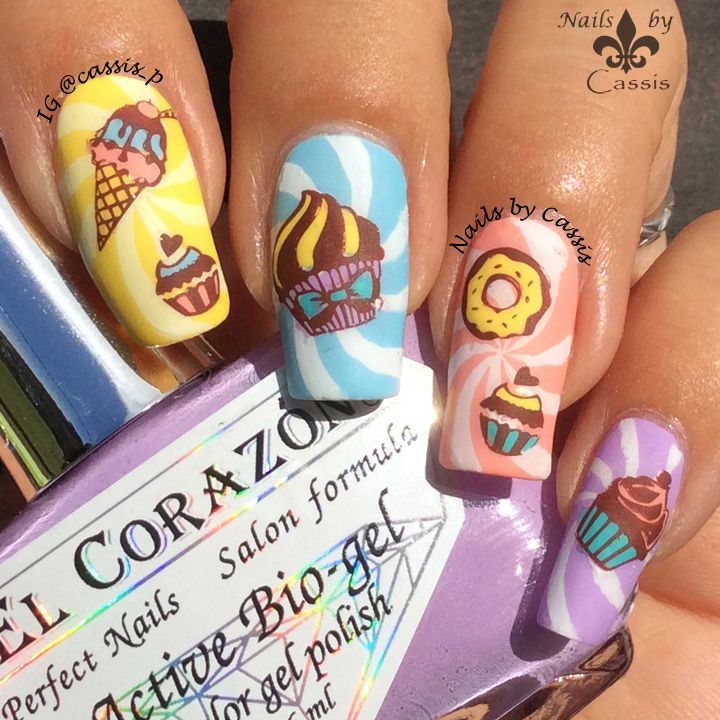
Finished product, mattified with Essie Matte About You

ベースは4色(黄色、青、ピンク、紫)。MoYou London Princess 12プレートのcandy swirl(ロリポップ柄?渦巻き柄?)をMessy Mansion Chalk(白)でスタンプ。爪の中央にスタンプするため、ここでは春の歌のクリアスタンパーを使っています。次にhehe 055プレートのカップケーキやアイスクリーム柄をYa Qin An Chocolate(どちらも春の歌より)でスタンプし、上の4色とターコイスを使って色付けしてdecal化。それぞれの爪に乗せる。Glisten & Glow HK Girlトップコートを塗ってからEssie Matte About Youでマット化。

使用ポリッシュはこちら。
Polishes used

左から、

Elcorazon No. 423/278 Cream
Elcorazon No. 423/279 Cream
Elcorazon No. 423/292 Cream
BC Co. shade #12
Sally Hansen Mellow Yellow
Messy Mansion Chalk
Ya Qin An Chocolate
It was a bit hard to stamp the full-size image with clear jelly stamper, because it's not squishy enough to accommodate my curvy nails. I didn't film the process, but I had to draw the missing lines with detail brush

このネイル、私がよくやる「ベーススタンプ+decal」の何の変哲もないネイルなのですが、何故かとても苦労しました。渦巻き柄を白でスタンプするときにポリッシュが爪に張り付いてくれず、何度やり直したことかorz・・・ MdU White、Ya Qin An White、Pueen Pure Whiteと試して、最後に使ったMessy Mansion Chalkでどうにかこうにかスタンプ出来たという感じ。ベースのポリッシュは早朝に塗っておいてスタンピングは昼休みにやったのですが、ベースが乾きすぎていたのが原因なんだろうか?そのときの爪のコンディションとクリアスタンパーとの相性なのかなぁ。しかも柄を爪全体に転写するために強く押してしまい、渦巻きが波打ってしまったよ(-_-)チーン
This hehe plate also has some cute toy images. I'll use them for another occasion :)

スタンプに失敗→カメラを止めて動画を消す→スタンプをセロテープで剥がす or ベースをやり直し・・というのを5回以上はやりました。しかも、今回はなぜかdecal化したスイーツ柄のスタンプまでてこずりました。「ピックアップできない柄はない」と思えるほど信頼している神スタンパー、Messy Mansion Soft Pinkでやってもですよ(-_-) heheプレートの彫りがやや浅めなのに加えて、Ya Qin An Chocolateの乾きが少し早いのと、40度近い気温の中扇風機をかけて作業していたという作業条件もあったのかもしれません。気温が高すぎてdecalにも気泡が入ってたしなぁ。

そんなわけで完成したときには疲労困憊。まぁまぁ、でも出来上がってホッとしましたよ。久々にマット化してみましたが、この方がなんとなく美味しそうですね。


Exotic Arch Stamping Mani

June 6th Update: I replaced the video at the end of this post with YouTube version.

Another UberChic mani for you. I've keeping my eyes on some chic and ornamental patterns that are scattered around on their plates, and I couldn't resist using few of them.

For this mani, I started off with Sally Hansen Silk Onyx for all my nails, and stamped a damask pattern from UberChic 1-02 plate with Mundo de Uñas Black for thumb, middle & ring finger. I topcoated, and placed two sets of straight tape I bought from What's Up Nail Art Store, and painted China Glaze HeliYum (pink) between these tapes, and peeled them off immediately. Then I made a stamping decal from an arch-looking pattern from UberChic 3-01 using Mundo de Uñas Gold, and placed it onto pink part. I topped with pink rhinestone from MoYou London, then finished off with Glisten & Glow HK Girl topcoat. For pointer, I stamped the same damask pattern with Mundo de Uñas Gold, and for pinkie, I simply added a pink rhinestone.

I was going for subtle stamping for base, but it ended up being too subtle. I used this Silk Onyx & MdU Black combo on this Christmas mani, and I really liked the effect, but when I topcoated, Silk Onyx turned too dark. Duh! I also couldn't make up my mind about what designs/colours to go for pointer and pinkie, but it ended up like this. I wasn't too happy with the result and was going to redo these two nails, but I started to like them as I took photos. At least I'm quite proud that the stamping on pointer came out pretty neat and straight!

6/6更新:記事最後の動画をYouTube版に置き換えました。 

UberChicのプレートを使ったネイル、第2弾。出来上がりはこちら。

Finished product, with Glisten & Glow HK Girl topcoat. In the sun

ベースは全爪Sally Hansen Silk Onyx。親指、中指、薬指にUberChic 1-02プレートのダマスク柄をMundo de Uñas Blackでスタンプ。いったんトップコートし、What's Up Nail Art Storeで買ったストレートテープを2つ置いてその間をChina Glaze HeliYum (ピンク)で塗り、すぐにテープを剥がす。次に、UberChic 3-01のアーチのような柄をMundo de Uñas Goldでスタンプしてdecalを作成し、ピンクの部分に置く。MoYou Londonのラインストーンウィールからピンクの滴形ラインストーンを乗せてGlisten & Glow HK Girlトップコートで仕上げ。人差し指は同じダマスク柄をMundo de Uñas Goldでスタンプしてラインストーンを乗せ、小指にはラインストーンのみ。

使用ポリッシュはこちら。

Polishes used

左から、

Sally Hansen Silk Onyx
China Glaze HeliYum
Mundo de Uñas Black
Mundo de Uñas Gold

Someone commented on my Instagram that this has exotic look, thus I named it 'Exotic Arch' :)

このネイル、久々に大迷走しました。ベースのSilk Onyxは濃いグレーのサテン(セミマット)なのですが、これが黒スタンプ後にトップコートした時点で黒々と色が変化してベースのダマスクスタンプがほとんど見えない状態に・・。Silk Onyxと黒スタンプの組み合わせは以前こちらのクリスマスネイルで使ったことがあって、このさりげないエフェクトが好きだったのですが、トップコートしちゃうとダメですね(-_-) いや、ポリッシュ自体はトップコートしても綺麗なんですが、黒スタンプと合わせるのはイマイチかな。動画を撮りながらも、「あ~こりゃ失敗だわ」なんて思いながら進めていました。さらに人差し指と小指のデザインと色が決まらず、中指の動画撮り終えた後も「ピンク一色にするか」「黒にピンクスタンプにするのか」、頭の中で喧々諤々(ケンケンガクガク)の議論を繰り広げた挙句にこんな風になりました。バランス悪~・・・と思いつつ写真撮った後に少しやり直そうかと思ったのですが、不思議と写真撮っているうちに「あれ?意外といいじゃん」と思えるようになってきましたよ(笑。

I was worried that the arch on the pink part gets too thick, but after topcoat it levelled out and
I hardly noticed the thickness

アーチスタンプの載っているピンクの部分は他の部分より少し厚いので、ボコッとした感じになるかな~と思いきや、トップコートを厚めに塗ったらほとんど段差が感じられなくなりました。ちなみにこのピンクの部分ですが、このぐらい太目に塗っておくのが◎です。これより幅が狭いと金のアーチの裏に隠れて目立たなくなります。黒・金のシックな組み合わせに派手ピンクがいいアクセントになっているんじゃないかと。


にほんブログ村 美容ブログ 自爪ネイルへ

Red x Yellow Abstract Mani

May 20th Update: I replaced the video at the end of this post with YouTube version.

After we settled in our new home, there are lots of things that keep me occupied - 10 chickens given by the previous house owner, big yard and the vege garden to look after, interior decorations, etc etc, leaving me less time for my nails. But yesterday I finally sat down and spent some times thinking about nail designs and actually painting my nails. It felt like forever ago that I last did nail art, so I thought I'd do something fun and hassle-free.

For this mani, I started off with JOSS Will Not (white) for thumb, middle finger, and ring finger, and stamped a geometric pattern from Born Pretty BP-41 with Mundo de Uñas Black. Then, I stamped a triangle pattern from Born Pretty BP-L006, painted JOSS Dazzling (red) and Sally Hansen Mellow Yellow (yellow) over the stamp, and let dry. Once dry, I peeled it off the stamper, cut in random triangle shape, and placed both the red and yellow triangles on my nails, overlapping a bit. I painted the same red and yellow polishes for pointer and pinkie respectively, and topped with square black studs I bought from eBay. I topcoated all nails with Glisten & Glow HK Girl topcoat.

I wasn't sure if I like it or not, but it has started to grow on me. I love this type of stamping that doesn't need precise placement. It's hassle-free, yet fun to create. Hope my lovely readers like it too!

5/20更新:記事最後の動画をYouTube版に置き換えました。

新居に引っ越しして2週間ほどが経ちました。全オーナーから譲り受けた10匹の鶏の世話や格段に広くなった庭の手入れ、家庭菜園やら家の内装やらで頭が一杯でなかなか爪に意識が回りませんでしたが、昨日ようやくネイルのデザインを考える時間を取りました。久しぶりなのでリハビリも兼ねて面倒じゃないのにしようと思って作ったネイルがこちら。

Finished product, with Glisten & Glow HK Girl topcoat. A cloudy day's shot

親指、中指、薬指のベースはJOSS Will Not (白)。Born Pretty BP-41から幾何学模様をMundo de Uñas Blackで爪にスタンプ。次に、Born Pretty BP-L006の三角柄を同じくMundo de Uñas Blackでスタンプし、その上にJOSS Dazzling (赤)とSally Hansen Mellow Yellow (黄色)を塗って乾かす。乾いたらスタンパーから剥がし、ランダムな大きさの赤と黄色の三角形に切り取り、少し重なるように爪に配置。人差し指と小指には同じ赤と黄色のポリッシュを塗り、eBayで買った黒の四角スタッズを配置。仕上げはGlisten & Glow HK Girlトップコート。

使用ポリッシュはこちら。

Polishes used

左から、

JOSS Will Not
JOSS Dazzling
Sally Hansen Mellow Yellow
Mundo de Uñas Black

I think this is the first time I did overlapping decals like this. I was a bit worried whether it will be
too bumpy, but it wasn't really. Maybe I should have applied the red one thicker as the base stamp
is showing through

完璧に真っ直ぐスタンプしないといけない柄と違って、こういうランダムに切ってランダムに配置すればいいネイルは楽でいいですね。リハビリネイルとしては最適。しかも工作みたいでやってて楽しいです。こういう風にdecalを重ねるのは確か初めてでしたが、分厚くなるかな?と思いきやそうでもなかったです。赤のdecalのベースが薄ら透けているので、もうちょい厚く塗ってもよかったかな。

These two stamps are different images from different plates, 
but I'm surprised myself that they blend together quite well

今回使った柄は別々の柄なんですが、目の錯覚なのか融合しているようにも見えますね。小難しいことをしたわけではないのですが、インスタでは「クリエイティブだね!」とのコメントをたくさんいただきました。一見平凡な柄からちょっと変わったデザインを生み出すのは楽しいです。いつもこういうネイルが思いつくといいんだけどな~。


にほんブログ村 美容ブログ 自爪ネイルへ

New Year's Sunrise Stamping Mani

Happy New Year! Last year was an incredible year for me as I got to connect with so many nail artists, opened Instagram account and gained 14K followers, and last but not least, have my own YouTube channel! It was such a busy year but fun. 

This year I'm thinking of slowing down just a little bit. I have a full time job (I'm not a nail tech, mind you), and most of my time outside work was dedicated to coming up with nail designs, creating them, filming the process as I create manis, writing up blog posts in 2 languages, and editing video tutorials. And oh yes, I do most of the housework too! It was like having two full time jobs. It's sometimes quite exhausting and I know I can't keep this pace up very long. I love seeing my Instagram account and YouTube channel grow, but that's not the purpose of my nail painting. 

So this is one of my new year resolutions - slow down to my comfortable pace. Hopefully this will also give me time to practice what I'm not good at, freehand, watermarble, etc. I looked back on my last year's new year resolutions on this post (although I only wrote this in Japanese) and it says:

1. Try not to buy too many polishes
2. Use all the untried
3. Do some frankening

At that time, I had 120 polishes but now.... about 240!! Haha! Well, I really need to slow down on this too. I have unbelievable number of untried also. *_* At least I got to franken quite a few polishes though!

Well, enough talk. Let's have a look at today's mani, shall we? I posted this mani on my Instagram on New Year's eve. In Japan, watching sunrise on New Year's Day is thought to bring good luck, so I created this mani for my friends and followers who may miss out on a real thing. 

I started off with white base, and applied PVA glue around my cuticles and placed masking tape on about 1/3 of each nail near the tip. I then did sponge gradient using pinkish red, orange and yellow, peeled off the glue and masking tape. I painted Sinful Colors Cinderella (light blue) near the tip and the base is done. Next, I made stamping decal using Torii gate image from Dashica Infinity 81 stamped with Mundo de Uñas Black, and placed it onto middle finger. I added birds from MoYou London Kitty 11 and painted the sunrise image in red and handpainted sun reflection in water using this detail brush from Born Pretty Store.

For pointer and ring finger, after the gradient, I painted A England Dancing With Nureyev near the tip and stamped trees and branches from MoYou London Suki 02 (ring finger) and Chez Delaney Asiatique 001 (pointer). I added some white dots on the trees and branches to represent snow. For pinkie, I added Kanji stamp from Chez Delaney Asiatique 001 plate, meaning 'happiness'.

This took me few hours to create but I'm so happy with the result. I have seen so many NYE manis featuring fireworks, but this is so different and I'm glad to share a piece of Japanese tradition in my mani. 

明けましておめでとうございます。昨年は私にとって大きな変化のあった年でした。たくさんのネイルアーティストさんたちと知り合うことができ、インスタグラムの開設に続いて自分のYouTubeチャンネルを持つまでになりました。年初には思いもよらなかったことです。忙しく、実りの多い1年でした。

新しい年を迎えて考えたのは、もう少し自分らしいペースで行こうかな、ということ。インスタを始めてから、毎日のようにネイルをアップされている皆さんのポストにつられて、自分のネイルチェンジのペースも少し早まった気がします。フルタイムの仕事と家事に加えて、ネイルデザインを考えて動画を撮って編集して、2か国語でブログも書いてインスタとYouTubeにアップ・・・という作業は思いのほか重労働で時間もかかります。他に自由になる時間はほとんど残りません。他のネイルアーティストさんたちのところにゆっくりお邪魔する時間もままなりません。インスタのフォロワーやYouTubeの登録者が増えていくのを見るのは楽しいですが、それが目的ではなかったはずです。

なので、今年は自分らしいペースで行こう、というのが新年の抱負の1つ。余った時間で苦手な手描きやウォーターマーブルの練習もしていきたいと思います。ちなみに昨年の新年の抱負がこの記事に書いてありますね。いわく、

一、新しいポリッシュの購入はほどほどに
二、未使用ポリッシュをゼロにしよう
三、自作に挑戦しよう

ふっ・・・・・。ちょうど1年前はポリッシュ所持数120本だった模様。この前数えたら240本あったよ・・・(フランケン、スタンピングポリッシュ、トップコート類除く)。それに伴い未使用ポリッシュも激増。自作(=フランケン)だけ唯一頑張った点ですかね。今年も引き続き、「せめてHelmer1つに収まる程度のポリッシュ数に留めよう」という抱負を掲げたいと思います。あとは先ほど言ったように苦手分野を頑張っていきたいと思います。

では今日のネイル。インスタに大晦日にアップしたネイルです。出来上がりはこちら。

Finished product, with Essence Better than Gelnails Top coat. Outdoor shot

白ベースでスタート。まずPVAグルーをキューティクル付近に塗っておき、爪先1/3程度をマスキングテープで隠しておく。三角スポンジにピンク寄りの赤、オレンジ、黄色の3色を塗り、爪にぽんぽんと数回乗せてグラデーション作成。グルーとマスキングテープを剥がして爪先にSinful Colors Cinderella(薄い青)を塗ったらベースは完成。次にDashica Infinity 81の鳥居柄をMundo de Uñas Blackでスタンプして中指に配置。その上にMoYou London Kitty 11から鳥をスタンプし、朝日を赤で塗りつぶして水面に朝日の反射を手描き。この時に使用したのは「春の歌」さんのこちらのブラシです。

人差し指と薬指はグラデーション後、A-England Dancing With Nureyevを爪先付近に斜めに塗り、その上にMoYou London Suki 02 (薬指)とChez Delaney Asiatique 001 (人差し指)から木や枝を追加。その上に雪を表す点をドット棒で追加。小指はChez Delaney Asiatique 001から「幸福」の文字をスタンプ。仕上げはNail of This WeekのChiroさんからいただいたEssence Better than Gelnailsトップコート。

使用ポリッシュはこちら。

Polish used

上段左から、

Layla Softtouch Effect 05 (for gradient)
Ciate hopscotch (for gradient)
Sally Hansen Mellow Yellow (for gradient)
Sinful Colors Cinderella
A-England Dancing With Nureyev

下段左から、

Mundo de Uñas Reddish (for sunrise & reflection in water)
Sally Hansen White On
Mundo de Uñas Black

This is A-England Dancing With Nureyev. Used for the rocks and ground.
Look how sparkly it looks in the sun!

テーマは言わずもがなですが「初日の出」です。日本では初日の出を見るとご利益があるといわれていることをインスタに書いて、「実際の初日の出が見られないかもしれない人のために作ったよ!」と一言添えてアップしました。すると「そんないわれがあるなんて知らなかった、日本の伝統を教えてくれてありがとう」とか「実際の初日の出が見られなかったらこのネイル見させてもらうね!」などなど、反応をいただけてこちらまで嬉しくなりました。漢字スタンプもベタではありますが、これを見た皆さんに幸福が訪れますように、の意味を込めました。

Can you imagine yourself watching sunrise coming up behind Torii gate on a frosty day,
where all you can hear is birds fluttering in the distance?

ちなみにこのキラキラしている青いポリッシュはA-England Dancing With Nureyev。これとSinful Cinderellaの組み合わせってどこかで見ませんでしたっけ?w またチョイ役で使ってしまったよ(゚∀゚;)

というわけで新年第1弾の初日の出ネイルでした。ニューイヤーネイルって海外では花火が定番なんですが、そもそも花火って日本人の感覚では夏の風物詩ですよね。シドニーの大晦日花火のネイルもやりたかったのですが、今回は「和」で攻めてみました。出来上がりに満足です。


にほんブログ村 美容ブログ 自爪ネイルへ

Mint & Chocolate Mani

Dec 23rd Update: I replaced the video at the end of this post with YouTube version.

Now that I finished writing up the Dashica haul, I can finally have a play with my Infinity plates! I felt like using Mint & Chocolate colour combo, and this is what I created.

For this mani, I started off with Sinful Colors Mint Apple and stamped a Celtic-like pattern from Dashica Infinity 70 with Mundo de Uñas Cafe for middle finger, ring finger and thumb. I applied topcoat before placing regular chevron tape from What's Up Nail Art Store (so it wouldn't peel off the stamp), then painted Sally Hansen Mint Sorbet toward the tip of my nails. Then I added three SS3 black rhinestones I bought from this online shop in Japan. For pointer and pinkie, I simply painted with Dior Dune.

This is my first time going with Mint x Chocolate combo, but I quite like it! Also my first time using Mundo Cafe. I tend to use Black too often, but Cafe give such a soft and yummy look. Will definitely use this more often.

12/23更新:記事最後の動画をYouTube版に置き換えました。

Dashicaの買い物記事をようやく書き終えたので、Infinityプレートを使ったネイルを早速作ってみました。「Infinityのプレートを使って」「色はチョコミントで」「decal以外の方法で」できるネイルは何かないかな~と思って考えたのがこちら。

Finished product, with Face of Australia Aussie Night topcoat

中指、薬指、親指のベースはSinful Colors Mint Apple。Dashica Infinity 70のケルト文様のような柄をMundo de Uñas Cafeでスタンプ。一度トップコートしてからWhat's Up Nail Art Storeで買ったChevronテープを爪に置き、上からSally Hansen Mint Sorbetを塗り重ねる。こちらのお店で買ったSS3サイズのストーンを3つ置いてFace of Australia Aussie Nightトップコートで仕上げ。人差し指と小指はDior Duneを2度塗り。

使用ポリッシュはこちら。

Polishes used

左から、

Sinful Colors Mint Apple
Sally Hansen Mint Sorbet
Dior Dune
Mundo de Uñas Cafe

I got so many comments on Instagram saying this mani looks yummy :D

チョコとミント色を一緒に使うのは実は初めてでした。というか、このDior使ったのいつ以来だろう?というのと、Mundo Cafeを使ったのも初めてでした。黒スタンプより柔らかい印象になっていいですな~。

Pitty the stamp is a bit crooked, otherwise I like it

インスタにこのネイルを載せたら、「美味しそう」「チョコミントアイスが食べたくなった」「チョコ食べてくる」とか食べ物連想の反応をたくさんいただきました。今度この色の組み合わせで食べ物スタンプしてみようかな?

では最後に動画をどうぞ。ちなみに、Chevronテープを置く前にトップコートを塗っているのは、下のスタンプが剥がれないようにするためです。ここと最後の仕上げには今回Face of Australia Aussie Nightというベースコート兼トップコートを使いました。特に意味はありません。手近にあったから。塗りたてはまあまあですが、時間が経つと艶がなくなって爪の表面がボコッとしてきます。でも厚みが出ないので仕上げではなく途中に挟むトップコートとしては使えそうです。

それから今回のスタンプ、いつもよりMundoの乾きがやや早いと感じました。いつもはカメラのフォーカスを調整したり柄が真っ直ぐスタンプされるよう一呼吸置いてスタンプするのですが、今回それをやったら爪に乗せたときに転写されず、スタンパー上で乾いてしまっていました。Mundo Cafeの特徴なのか、それともベースカラーの表面が乾きすぎてたのかは不明。なので、動画にはないですがスタンプ前にもトップコートして柄が転写されるようにしています。


にほんブログ村 美容ブログ 自爪ネイルへ

31DC2014 - Watermarble: My First Successful Water Marble!

The most dreadful prompt for 31DC2014 has come - watermarble. Since I got into nail art last year, I have never ever succeeded in watermarbling. I have read and watched quite a bit of water marble tips and tutorials, but it just didn't work for me.

Then only recently I read two very helpful blog posts about watermarbling again. One is this post by Cathy at More Nail Polish, and the other is this post by my water marble guru, Coppi. I know Cathy has been having trouble with watermarbling for a long time, so I got so excited to see her perfect watermarble manis and read about her helpful tips.

I don't know why but I had a very good feeling about using Sally Hansen Xtreme wear for this prompt, and lo and behold, it did work!! I think my problem was that the water was a bit too warm. I also used to use sheer polishes for watermarbling (I read somewhere that they work better), but this time I used quite opaque Sally Hansen cremes. I'll see if other polish brand works as well, seeing that I got the right water temperature.

This got me motivated to do more watermarble manis. I wanna try flower design one day! I would like to thank both Cathy and Coppi for their helpful blog posts!

今日の31DC2014チャレンジのお題。来たよ、来てしまったよ・・・・「ウォーターマーブル」。実はこのブログでの初めてのネイルアートが無謀にもウォーターマーブルだったんです。見事に失敗してるのでリンクは貼りませんがw

それ以降、何度もWM挑戦しては撃沈の日々。3滴ぐらい落としたあたりからもうポリッシュが広がっていかないんですよね。もう無理!と思いかけたところに降臨した2つのブログ記事。

1つ目は「爪爪爪 -THE趣味ネイル」のこっぴさんのこちらの記事。2つ目は「More Nail Polish」のCathyさんのこちらの記事。こっぴさんは言わずと知れたウォーターマーブルの申し子ですから、一字一句食い入るように読ませていただきました。そしてCathyさんは最近初めてWMに成功されたとのことで、こちらも詳しく成功の秘訣が書かれていました。

この2つの記事を読ませていただいて、またやってみようという気になりました。ちょうどお題がやってきたので挑戦・・・・。そしたらできた・・・できました(;▽;) 3滴以上落としてもポリッシュが広がっていく光景を初めて目にしました(T_T) 出来上がりはこちら。

Finished product with Seche Vite

たぶんこっぴさんぐらいの玄人ウォーターマーブリストから見ると失敗の部類に入るかもしれませんが、個人的には非常に歓喜しました\(^o^)/ WMの水は室温の水を使うといいとCathyさんも書かれていましたが、今まで失敗したのは水がちょっと暖かすぎたのかもしれません。

使用ポリッシュはこちら。

Polish used

Sally Hansen Cherry Red
Sally Hansen Pacific Blue
Sally Hansen Mint Sorbet
Sally Hansen White On

すべてSally Hansenで揃えてみました(゚∀゚) WMにはシアーなポリッシュがいいと以前どこかで読みましたが、割と濃いめのSally Hansenで大丈夫でした。

I painted white first then used 3 other colours for water marbling

こっぴさんも記事の中で書かれていましたが、WMはまず白のベースを塗っておくとその上の色が映えるということだったので、White Onを塗っておき残りの3色でWM。

Showing the thumb also. I actually like the thumb design the best!

親指も入れるとこんな。親指の模様が一番好きかも(゚∀゚)

I went for an easier design this time, but will try flower one day!

WMのデザインは点を中心に集めるお花みたいな模様が一番一般的かと思いますが、なかなか形の良いお花になってくれなかったのでもっと簡単なデザインに落ち着きました。しかもSally Hansenで行く!と決めたので色の選択肢が限られてあまり面白味のないものに・・・^_^; ドット足してやろうかとか、上にスタンプしてやろうかとか、そういう余裕はまったくなくひねりのないネイルですが、私にとっては大きな一歩です。

是非もっともっと練習してお花デザインにも挑戦したいです(゚∀゚) こっぴさん、Cathyさん、参考になる情報をどうもありがとうございました!\(^o^)/


にほんブログ村 美容ブログ 自爪ネイルへ