5th of September was Melissa @never_lacking_lacquer 's birthday, and Mary @dreamymm and Diana @dianavnisselroy gathered a bunch of us nail artists to recreate one of Melissa's designs to do a birthday collage. Mel likes neons and sparkles, so that was the theme for this recreation. I went through Mel's feed on Instagram, and oh my, she's got heaps of fabulous designs to choose from! One of the designs that caught my eyes was a freehand geometric mani she did about 31 weeks ago. I remembered I had a geometric plate that I received from Harunouta a while ago, and decided to use it for this recreation. Thumb, middle finger & ring finger: Base is Picture Polish cherish. I placed two sets of striping tapes horizontally on these nails, and painted Australis Play the game (neon blue) between the tapes. Then I made stamping decals out of two geometric images on BP-77 plate using Ya Qin An Black, and coloured in with gold, black, and white. I placed the decal on these nails and finished off with HK Girl topcoat. Pointer & pinkie: Base is Australis Play the game, and I added two round gold studs. Mel's original design is done by freehand, so this isn't a true-to-original type of recreation, yet I quite like the end result. Recreating other's work is always fun because you can get to create designs or use colour combos that you never come up with otherwise. Hope Mel likes our creations, and happy birthday!!
親指、中指、薬指 : ベースはPicture Polish cherish。ラインテープを爪に水平に2本置き、その間をAustralis Play the game (ネオンブルー) で塗る。BP-77プレートの幾何学模様2つをYa Qin An Blackでスタンプし、金、黒、白で色付けしてdecal作成。爪にdecalを乗せてHK Girlトップコートでフィニッシュ。 人差し指と小指 : ベースはAustralis Play the game。金の丸スタッズを2つ追加してHK Girlトップコートでフィニッシュ。
使用ポリッシュはこちら。
Polishes used
左から、
Picture Polish cherish
Australis Play the game
JOSS More Nail Gold
JOSS Will Not
Ya Qin An Black
This is the birthday collage done by us. Pretty epic don't you think!?
ちなみにこちらが出来上がった誕生日コラージュ。圧巻すぎますね(゚∀゚)
And here is Melissa's original design. Stylish, intricate, and striking!
As I showed you in the previous post, one of the items I received from Harunouta was nail foils. I've never used foils before, but I've been doing a bit of research about how to use them for quite a while now. I've read and watched plenty of tips and tutorials about foils, but the 2 girls I particularly want to thank are Tamira @Lacquer Lockdown and Eleonora @Nail Stamping Mania. Tamira has a great post about what topcoat should be used for nail foils (here), and Eleonora has an informative video showing how to do foil stamping (here). Today's mani is my first attempt on foil stamping, and here is the result.
Middle & ring finger: I started off with A-England Cathy. I cut the blue-greennail foils to pieces, a bit bigger than nails. I applied a rather thick coat of Essie Good to Go topcoat on Simply Neat Miracle Mat, let it dry for about 30 mins, then stamped a flower image from Harunouta BP-L024 plate using Messy Mansion Carbon& Messy Mansion pink stamper. Then I immediately pressed a piece of foil onto the stamp so the foil sticks to the tacky stamping polish. I took the foil away, then peeled the decal off the mat. I cut the decal to nail size, then applied a thin coat of clear polish on nails as a glue for the decal, and placed the decal on nail. I first applied the Essence clear polish (to avoid the foil to go wrinkly), then finished off with Glisten Glow HK Girl topcoat. Thumb, pointer & pinkie: Base is A-England Cathy. I simply added some rhinestones I bought in Japan and finished off with HK Girl topcoat.
中指と薬指 : ベースはA-England Cathy。事前に青緑のフォイルを爪より少し大き目のサイズに切り取っておきます。Simply Neat Miracle MatにEssie Good to Goトップコートを厚めに塗り、 30分ほど乾かしてからその上に春の歌のBP-L024プレートの花柄をMessy Mansion CarbonとMessy Mansionピンクスタンパーでスタンプ。間髪入れずにそのスタンプの上にフォイルを押し付け、まだ完全に乾ききっていないスタンピングポリッシュにフォイルがくっつくようにします。フォイルを剥がし、decalをマットから剥がす。decalを爪のサイズに切り取り、decalを貼り付けるために爪に糊代わりにクリアポリッシュを塗ってからdecalを爪に載せる。仕上げにEssenceクリアポリッシュを爪に塗ってから(フォイルのしわ防止のため)、Glisten Glow HK Girlトップコートでフィニッシュ。
These are the polishes I used. A-England Cathy and Messy Mansion Carbon.
使用ポリッシュがこちら。A-England CathyとMessy Mansion Carbon。
Let me tell you, there's a lot of trials and errors involved with this mani. I did a bit of a practice before I actually started creating and filming this mani, but I still didn't know how each step would come out. I did this 'decal on stamping mat' method on my right hand, and intended to do the 'direct stamping on nail' method on the demo hand (left hand), but unfortunately things went wrong so I removed the base and decided to take the decal route.
I used a few different clear coats for this mani, and I'd like to explain how and why I used them:
Face of Australia Aussie Night - I used this as a base coat.
Essie Good to Go topcoat - I applied this topcoat on the stamping mat for making decals. I usually use Essence clear polish or Daiso topcoat for stamping decals, but I used this for practice because it dries much quicker than these two and saves me time. I usually avoid fast-drying topcoat to make decals because decals can get stiff and not flexible, but I decided to give it a go with this mani. I'll probably switch back to my good ole' essence and Daiso next time.
Essence clear polish - I used this for 2 purposes; a) as a 'glue' to stick the decal onto the nail, b) as a 'cushion' before applying final topcoat. Decals that are made on the stamping mat are dry, so you need to apply something on your nail for it to stick to the nail. I used essence here, but any topcoat/clear polish will do. I also used this before final topcoat, because I learned that applying HK Girl topcoat directly can crinkle the foils. I first tried Nfu-oh Aqua Base, because water based polish like this is said to do great job to avoid the crinkle on foils. Unfortunately however, it gave the mani a miky look when I tested it, so I decided not to use it. I had no other alternative as a cushion topcoat, so I simply tried essence and it seems to work OK for this purpose.
Glisten & Glow HK Girl topcoat - Final topcoat to seal the design.
Essie Good to Goトップコート - decalを作成するためにスタンピングマット上に使用。普段、スタンピングdecalの作成にはダイソートップコートかEssenceクリアポリッシュの2つしか使わないのですが、今回練習にこちらを使ってみました。理由は乾きが早いので練習時間を短縮できるから。この手の速乾系のトップコートを使うとdecalが硬くなりやすいので普段は避けるのですが、本番にもそのまま使ってみました。やはりdecalが乗りにくかったので、次回はいつものダイソーとessenceに戻すと思います。
Essenceクリアポリッシュ - これについては2つの目的で使用しました。decalを爪に載せる際の糊代わりとして、そして仕上げのトップコート前の「クッション」として。スタンピングマット上で作成したdecalは乾燥しているので、爪に載せる前に糊となるものが必要です。たまたまessenceを使いましたが、ここはどんなトップコート/クリアでも大丈夫です。そして仕上げのトップコート前にも使いました。理由は、HK Girlを初めとするいくつかの速乾系トップコートをフォイルに直接塗るとしわが出来ると言われているためです。このしわを防ぐクッション代わりにNfu-oh Aqua Baseなどのウォーターベースのポリッシュをはさむといいそうです。ちょうどNfu-ohを持っているので試してみたのですが、しわはできなかったもののネイル全体が乳白色になってしまったので本番では使用しませんでした。替わりとなるものもなく仕方がないのでessenceをこのクッション目的で使ってみたところ、特に問題はありませんでした。
Glisten & Glow HK Girlトップコート - 仕上げの速乾トップコート。
What I most struggled about this mani is the part where I stick the decal onto my nails. Essie Good to Go I used for decals wasn't a good choice, and I really should have stuck to my usual decal making topcoats (Daiso & Essence). I gave it 30 minutes for it to dry, but maybe this dry time was too long? I really don't know. In trying to 'tame' the decal to lie flat on my nails, I got lots of bubbles and the decals went bumpy on the nails. It looked ok in the end after applying HK Girl topcoat, but I nearly was gonna redo these two fingers. But the good news is that I learned a lot in the process, and I'd like to share some findings with you:
このネイルで一番苦労したのがdecalを爪に貼り付けるところ。これがなっかなか貼りつかないでやんの・・!練習からの流れで本番にも使ってしまったEssie Good to Goはあまりいいチョイスではなかったです。いつものdecal作成トップコート(ダイソー&essence)を素直に使っておけばよかった。乾燥時間にたっぷり30分取りましたが、これが長すぎたんだろうか?よく分かりません。decalを爪に貼り付けようとする過程で気泡はたくさん入るわ、デコボコになるわで散々でした。HK Girlトップコートを塗ったらようやく人様にお見せできる状態になりましたが、写真を確認するまでは本気でやり直そうと思ったぐらい。ただ収穫として、試行錯誤の中でいくつか学んだことがあるのでそれを最後に書きたいと思います。
Tips for foil stamping:
When you make foil decals on stamping mat, make sure you apply a clear coat/topcoat in a bigger area than your stamper if possible. If this area is small, your stamper can pull the clear coat off the mat when you transfer the image onto it. (#1 in pic above)
In relation to the point above, avoid using sticky stamper. Again, it can pull the clear coat off the mat.
Make sure your stamping base (clear coat on stamping mat, or your base polish on nail if you are direct stamping) is fully dry. If it's still tacky, foil will stick to the base as well as the stamping polish when you press it onto the base. (#2 in pic above)
Work very fast. After you stamp, you have to immediately press the foil onto the stamp while the stamping polish is still tacky. Make sure you have a piece of foil ready.
Choose a 'somewhat slow drying' stamping polish. I didn't try many, but Messy Mansion stamping polishes (other than metallics) fall into this category. If you use fast drying stamping polish, you have to work lightning fast. If you use much slow drying polish such as Mundo de Unas, you need to pause for a while before you press the foil onto the stamp, otherwise polish will be stuck to the back of the foil instead of foil sticking to the stamp.
Choose stamping polish colour which blends well with the foil colour. In case foil didn't transfer on some parts of the stamp, that colour shows. I used black stamping polish this time, as it won't affect much if the black shows up. (#3 in pic above)
Try to choose a stamping image with thicker lines. Thin lines dry faster than thicker ones when you stamp, so foil may not transfer well. (#4 in pic above)
Some girls give a quick wipe with acetone on the back of the foil, so the foil transfers better. I didn't try this, but you may have to do this depending on the types of foils you get.
’乾きがやや遅め’のスタンピングポリッシュを選びます。すべてテストしたわけではありませんが、今回選んだMessy Mansionのスタンピングポリッシュはこのカテゴリに入ります(メタリック以外)。乾きが早すぎるスタンピングポリッシュを使うと超高速で作業する必要があり、Mundo de Unasなどの乾きが遅いポリッシュを使うとフォイルを押し付ける前に一呼吸置かないといけなくなります。このタイミングが慣れないと少し難しいです。早めに押し付けるとフォイルがスタンプに貼りつかず、逆にポリッシュがフォイルの裏にくっついてしまうことになります。
Phew! Congratulations to those who have come this far. I'm not an expert on foil stamping, and would like to learn more about it. Please tell me what you think, and share your thoughts and tips in the comments below.
Today I'm showing you some items sent for review by Harunouta. Harunouta is basically a Japanese site of Born Pretty Store, but they also sell exclusive items that BPS don't carry. You can follow their instagram account here. I have done numerous reviews for them in the past already, and I was approached again in February to do another one. I picked some items from their shop, but this time the parcel took 3 months to get here. Usually it only takes about 2-3 weeks at the longest. Bear in mind that although the site is in Japanese, they ship from China. I sometimes experience delays in mail delivery coming from China and Russia, so I wasn't surprised. Anyway, let's have a look at what I got.
First up is 3 Ya Qin An stamping polishes. If you read my previous Harunouta reviews, you see how fabulous these stamping polishes work. Product page is here and here. I asked for #21 (orange), #22 (rusty red), and #25 (pale blue). Looking at the product page though, I think I got the wrong item - I think the pink on the left is not #22, but #15. Ya Qin An polishes don't have the number or name on the bottle, so there's no knowing which colour it actually is.
Here are the paper swatch on both black and white. They stamp so nice and bold on both colours.
そしてこちらが白と黒の紙上でのswatch。どちらの色の上でも抜群の発色です。
Next up is nail foils. Product page is here. I chose #2, #15 & #21. I have never used nail foils in actual manis before. Hope I can come up with some fun use of them.
Liquid nail tape. Product page is here. I was curious to see if this is glue-based liquid tape or latex-based. Good news is that it's latex-based. If you are allergic to latex, you should avoid using it though. Once you apply on your skin, it dries in a minute or so and peels off in one good piece. Sweet.
リキッドネイルテープ。製品ページはこちら。製品ページを見た感じ、グルー系かラテックス系か判断が付かなかったのですが、幸いなことにラテックス系のリキッドテープでした。ラテックスアレルギーの方は残念ながら使えませんが。指の周りに塗ると1~2分で乾き、剥がす時も一度に綺麗に剥がれます。 Lastly, 3 stamping plates. 2 BP-L rectangle plates and 1 BP round plate.
Here's a close look of each plate. This is BP-L019. Product page is here. Various birdies! How cute are those cartoonish owls? Certainly not a type of mani I would normally go for, but hey, it's nice to have some variety.
This is BPL-025, product page is here. Another animal plate. It looks like I had a good intention of doing some animal manis back in February, but I don't remember what sort of mani ideas I had in mind. Anyway, it's another nice-to-have plate.
Finally, BP-60 plate. Product page is here. I was hoping to use this for Easter in March, but because of the delivery delay, I couldn't get to use it. Maybe next year!
So there you have it. Be sure to check out Harunouta store if you're interested in any of these items. If you have difficulty reading Japanese, then I recommend visiting Born Pretty Store and doing product search by product number.
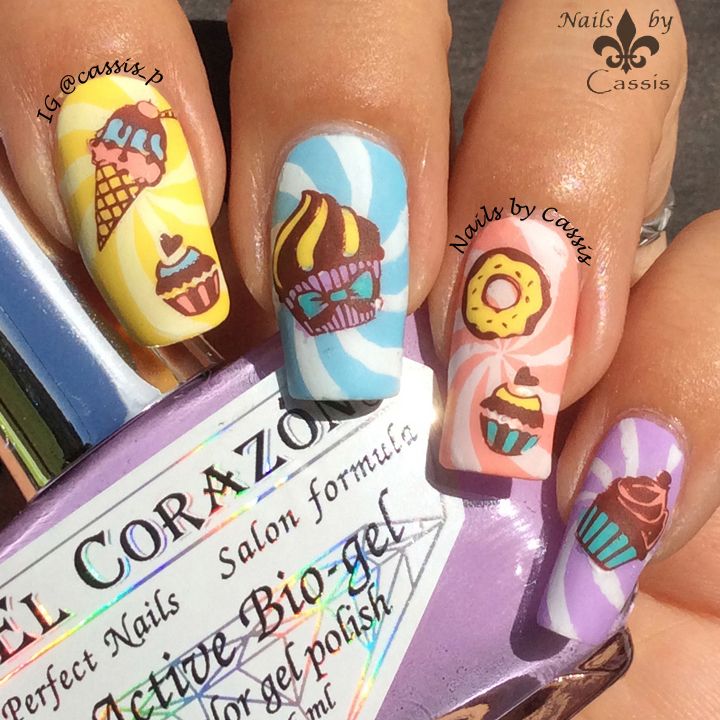
8th of this month was Chinese New Year, and 14th is Valentine's Day. I've already done manis for each theme (here and here), so what should I create next? I'm still uninspired and couldn't think of anything, so I decided to go through my plate collection and spotted a cute plate that I've been wanting to use for a long time - hehe 055. For this mani, I started off with 4 different colours, yellow, blue, pink & purple. Then I stamped a candy swirl pattern on MoYou London Princess 12 with Messy Mansion Chalk (white) for all nails. I used clear jelly stamper from Harunouta to stamp the swirl in the centre. Then I made stamping decals out of cupcakes & ice cream patterns on hehe 055 using Ya Qin An Chocolate (both available from Harunouta), coloured in with the same 4 colours used for base plus turquoise. Finished off with Glisten & Glow HK Girl topcoat, and mattified with Essie Matte About You afterwards. I first tried to do the swirl using nail vinyls instead of stamps, but it got a bit lumpy and didn't like how it came out. I hardly reach for symmetric stamp like this because I suck at stamping in the centre, but clear stamper changed all that. I don't know why though, but I really struggled in creating this mani. When I tried to stamp the swirl with clear stamper, white polish didn't adhere to my nails well. I tried MdU White, Ya Qin An White, Pueen Pure White, and finally Messy Mansion Chalk. This Messy Mansion did the best job. I painted my base colours in the morning before work, and did stamping at lunch break, so it could be because the base was really really dry. I also pressed too hard when transferring the image onto my nails, so the swirls got quite wavy. I don't know how many times I had to stop recording to redo the stamps, and felt really exhausted by the time I finish this mani. Ah well, at least it turned the way I wanted.
Finished product, mattified with Essie Matte About You
ベースは4色(黄色、青、ピンク、紫)。MoYou London Princess 12プレートのcandy swirl(ロリポップ柄?渦巻き柄?)をMessy Mansion Chalk(白)でスタンプ。爪の中央にスタンプするため、ここでは春の歌のクリアスタンパーを使っています。次にhehe 055プレートのカップケーキやアイスクリーム柄をYa Qin An Chocolate(どちらも春の歌より)でスタンプし、上の4色とターコイスを使って色付けしてdecal化。それぞれの爪に乗せる。Glisten & Glow HK Girlトップコートを塗ってからEssie Matte About Youでマット化。
使用ポリッシュはこちら。
Polishes used
左から、
Elcorazon No. 423/278 Cream
Elcorazon No. 423/279 Cream
Elcorazon No. 423/292 Cream
BC Co. shade #12
Sally Hansen Mellow Yellow
Messy Mansion Chalk
Ya Qin An Chocolate
It was a bit hard to stamp the full-size image with clear jelly stamper, because it's not squishy enough to accommodate my curvy nails. I didn't film the process, but I had to draw the missing lines with detail brush
このネイル、私がよくやる「ベーススタンプ+decal」の何の変哲もないネイルなのですが、何故かとても苦労しました。渦巻き柄を白でスタンプするときにポリッシュが爪に張り付いてくれず、何度やり直したことかorz・・・ MdU White、Ya Qin An White、Pueen Pure Whiteと試して、最後に使ったMessy Mansion Chalkでどうにかこうにかスタンプ出来たという感じ。ベースのポリッシュは早朝に塗っておいてスタンピングは昼休みにやったのですが、ベースが乾きすぎていたのが原因なんだろうか?そのときの爪のコンディションとクリアスタンパーとの相性なのかなぁ。しかも柄を爪全体に転写するために強く押してしまい、渦巻きが波打ってしまったよ(-_-)チーン
This hehe plate also has some cute toy images. I'll use them for another occasion :)
スタンプに失敗→カメラを止めて動画を消す→スタンプをセロテープで剥がす or ベースをやり直し・・というのを5回以上はやりました。しかも、今回はなぜかdecal化したスイーツ柄のスタンプまでてこずりました。「ピックアップできない柄はない」と思えるほど信頼している神スタンパー、Messy Mansion Soft Pinkでやってもですよ(-_-) heheプレートの彫りがやや浅めなのに加えて、Ya Qin An Chocolateの乾きが少し早いのと、40度近い気温の中扇風機をかけて作業していたという作業条件もあったのかもしれません。気温が高すぎてdecalにも気泡が入ってたしなぁ。
Harunouta contacted me late last year that they would like to send me some thank-you gifts, so I picked few items from their shop and they arrived this week. Let's see what I got.
One side of #21719 is a flat brush that's perfect for one-stroke nail art. The other side is a very thin brush. #21734 is also very thin.
#21719の片側はワンストロークネイルアートなんかに適した平筆になっていて、別の側はかなりの細筆。#21734も似たような細筆です。 Comparison with the brushes I have. The top two is Pure Color 10 and Pure Color Glamour 1. You can see these two brushes from Harunouta are longer and thinner.
手持ちのブラシとの比較。上の2本はPure Color 10とPure Color Glamour 1です。春の歌のブラシ2本はより細く長いことが分かるかと思います。 The other three brushes. These are sold as a set and the product number is #3296.
There are mermaid, cupid, cross, flower, crown, mustache, butterfly, diamond, stars, etc. For size reference, the cross is about 0.7cm high. They are easily bendable to accommodate the curve on your nails.
Ya Qin An Chocolate stamping polish and BP-77 plate. Product number is #20702 and #21808. My YQA Chocolate is getting low (review post here), so this is a backup.
Ya Qin An ChocolateスタンピングポリッシュとBP-77プレート。製品番号は#20702 と #21808。ここでレビューしたYQA Chocolateが大分減ってきたので、バックアップとして1本頼みました。
Here's a paper swatch of BP-77. I love geometrics!
BP-77の紙swatch。幾何学模様は遊び甲斐があるのでこの1枚を選んでみました。
Lastly (and highlight of this post), clear jelly stamper. Product number is #24021. I've been interested in this stamper for a long time! The original clear jelly stamper was first released from a Canadian stamping supply shop, but I read a mixed review of it and the price point was above what I was willing to pay (over $20 including shipping), so I waited for other brands to start selling it. Sure enough, Harunouta (and Born Pretty) started to sell for a fraction of a price.
So the idea of this stamper is that you can see through from the other end of the stamper, so you see exactly where the stamped image goes. Stamper head is about 2.8cm in diameter, slightly bigger than a standard stamper head.
Before I received this stamper, I bought two of these stampers from AliExpress. This is the product page. These and the one from Harunouta are exactly the same, except for the squishiness of the stamper head. Harunouta is slightly softer than my AliExpress ones. Harunouta clear jelly stamper can probably be categorised as 'squishy firm'.
So the most important part - how does it pick up image? There are the 4 stamping polishes I tried for this test. From left: Ya Qin An Chocolate, Pueen Randolph Teal, Mundo de Unas Reddish, and Messy Mansion Chalk. Test is done without priming the stamper. Actually, you aren't supposed to prime this stamper with Magic Eraser or acetone as it would cloud the stamper head (UPDATE: I was informed by Julia of Messy Mansion and other stamping addicts that use of acetone will not affect silicone stampers including clear ones). In case it doesn't pick up image, all you can do is either wash it with soapy water or wipe with alcohol.
では一番肝心な点、柄をピックアップするかを見てみましょう。ピックアップテストに使用したスタンピングポリッシュは上の4本。左から、Ya Qin An Chocolate、Pueen Randolph Teal、Mundo de Unas Reddish、Messy Mansion Chalk。テストはprimeなしで行っています。ちなみに、このスタンパーをメラミンスポンジやアセトンでprimeすると表面が曇ってしまうため、primeはやらない方がいいと言われています(追記:Messy MansionのJuliaさんや他のスタンピング上級者の皆さんによると、アセトンをシリコンスタンパーに使っても問題ないそうです)。柄がピックアップしない場合の対策は、お湯と石鹸で洗うかアルコールで拭くぐらいしかありません。
First test is done with Pueen Fairytale Lover 01 plate. Although not perfect, it picks up image much better than I expected.
Last one is Born Pretty BPL-024. All look pretty good. I first grabbed a different BP plate, but the result on that was disastrous. This BPL-024 is quite nicely etched, but many BP plates are shallow-etched and you would probably not get a crisp stamp using those plates.
One tip I found during this test is that, you need to work a little bit faster than usual when pickup image. I first tried with my usual speed (after scrape and before pickup), but as polish on the plate started to dry, I could only pick up part of the image. Then when I worked slightly (few milliseconds) faster, I could pickup the whole image. Mundo de Unas and Messy Mansion stamping polishes are obvious winners on this test, as they dry slower than others.
ピックアップテスト中に気付いた点が1つ。スクレイプしてから柄をピックアップするまでのスピードをいつもより早めにした方が柄を綺麗にピックアップできます。いつものスピードで柄をピックアップしてみたところ、プレート上のポリッシュが乾き始めるとうまくピックアップできないことが分かりました。いつもより数ミリ秒単位でも早く作業することを心掛けたところ、柄全体をピックアップできました。このテストではMundo de UnasとMessy Mansionのスタンピングポリッシュの2つの結果が特によかったですが、両方とも乾きが遅いタイプのポリッシュです。 After the pickup test, I also tried on my nail. I like how this stamper performs, but I found this long holder a bit hard to use. So I decided to temporarily stick the stamper head into a masking tape and use it like that (left), till I find something better.
So here is a quick test. Stamping plate is MoYou London Fashionista 07, and stamping polish is Mundo de Unas Black. It's super easy to see where the image goes on your nail, so you don't have to worry about images getting crooked. Wow, love it love it love it! I think this is going to be my new fav stamper, but I just wish they come up with a better holder.
そしてこちらがテスト結果。プレートはMoYou London Fashionista 07、スタンピングポリッシュはMundo de Unas Black。柄が爪のどの部分に載るかが一目瞭然なので柄が曲がる心配なし。いいねいいね~、これからかなり活躍していく予感がします。しかし、ホルダーだけはもっと短い&見やすいやつをお願いします。
There you have it. Hope you enjoy my review. I know this stamper is going to be a game changer for me, and I can't wait to start using it!
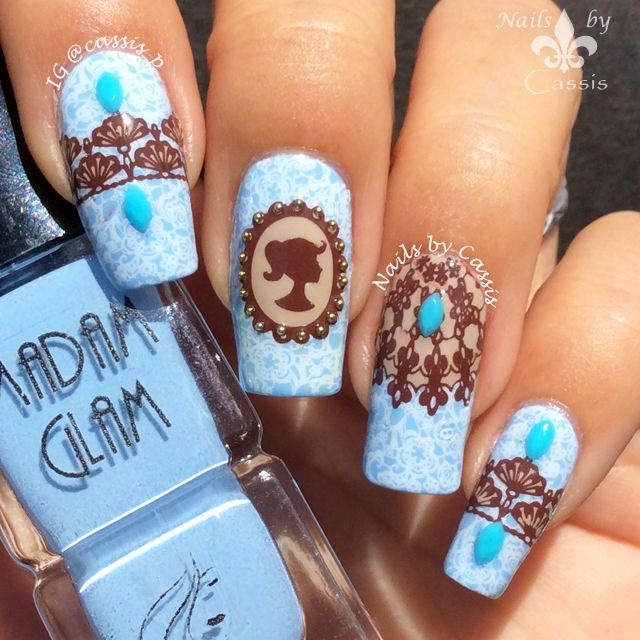
Out of 8 beautiful plates kindly sent by Marianne Nails (review post here), I chose plate No.68 to create my first design. Base is my favourite blue, Madam Glam Sea Swing and Sun (swatch shown here) for all my nails. Apply Simply Peel around my nails. I stamped a floral design from Marianne Nails No.68 using Urban Nail Art White stamping polish (review post here). Then I made a stamping decals out of different images on the same plate using Ya Qin An Chocolate, coloured in with BC Co. shade #26, and placed them on each nail. For middle finger I added some gold beads fom Harunouta around the lady silhouette, and for other nails I added blue decorations my super talented and sweetest friend Minnie @nailbees kindly gifted me. Finished off with Glisten & Glow HK Girl topcoat. I'm super thrilled with how it turned out. This simple colour scheme gives such a nice vintage feel. This Marianne Nails plate is all about elegance, and I recommend this to anybody who likes elegant lady-like manis.
Finished product with Glisten & Glow HK Girl topcoat
ベースは全爪Madam Glam Sea Swing and Sun(swatchはこちら)。キューティクル周りにSimply Peelを塗ってからMarianne Nails No.68プレートの花柄をUrban Nail Art White(レビューはこちら)でスタンプする。同じプレートのさまざまな柄をYa Qin An Chocolateでスタンプし、BC Co. shade #26で色付けしてdecalを作成し、各爪に乗せる。中指は春の歌のゴールドブリオンを女性のシルエットの周りに配置し、他の爪にはいつもいつもお世話になっているMinnie @nailbeesが送ってくださった青のデコレーションを配置。仕上げはGlisten & Glow HK Girlトップコート。
使用ポリッシュはこちら。
Polishes used
左から、
Madam Glam Sea Swing and Sun
BC Co. shade #26
Urban Nail Art White
Ya Qin An Chocolate
I just LOVE this Madam Glam polish. It really makes me feel great wearing this fresh colour. The blue decorations Minnie gave me were a great match to this look also!
A Japanese cat-lover, married to an Aussie and living in Australia. This blog is about nails, polish, and anything in between.
猫大好き、旅行大好き、ポリッシュ大好きな自爪派のブログです。