My 4th MoYou London Haul

Friday, October 31, 2014 2 Comments A+ a-

Quick post today. I placed my 4th order with MoYou London and thought I might show you what I got. The order arrived in about two weeks.

今日は簡単更新。MoYou Londonで4回目のお買い物をしたのでそのプレートのご紹介です。10月中旬に注文して約2週間で到着。購入したのがこちら。

6 beautiful plates I got

ざざんっ。今回は6枚購入。今まで買ったことのなかったコレクションをメインに選んでみました。カワイコちゃんたち、カシス家へようこそ!\(^o^)/

Gothic 09. This is Gothic girl Raven. How awesomely cute is she?
And how gorgeous is this plate?!

まずGothic 09。そしてこの子はゴシック・ガールのRavenちゃん。は・・・・・初めましてRavenさん(*´д`*)初対面でこんなこと言うのもなんですが、タイプです。どストライクです。一目惚れです。顔も佇まいも服装も名前も全部好きです。ちなみにRavenとは「オオガラス」の意味です。Game of Thronesでも出てきますよね。

Gothic 10. Another stained glass type of plate

Gothic 10。またRavenちゃん。教会と宗教画を思わせる荘厳なプレート。

Gothic 11. This plate has a Gothic Halloween feel to it

Gothic 11。もういっちょRavenちゃん。ハロウィンゴシックっぽい雰囲気のプレート。この3作、どれか1つにしようと思ったのですが選べずに結局3枚お買い上げ。絶対使いこなすのが難しそうだけど、見てて幸せな気持ちに浸れる3枚。

Mother Nature 02. This is Eve the Mather Nature. Heaps of birds and flowers

Mother Nature 02。この子は母なる自然、イブちゃん。鳥とお花がいっぱいのプレート。このコレは2枚目です。このプレート、ずっと買おうか悩んでいたのですが、和風ネイルに使えそうなある柄を見つけて秒速でカート入り。

Rockstar 12. This is Roxy the Rockstar. Music related plate

Rockstar 12。この子はロックスターのRoxyちゃん。インスタのShimaさんが8月のMoYouコンテスト中にこのコレのプレートを使った素敵なネイルをたくさん披露されていたので私も感化されました。ポップな柄や音楽系の楽しげな柄がいっぱい。

Bridal 07. This is Kate the Bride. Oh so popular lace plate!

Bridal 07。この子は花嫁Kateちゃん。このレースプレート、本当に人気が高いですね。今回購入を急いだのはこのプレートがまた売り切れる前に買いたかったからです。ちなみにこのプレート、初期ロットは不具合があります。修正されるまで待ったので購入が遅くなったというのもあります。

以上6点のプレート紹介でした。次回は早速このうち1枚を使用したネイルをご紹介します。

にほんブログ村 美容ブログ 自爪ネイルへ

Recreation of Louise's Fashion Mani

Thursday, October 30, 2014 0 Comments A+ a-

I hit my middle finger hard on the fridge the other day and had to cut all my nails short. This is about the same length my nails used to be, but I'm really missing my long nails already.

I took this as a good opportunity to do this mani. This is inspired by my awesome friend Louise @louisenails over at Instagram. Not only does she have awesome stamping skills but her freehand skills are totally incredible also. I saw her shirt mani during MoYou London contest in May for the theme 'Fashion', and I instantly fell in love.

For this mani, I started off with my off-white franken KINARI (mixture of beige and white) and stamped butterfly and rose pattern from MoYou London Princess 12 and tribal pattern from Pro 06. Stamping polishes are Mundo de Uñas Mexican Pink, Geranium, and Lavendar. I then used french guide tips near the cuticle to create triangle shape and painted Sinful Colors Steel Reserve on it. The rest is freehand topped with yellow rhinestones.

When I first saw Louise's original mani, I thought it looks cute on her pointy nail shape. So glad I got to try this while my nails are short, because I was worried it may look silly on my long nails :P This mani made me realise I should practice freehand more! I even struggled with getting those easy lines nice and neat... I'm so in awe with Louise's skills and creative design!

今日はまたお友達のデザインに挑戦。インスタでいつも仲良くしてもらっているLouise @louisenailsのデザインを再現したものです。Louiseとは私が5月にインスタのアカウントを開設してまもなくお友達になり、以降毎ポスト欠かさず遊びに来て楽しいコメントを残してくれる素敵な方です。いつも楽しませてもらっているので、感謝の気持ちを表したくて彼女のデザインを作ってみることにしました。出来上がりはこちら。

Finished product with Seche Vite

ちなみに先日冷蔵庫に中指をぶつけてしまい、爪を3mmほどもってかれました。なので全体を短くカット。これでも1.8cmありますが、2cm以上に慣れてしまった私には物足りない(;▽;)

ベースはオフホワイトのフランケン「生成」。MoYou London Princess 12から薔薇とチョウチョの柄、Pro 06からトライバル柄をそれぞれMundo de Uñas Mexican Pink、Geranium、Lavendarでスタンプ。トップコートした上で直角のフレンチガイドをキューティクルあたりに置いて三角を形成し、上からSinful Colors Steel Reserveを塗る。あとはすべて手書き。黄色のラインストーンもMoYou Londonから。小指は生成を塗った上に直線のNail Vinylを数点置いてその上からSinful Colors Innocentを塗る。百合の紋章のメタルパーツはこちらのお店から。

そしてこちらがインスパイア元のLouiseのネイル。

This is Louise's original. Don't you think it looks cute on her nails? 

あんまり比べたくないんですが^_^; Louiseの爪の形に合った可愛いネイルだと思います(゚∀゚) 使った柄も可愛いし、手書き部分も線がシュッと入って私のとは雲泥の差・・・(汗。Lizaのネイルをやったときもそうですが、コピーがオリジナルを超えることは絶対ありえないですね。というか私が下手くそなだけです、ええ。

使用ポリッシュはこちら。

Polishes used

左から

Off-white franken KINARI (生成)
Sinful Colors Steel Reserve
Sinful Colors Innocent
Mundo de Uñas Lavendar
Mundo de Uñas Geranium
Mundo de Uñas Mexican Pink

Pinkie is done with straight Nail Vinyl, painted with Sinful Colors Innocent.
The fleur-de-lis embellishment comes from a Japanese online shop

このちょっとした手書きの線描くのにも非常に緊張しました。カメラが回っているときなんか息止めてたかも(笑。ダメですね、スタンプばっかりやってちゃ。簡単な線ぐらい描けるようにならないとorz

I used those colours and patterns that I've hardly used before. Turned out colourful and fun

ブラウスの柄はせっかくなので普段あまり使わないような柄を選んでみました。色もLouiseの元の作品にならってカラフルに。MundoのMexican Pinkは今回初めて使いましたが、この色、スタンパーに染みになることで有名なのです。案の定白いスタンパーに染みが付きましたが、逆に白スタンプが見やすくなりました(笑。染みはスタンパーを使っていくうちに薄れていくと思います。

というわけでLouiseのブラウスネイルの再現でした。課題の多いネイルですが、Louiseはとても感激してくれてこっちまで嬉しくなりました(T_T)。しばらくは小爪に似合うデザインを考えていきます。

最後にインスタ動画をどうぞ。IEでレイアウトが崩れる件、たぶん解決しました。インスタの埋め込みコードが最近変わったのが原因のようです。元のコードの形式で埋め込んだらIEでも正常に見えるようになりました。シイキさん、改めてご指摘ありがとうございましたm(_ _)m

Cherry Red SpectraFlair Franken with Rose Stamping

Tuesday, October 28, 2014 0 Comments A+ a-

Any Internet Explorer browser readers out there? I was pointed out that my posts look distorted when they have Instagram videos at the end. I'm looking into it but still have no clue as to how to fix it. As far as I know, Chrome, Firefox, and Safari users shouldn't be affected, so I recommend using those browsers (if you have them installed) until I find a solution. Sorry for the inconvenience!

Onto today's nails. It's middle of the spring here in OZ but it's already like summer where I live. You know what that means? Perfect season for holos! 

I don't know why but I felt like wearing bright red holo; the only problem is that I don't have any red holos in my stash. No problem, I can franken myself.

It was a long time ago when I frankened a holographic polish. The last holo franken was 'Aizumi' you can see on this post. If you're interested in where I got my franken supplies and what I got, you might wanna read this post (sorry only minimal English back then).

For Aizumi, I used a blue shimmer polish (Sinful Color Midnight Blue) to colour it blue, but this time I use Adirondack alcohol ink for the tint. For this franken, I filled about 1/3 of the bottle with SpectraFlair liquid and another 1/3 of the bottle with suspension base. I then added 10 drops of Adirondack 'Watermelon', swatched on paper to see colour intensity, did the same for 20 drops/30 drops/40 drops, and ended up adding 50 drops all up.

I wanted a very red holo like blood, but this one turned more like a pinkish cherry red. I realised afterwards that Adirondack 'Watermelon' has some pinkish tint to it. Still it's a pretty colour and I'm happy with the result. I enjoyed wearing it so much and did a quick rose stamp using BuNa-A plate. I really adore this look! 

冒頭から2つほどお知らせを。先日シイキさんから「インスタ動画付きのポストをIEで見るとレイアウトが崩れている」とご指摘いただき、現在調査中です。Bloggerのテンプレートの方は怪しいところが見当たらず、インスタのコードの方かなと思っているのですが、まったく解決の目途が立っていません。私の読者のIEユーザーは9%ほどいらっしゃるようで、ご不便をお掛けして申し訳ありません。Chrome、Firefox、Safariユーザーの皆さんは影響ないと思います。

それからもう1つ。Twitterなんですが、私はMoYouの木曜のトリビアに参加するぐらいしか使っていないので、フォローしていただいてもトリビアの回答が流れてくるだけで何の益もないと思います^_^; とても申し訳ない気分になるので、アンフォローしてくださって全然構いませんので(笑。というか、トリビア参加している方いらっしゃいますか?私は最近全然当たりませんが、数か月前に一緒にやろうと誘ったJaeさんはもう3回当たっています(爆。

前振りが長くなりましたが今日のネイル。10月後半になって一気に気温が上がり、既に30度超えのギンギラ陽気の日も出てきました。そうするとムクムク沸き上がる「ホロを塗りたい!」という気持ち。しかも鮮血のような赤が塗りたい → でも持ってない → じゃあ作ろ!ということで、久々にフランケン。出来上がりはこちら。

Two coats, no topcoat. Outdoor shot

鮮血というよりピンク寄りになってしまいましたが^_^; これで2度塗り、トップコートなし。屋外で撮影。

What I used for this franken. Suspension base, SpectraFlair 2% in liquid form,
and Adirondack Watermelon

フランケンに使った材料は上の画像にあるとおり。左からsuspension base、リキッドタイプのSpectraFlair、それからAdirondack Watermelon。作り方はsuspension baseを空ボトル1/3ほど注ぎ、SpectraFlairをさらに1/3注ぐ。Adirondack Watermelonを10滴追加してよく振り、紙にSwatch、好きな濃さになるまで最終的に50滴ほど追加。

前回のホロフランケン「藍墨」は青のシマーのポリッシュを使って色付けしたんですが、今回はアルコールインクという色付けに打ってつけの材料があるのでこれを利用しない手はありませんね(゚∀゚) 鮮血のような赤にしたかったのですが、このAdirondack Watermelon自体少しピンク寄りの赤だったのは後で気づきました。

ちなみにこのフランケンの材料の購入先についてはこちらの記事を参照してください。残念ながらこのお店はOZ以外に配送していません。

Didn't turn out as red as I expected but it's still a pretty colour

このフランケンの名前、「桜桃」(おうとう)にしました。いわゆるさくらんぼですね。トップコート塗らずに翌日撮影しましたが、剥げたりボコったりすることもありませんでした。

Macro in the sun

マクロがこんな。いや~ホロってやっぱりいいですね(しみじみ)。

Pic in the lightbox

ライトボックスで撮影するとほとんどホロは見えません。

Added rose stamp from BuNa-A plate, topcoated with Seche Vite

最終的にこうなりました。BuNa-Aプレートから薔薇をMundo黒でスタンプ。Seche Viteでフィニッシュ。

I'm happy with this cute and wearable mani! What do you think?

というわけで、久々のフランケン非常に楽しかったです\(^o^)/ ホロ特有の塗りにくさはなく、2度塗りで乾きも早く持ちもいいです。オージーインディーズのほとんどがここのお店のフランケン材料を使っているそうですが、Picture PolishやらEmily de Mollyが絶賛されている理由が分かる気がしますね。今度は白のTinterを買ってクリーム作りにも挑戦しようかな。

にほんブログ村 美容ブログ 自爪ネイルへ

Mirrored Stamping with MoYou London Explorer 23

Friday, October 24, 2014 4 Comments A+ a-

25th Oct UPDATE: I created YouTube version and replaced the insta video at the end of this post.

I woke up in the middle of the night and went straight to my 'nail station' to work on something. I actually had this idea in mind for a while but didn't get to try it out until this time.

For this mani, I started off with off-white franken (mixture of beige and white) and stamped an animal silhouette pattern from MoYou London Explorer 23 with Mundo de Uñas Black. Then, using the same image, I made a decal and flipped it and simply sticked the other surface onto my nails to create mirror image. Before placing the decal, I applied clear polish onto the tip of my nails as a glue because the other surface is too dry to stick otherwise.

After decal was placed, I took a piece of makeup sponge and my homemade jelly colours, blue, orange, and yellow, to colour the background. I'll show you the picture I found while googling that I got this inspiration from.

If you look at my video at the end of the post, you'll see it's a real simple technique, but I honestly haven't seen this done before. I'm so happy to find a new trick that I haven't seen anywhere before! I'm preparing YouTube video and will upload here as soon as it's ready.

10/25更新:YouTube動画を作成しましたので、記事の最後のインスタ動画を置き換えました。

前回の記事に書いた「隠語を使われた」という件、いきさつや話の前後関係のご説明とお詫びの言葉をいただきまして、今はまったくわだかまりはありません。大変お騒がせしました。

さて今日のネイル。昨日、明け方に突然目が覚めてそのまま"ネイルステーション"に直行。夢の中で閃いたんでしょうか?ずっと温めていたアイデアがあって、それをようやく実行に移す時だと直感。まず出来上がりがこちら。

Finished product, with Seche Vite

ベースはオフホワイトのフランケン(ベージュと白を混ぜたもの)。MoYou London Explorer 23の動物のシルエットをMundo de Uñas Blackでスタンプ。次に、同じ柄を使って今度はdecalを作成。decalが乾いたらそれを裏返して爪先にくっつければミラーエフェクトの出来上がり。いつもとは逆の面を爪につけるので、そのままだと表面がサラサラすぎてきれいにくっつかないと思います。貼り付ける前にクリアポリッシュをのり代わりにしています。インスタ動画をまた作りましたが、YouTube動画もそのうち作ります。

decalが貼り付いたら、スポンジとお手製ジェリー(詳しくはこちら)を使って背景を色付け。通常のスポンジグラデに比べてグラデのスムーズ感は皆無ですが、ぼやぼやっとした感じが逆に自然で好きです。

使用ポリッシュはこちら。

Polishes used

左から、

Homemade jelly - Blue
Homemade jelly - Orange
Homemade jelly - Yello
Sinful Colors Steel Reserve
Off-white franken "生成" - "KINARI" (mixture of beige and white)
Mundo de Uñas White
Mundo de Uñas Black

ちなみにインスパイヤ元になった画像があります。「サファリ シルエット」とかの検索で出てきました。(出所はこちら

This is the pic I inspired from (taken from this site)


Pinkie is painted first with this Sinful Colors and stamped with white, then leadlighted

小指(と見えていない親指)はこのSinful Colorsを塗った上にMundo白でスタンプ後、Leadlightです。

What do you think of this mirror effect? :)

ちょっと爪が甘いところはありつつも、頭で思い描いていたとおりの仕上がりになりました。この「decal裏返しでミラーエフェクト」テクニック、言われてみればそりゃそうだよねと感じると思うのですが、誰もやっているのを今まで見たことがありません。新しいことにチャレンジできたことが少し誇らしかったりします(゚∀゚) インスタでもたくさんお褒めの言葉をいただけて嬉しいです。ミラーエフェクトを作り出すもう1つの割と有名なテクニックがあるのですが、それはまたいずれ。

では動画はこちら。後日YouTube版に置き換えますので、詳しくはそちらをどうぞ。


にほんブログ村 美容ブログ 自爪ネイルへ

Sugar Bubbles Stamping Plate Review & Black 'n Mint Mani

Wednesday, October 22, 2014 4 Comments A+ a-

I had some unpleasant experience on SNS recently. I got some nasty comments on my Instagram and had to delete them, and I accidentally saw someone talk about me behind my back on other SNS. Have I done something wrong? No, I haven't. Why worry then? Well, I'm a human and I have a feeling.

I'm feeling better now because my precious friend over at Instagram cheered me up with a hilarious pic and she and another of my dear friend reminded me that I have those lovely friends who value me. SNS can do both harm and good, but I've decided to focus on having a fun time with my lovely friends rather than on nastiness.

Onto today's mani. I bought 3 Sugar Bubble plates recently through Aussie group buy hosted by Nail Stamping Queen and thought I might give it a try. 

I started off with Sally Hansen Mint Sorbet and stamped a design from SB 018 plate with Mundo de Uñas Black. I then placed two sets of nail vinyl I bought from this shop near the centre and painted black on the side of the nails. For pointer and pinkie, I painted black and stamped with Mundo de Uñas Spring Green.

It's a simple mani with only two colours but I like that it has a classy look. I get odd comments like 'this mani is a bit difficult to make', so I thought I might go for something easy. 

For Sugar Bubbles plates, I paid $12/plate including shipping. I didn't buy directly from Sugar Bubbles so if any of my readers are interested, I suggest going to their facebook page and find information there. 

Qualitywise, I had a bit of a trouble with some of the designs not picking up very well with normal polishes. When I switch to Mundo de Uñas, the result is a bit better. Still, the designs are pretty and some are unique. I will show you the plates and a quick swatch later in the post.

冒頭からナンですが・・・。ここ最近立て続けに嫌な気分になる出来事があり、何もかも放り出したくなっていました。インスタでごくたまに中傷コメントが入ってきたり、他のSNSで私のことが妙な隠語を使って語られているのを偶然見てしまったり。人様にご迷惑をお掛けすることは何1つしていないので堂々としていればいいのですが、人間ですからそう簡単にはいかないものです。

でも、どうでもいいやと昨日思えるようになりました。嫌な思いをしたことをほのめかしたら、とっておきの画像を見せて大いに笑わせてくれたインスタの友がいました。ここに来ればあなたを大切に思う友がいつもいるよ、と言ってもらえました。毒にも薬にもなるSNSですが、やはり私にとっては薬の部分が多いです。楽しい仲間たちと楽しい時間を過ごすことだけに集中して、これからもネイルをアップしていこうと思います。

気を取り直して今日の内容。少し長くなりますが、Sugar Bubblesというブラジルの会社のプレートの簡単レビューとそれを使ったネイルです。まずネイルがこちら。

Finished product with Seche Vite
(Smudging on pinkie is caused by Revlon Top coat)

ベースはSally Hansen Mint Sorbet。Sugar Bubbles SB 018から蔦のような柄をMundo de Uñas Blackでスタンプ。トップコートした後で、こちらのお店で買った直線のテープを爪の中央付近に2つ置き、爪の両端を黒で塗る。人差し指と小指は黒で塗ってMundo de Uñas Spring Greenで同じ柄をスタンプ。使用ポリッシュはこちら。

Polishes used

左から

Sally Hansen Mint Sorbet
one-coat black franken
Mundo de Uñas Spring Green
Mundo de Uñas Black

Some girls commented that the black lines make the nails even longer. Well said!

インスタで「黒の線が入ると爪が長く見えますね」とコメントをいただきましたが、言われてみれば確かに(゚∀゚) ちょっとの手間でクラシックな感じに仕上がったんではないかと。

Black can't go wrong with any colour! Loving the classy look :)

ちょっとシンプルすぎかとも思ったのですが、たまに私のネイル動画を見て「難しい」「思考停止した」と言われることがあって、こういう簡単なのもたまにはいいかなと。

ではSugar Bubblesの簡単レビュー。

Three Sugar Bubbles plates I bought. SB 018, SB 028, & SBS 04

これが私が買った3枚のSugar Bubbles。SB 018、SB 028、SBS 04です。

Size comparison to MoYou plate (right). Plate itself is 10.5cm x 5.5cm.
Each image on this plate is 2.1cm x 1.6cm

MoYou London(一番右)のプレートとのサイズ比較。プレートのサイズ自体は10.5cm x 5.5cm。やや小さめ。柄自体は2.1cm x 1.6cmとMoYouのXLプレートより大きめ。

Quick paper swatch of SB 018. They are stamped with normal polishes, not Mundo.
Can you see the fine lines on the top left and top middle are a bit lost?

今回のネイルに使ったSB 018の紙Swatchの一部です。Mundoではなくいつもテストに使っている普通のポリッシュを使用。細かい線でできている左上の2つの柄、一部かすれていますね。2度スタンプしてどちらも同じ結果だったので彫りが浅いんだと思います。Mundoに切り替えると多少よくなります。他の2枚は大きな問題はありませんでした。

Sugar BubblesはNail Stamping Queen主催のグループバイで購入しました。1枚12ドル(送料込み)。もちろん、直接買う場合は値段も送料も変わってきます。興味がある方はSugar BubblesのFacebookページを見ていただければと思います。

Sugar Bubblesの総評としては、12ドルも払ったので期待値が高かった分、満足度はやや控えめ。ここでご紹介したChez Delaneyのプレートもそうでしたが、「MoYou以外のプレートも欲しい!」と思って他のブランドにも手を伸ばしたものの、やっぱり値段も入手しやすさもバリエーションも品質もMoYouにかなう会社はないな、と。ただ、柄は使いやすいものが多いし、この買った3枚は非常に気に入っています。

インスタなどでプレートを使った動画を公開すると、「あなたが使ってたから私も買ったよ!」というコメントをたくさんいただくんです。そうするとやっぱり、自信を持って紹介できるプレートを使いたいわけで。というわけで、これからはあれこれ浮気せずMoYouのプレート集めに専念することになりそうです(笑。


にほんブログ村 美容ブログ 自爪ネイルへ

Trip to Great Ocean Road

Tuesday, October 21, 2014 2 Comments A+ a-

Hubby and I took a week off last week and visited Great Ocean Road. I brought two polishes with me on this trip - Dance Legend Pulsar & Milky Way from Galaxy collection. Not many nail pics but please read on if you're interested :)

先週、1週間ほどお休みをもらってグレート・オーシャン・ロードに遊びに行ってきました。今回のポストではそのときの写真をお見せします。旅行に持って行ったのはDance Legend PulsarとMilky Wayの2本。どちらもGalaxyコレクションです。爪の写真はあまりありませんが、興味がある方は続きをどうぞ。

Day 1 - Warrambool. This is Flagstaff Hill Maritime Village.
It's laid out like an 1870s period village and has a museum featuring
a large collection of items from shipwrecks

第1日目、Warramboolの町に到着。これはFlagstaff Hillという1870年代の港町を再現した町。博物館なんかもあり、このあたりで難破したLoch Ard号を初めとする数々の船の遺品などが収められています。この日はこのVillageのナイトショー(Loch Ard号が難破したときのお話)を見て終了。

Day 2 - Tower Hill Reserve. This is an inactive volcano where wildlife are abundant.
A cute wallaby greeted us near the entrance of the reserve

第2日目、Tower Hill Reserveに向かう。ここは死火山でクレーターができており、野生動物が多数棲みついています。このワラビーは入口付近でお出迎えに来てくれた模様。

Father & baby emus near the Visitor Centre at Tower Hill

ここではいくつかウォーキングトラックがあるので、とりあえずビジター・センターに向かってみると・・・。エミュー親子に遭遇!夢中で草を食んでいました。赤ちゃんエミューの可愛さったら(゚∀゚)

There are 4 walking tracks in this Reserve. We luckily spotted an echidna on one of the tracks

ここTower Hillに4つほどあるウォーキングトラックのうちの1つを散策中、旦那殿がハリモグラを発見!可愛い顔してますな~。カメラ向けたらポーズ取ってくれました。

Looking down on a crater from one of the walking tracks

高台からクレーターを見下ろしたところ。4つのウォーキングトラックすべてを3時間ほどかけて回ったので既に足はガクガク。

Back to Flagstaff Hill Village. Model of Loch Ard that shipwrecked around this area

Warrnamboolの町へ戻る。前日に見られなかったFlagstaff Hill Villageの博物館へ。この地域で難破したLoch Ard号のモデル。

There were only two survivors on Loch Ard shipwreck.
And another one, which is this porcelain peacock almost as tall as a human, was recovered
completely intact

この難破したLoch Ard号には乗客とクルー合わせて55人ほど乗っていましたが、生存者はたったの2名。それともう1つ、この陶器のクジャク。人の高さほどもあるこのクジャク、どこも欠けることなく回収されたんだそう。いくらか忘れましたが、難破船から引き揚げられたお宝として最高額が付けられているらしい。

Moving on to Port Campbell  - this is famous 12 apostles

Warramboolを離れ、次の宿泊地Port Campbellへ。ここの一帯は奇岩が立ち並び、国立公園になっています。この岩たちは有名な「12使徒」。ちょっと曇りがちであまりいい写真が撮れず。

Day 3 - Port Campbell National Park. This is Bay of Islands
Look at the rock on the left bottom!

第3日目、Port Campbell国立公園を隅から隅まで移動。ほとんど奇岩群を眺める日となりました。これはBay of Islands。左の岩とか、どうなってんのこれ?

Going down to see the 'Grotto'

1つの見どころから別の見どころまで車で5分程度なので、ちまちま停まりつつ奇岩群を見ていく。これは洞穴みたいになっているGrottoに下って見に行くところ。

London Bridge - Left part and the rock used to be joint together

ロンドン橋と呼ばれる奇岩。左の岩と以前はつながっていたそうですが、波の浸食で崩落。崩落したとき先端の方にいた観光客とか怖かっただろうなぁ・・・(汗。

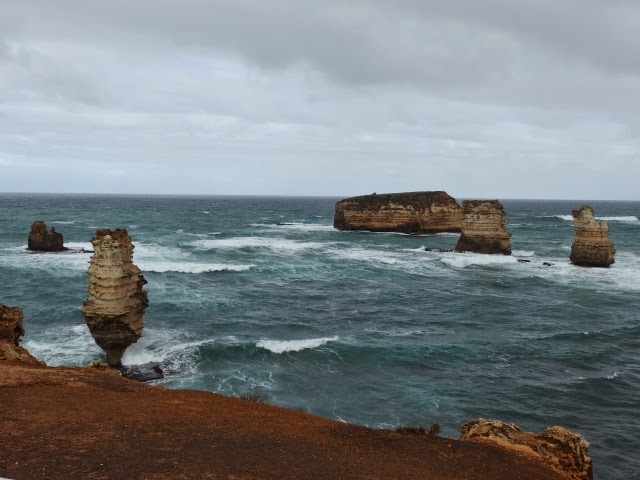
Loch Ard Gorge, where the tragic shipwreck occurred. Loch Ard went aground here
after over 90 days of travel from England, just an hour before it reached a safe port.

お次はLoch Ard Gorge。Loch Ard号が難破した場所です。この船はイギリスを離れて90日以上もの航海の後、港まであと1時間というところでこの場所で岩礁にぶつかって沈んだのです。乗客たちの無念は如何ばかりか・・。この左下側が浜になっていて、2人の生存者がここに流れ着いて命拾いをしました。

Loch Ard Gorge from a different angle. The left rock in the middle is where Loch Ard hit

Loch Ard Gorgeを別の方角から見たところ。真ん中左の岩の先端部分にLoch Ard号はぶつかったそうです。霧が濃くてよく見えなかったんだそうで、悲劇ですね。この地帯は「難破コースト」と呼ばれるほど船の難破が多く発生した地帯です。報告されているものとされていないものも含めて600隻ほど沈んだのではと言われています。

Another rock formation called the 'Razorback'. The insta video below shows the view here plus Dance Legend 'Pulsar'

また少し進み、こちらはRazorbackと呼ばれる奇岩。インスタでもここの動画を挙げました。


インスタ動画の下半分はこのとき塗っていたPulsar。1度塗りだとかなりムラになるのですが、2度塗りでかなりカバーされ、これは3度塗りです。左は日向ショット。右が日陰でカラーシフトを見せているところ。ホロ粒子が写真だと見づらいですが、日に当たると美麗です。

Day 4 - Driving toward Apollo Bay.
We drove through Kenett River and spotted 10 or more koalas here

第4日目、奇岩地帯を後にしてApollo Bayへと向かう。この日はほぼ車で走り続けで、途中Kenett Riverでコアラ探しをしたぐらい。しかしここのコアラたちの数が凄かった!高い木の上で寝ている野生のコアラを割とすぐに発見できました。全部で10頭ぐらい?野生動物の宝庫と言われるカンガルー島でもこんなにたくさんのコアラは見なかったよ。

Most of the koalas we spotted were asleep high up in the trees,
but some were awake and looking around

ほとんど日中は寝ているコアラですが、ぼーっとしていたりあたりを睥睨しているコアラもちらほら。そしてインスタの方でアップしたもう1つの動画がこちら。こちらのポリッシュはMilky Wayです。


このコアラのふわふわなお尻・・・(*´д`*)下まで降りてきたら触ってやるー!と思ったのですが、途中まで降りてサッサカとまた登って行きました。このMilky Wayは同じく3度塗り。こちらも4色ほどのカラーシフトを見せて本当に見てて飽きませんでした。

Day 5 - Driving toward Melbourne. We didn't stop anywhere on the way.
This is an ocean view from the Great Ocean Road

第5日目、Apollo Bayからメルボルンへ。この日はあまり写真を撮りませんでした。ずっと海沿いを走っていくので上の写真のような光景が続きます。

かなり曲がりくねった道が続くので途中アクシデントも発生。レンタカーに乗ったアジアの観光客に車のボンネットあたりを追突されてかなり傷を付けられました。今保険会社とその件で旦那殿がやり取りしてくれていますが、愛車に傷がついて2人ともショック。

メルボルンでは日本食材を売るお店2店ほど回り、ふりかけやらお好み焼の粉やら梅干しやら、普段なかなか手に入らないものを山ほど購入。合計金額300ドル(チーン)。ラーメン屋も2店ほど回って久々に日本の味を堪能。

そんな感じで駆け足でしたがグレート・オーシャン・ロードの旅の紹介でした♪ 次回はまた通常運転に戻ります。

にほんブログ村 美容ブログ 自爪ネイルへ