Bliss Kiss Simply Peel (New Branding) & Simply Kissed Review

Monday, October 31, 2016 6 Comments A+ a-

I have quite a bit going on in my life at the moment, and I'm not planning to do new nails any time soon. I do however have some fabulous products to show you that I received from my favourite nail care shop, Bliss Kiss. The items I'm showing you today is new branding Simply Peel Liquid Latex Barrier and Simply Kissed Moisturizing Lip Balm.

Before I go into review, here are the links to the Bliss Kiss store and SNS:

最近プライベートでバタバタしており、しばらくネイルはできなそうです。ネイル記事の更新を楽しみにしてくださっている方々、すみません。今日は私のお気に入りネイルケアショップ、Bliss Kissから届いた商品のご紹介。お見せするのはSimply Peel(新ラベル)リキッドラテックスとSimply Kissed保湿リップバームです。

レビューに入る前に、Bliss KissのショップとSNSへのリンクはこちら。

So these are the products I received. Left is Simply Peel Liquid Latex Barrier. Product page is here and the price is $12.47. Right is Simply Kissed Moisturizing Lip Balm. Product page is here and the price is $3.49.

こちらが受け取った2点。左がSimply Peelリキッドラテックス。製品ページはこちらで、価格は$12.47。右がSimply Kissedリップバーム。製品ページはこちらで、価格は$3.49。

I'll show you Simply Peel first. Some of you may remember my first Simply Peel review I did on this post. The one I'm showing you today is in a new label. Everything else except for the label; formula, volume, bottle, brush etc, is exactly the same, so I would recommend reading the post above for in-depth review about this product. The left bottle in the pic is the old model, and the right bottle is the new branding one that you can buy from the shop.

まずはSimply Peelをお見せします。ブログを長期フォローしてくださっている方は1年以上前にアップしたこちらのレビュー記事を覚えている方もいらっしゃるかもしれません。今日ご紹介するのはラベルが変更されたものです。フォーミュラをはじめ、容量、ボトル、ブラシなど、ラベル以外の点に変更はないため、製品について詳しく知りたい方は上記のレビュー記事をご覧ください。写真左のボトルが古いモデル、右のボトルが現在購入できる新モデルです。

At the back of the bottle, you can find directions and a list of ingredients. Note that if you have latex allergy, be sure not to use the product.

ボトルの裏側には用法と成分一覧が記載されています。ちなみにラテックスアレルギーの方は本製品を使用しないようご注意ください。

I showed 3 usages of Simply Peel in my other post, so I'll just show you a quick demo this time. It performs exactly the same with the old one; after you apply it around your nail, it dries clear in few minutes. Then do whatever messy stuff necessary (gradient, water marble etc), and just peel it off in one nice piece.

前のレビューでSimply Peelの使い方3つをご紹介済みですので、今回は簡単なデモのみ。効果などは以前のボトルとまったく同じです。爪の周りにSimply Peelを塗ると数分で色がクリアに変化して乾いたことが分かります。その後グラデーションやウォーターマーブルなどのネイルアートを施して、剥がすときはペロンと簡単に途切れることなく剥がすことができます。

When you purchase Simply Peel, you may also receive this friendly notice. During transit, it sometimes happens that the package containing Simply Peel is left in extreme heat, causing it to dry up. If you receive the package and Simply Peel is already solid and unusable, don't fret. You just need to contact Bliss Kiss and they are happy to replace it for free. Now tell me, how many companies do you know give you a notice like this? Seriously, Bliss Kiss has the best customer service.

なお、Simply Peelを購入すると上のような注意書きが添付されてくると思います。配送中、Simply Peelが入った小包が極度に暑い環境に置かれたりすると、固まってしまうことがあります。小包が無事届いて中身を開いたらSimply Peelが固形になっていて使えない!なんていう事態になってもご心配なく。Bliss Kissに連絡すれば無料で交換しますよ、という内容です。わざわざこういった注意書きを添えてくる会社、他にどのぐらい知っていますか?このあたりがBliss Kissのカスタマーサービスが最高と言われる所以だと思います。

Moving onto Simply Kissed Moisturizing Lip Balm. This is a completely new product that Bliss Kiss recently started to sell. If you read the product description, you'll get to know how it was developed and how much effort was put into creating this little product.

お次はSimply Kissed保湿リップバームのご紹介。こちらはBliss Kissが最近リリースした新製品です。製品説明を読むと完璧な製品に仕上げるために費やした努力など、開発秘話を読むことができてためになります。

As the description says, 'Simply Kissed™ lip balm is a unique blend of five natural ingredients with no additives, preservatives, colorants or fragrances. Many lip balms contain petroleum derivatives which actually cause dryness and require even more frequent applications.' Ana is right - my most used lip balm, Vaseline Lip Therapy, lists petrolatum as the first ingredient. 

商品説明によると、「Simply Kissed™ リップバームは5つの自然由来の成分をブレンドし、添加物、保存料、顔料、香料は一切使用されていません。多くのリップバームには石油由来の成分が含まれており、これが乾燥を引き起こし、頻繁に塗る必要が生じます」とのこと。なるほどおっしゃるとおり、私の愛用のVaseline Lip Therapyにも成分一覧の一番最初にpetrolatum(鉱油)が挙げられています。

So, I decided to put this product to test. A bit of a background of my lip status. My lips are the most troublesome part of my whole body - they are always dry, cracking, peeling, sometimes bleeding. I subconsciously reach for my lips and start peeling because there's always a loose skin on my lips, and my husband always goes mad because that often leads to bleeding. As I said before, I use Vaseline Lip Therapy most exclusively for 5+ years. I just like the smell of it, and its very waxy texture makes me think it's very moisturising. Is it effective? Well, I still have cracking lips even when I use this, so I would say not so much. But I still keep using it because none of the other lip balms I have tried completely give me silky smooth lips, and as I said, I like its smell so much.

この新製品、早速使ってみることにしました。その前に私のリップの状態について事前情報を。私のリップは体全体で最も問題のあるパーツと言っても過言ではないです。常に乾燥してひび割れていて、皮がむけて出血を伴うこともあります。いつも皮が剥がれた状態なので、無意識のうちに手が唇に伸びてさらに皮をむいてしまい、血が出るほど酷い状態になって旦那に怒られることも。前にも書いたようにリップバームにはVaseline Lip Therapyを5年以上使用しています。この匂いが好きで、リップがツヤツヤになるので保湿十分に感じられるところが気に入っています。それで効果のほどはというと、ひび割れなどが改善されたわけではないので効果抜群とはいいがたいです。とはいえ、今まで試したリップバームはどれもイマイチだったので、匂いが気に入ったこちらの製品をずっと使い続けていたという経緯です。

Back to Simply Kissed. I've used this exclusively for a week and took note of how everything went. No lip photos sorry, I wasn't game enough to take a photo of my 'before' status!

Simply Kissedに戻ります。テストとして1週間ほど、これだけを使い続けて感想を書き綴ってみました。唇の写真は出てきませんのでご安心を。「使用前」写真など恐ろしくて撮れませんでした(汗。

Day 1: Just before I started using it, I subconsciously peeled off my lip skin again and had a massive bleeding. Tissue was covered with blood! When that was settled, I applied Simply Kissed. It had no smell and was very light in texture compared to Vaseline Lip Therapy. My lips dried in about an hour, so I applied again. I repeated that every few hours that day, ended up applying 6-8 times all up. I applied again just before bed.

Day 2: My lips were dry when I woke up so I applied again. I decided to apply a little thicker than I did on Day 1. I applied every 2-3 hours. My lips started to feel smooth and less loose skin. I applied just before bed.

Day 3: I woke up in the middle of the night and my lips were dry, so I applied again. In the morning my lips were moist with minor loose skin. I applied every 2-3 hours, and by evening I had no loose skin. I applied just before bed.

Day 4: When I woke up in the morning, my lips were still moist and smooth. No dead skin to pick at. Because of this, I forgot to apply frequently and only applied like every 4-5 hours. 

Day 5 onward: I kept this 'every 4-5 hours' pace and my lips were in great condition. I sometimes get loose skin which peels off smoothly without bleeding and my lips stay smooth not bumpy.

1日目: 使用を開始する前、また唇の皮を無意識にむいてしまい、血が大量に出てしまう。ティッシュは文字通り血の海・・・。出血が落ち着いてからSimply Kissedを塗る。匂いはなく、Vaseline Lip Therapyと比べると非常に軽いテキスチャー。1時間ほどで乾いてしまったので再度使用。この日はこれを数時間おきに繰り返し、合計6-8回ほど塗る。寝る前にも塗布。

2日目: 朝起きたときに唇が乾いていたので再度塗る。1日目は軽く塗ったが、もう少し厚めに塗るよう心掛ける。塗る間隔は2-3時間おき。唇がスムーズになり、皮が剥がれてくることが少なくなってくる。寝る前にも塗布。

3日目: 夜中に目が覚めたときに唇が乾いていたので再塗布。朝起きたときにはまだ潤っており、皮が少しむけていた程度。2-3時間おきに塗り、夕方にはルーススキンがなくなってくる。寝る前に再塗布。

4日目: 朝起きたときに唇はまだ潤っており、ルーススキンもなくスムーズ。むける皮がないので少し手持無沙汰(笑。状態が良かったのでこの日は4-5時間おきに塗り直し。

5日目以降: 以降は4-5時間ペースでの塗り直しで唇のコンディションは良好。たまにルーススキンができるが、ポロっと綺麗に剥がれて血が出ることはなく、唇がデコボコになることもなくスムーズ。

So, I was ready to do a full week's test, even two weeks if necessary, but at Day 5, my lips were already in great condition. As of this writing, it's been already two weeks since I started using it, and I have zero problem. I don't remember the last time my lips are this smooth, not bumpy, and without bleeding! The result may change for individuals, climates, and work environment, but for me this Simply Kissed worked amazingly. Another great well-thought product from Bliss Kiss, and I know I'll be stocking up when this one runs out. If you have trouble with your lips as I do, why not try this?

というわけで、必要とあらば2週間やろうと思っていた使用テストですが、5日目で既に唇のコンディションが大幅に改善されました。執筆時点で使用開始後既に2週間経っていますが、いまだに調子がいいです。これほどスムーズで皮もなくデコボコもなく、出血もない状態はいつ以来かな?というぐらい。もちろん使用する人、気候、生活や仕事環境によっても結果は変わってくると思いますが、このSimply Kissed、私には抜群に相性がよかったです。Bliss Kissの製品にはいつも感心させられますが、この製品も期待を裏切りませんでした。値段も手ごろだし、この1本がなくなったらまとめ買いする予定です。リップコンディションに不満がある方はぜひ試してみてください。


*Products sent for honest review
*記事中の製品はレビュー目的で送っていただいたものです

Skull & Splatter Mani

Friday, October 21, 2016 2 Comments A+ a-

By this time of the month, almost every nail artist in the world has created at least one Halloween mani for the year right? Well, I wasn't really sure if I'd be able to create one this year. I'm just not good at creating seasonal manis which have to be done at certain time of the year. After I did the review on Pueen Halloween plate, however, I feel motivated to create one just in time.

Middle finger & ring finger: Base is Sinful Colors Cold Leather (middle) and JOSS Dazzling (ring). Because Sinful Colors Cold Leather is a matte polish and decal won't stick to a matte surface, I applied topcoat before proceeding. I made stamping decals out of 2 different skull images from Pueen Halloween Party 01 plate using Pueen Pure White, and coloured in with red (JOSS Dazzling), gray (A-England Wuthering Heights), and navy (Sinful Colors Cold Leather). Once decals are dry, I peeled them off stamper and placed each on these 2 nails. Finished off with HK Girl topcoat.

Thumb, pointer &  pinkie: Base is Rimmel Gray Matter. I stamped the splatter image on the same plate with navy (Ya Qin An Navy), red (Pueen Exotic Red) & white (Pueen White). 

I couldn't finish this mani in one sitting as I was super busy. Decals were pre-made (just before topcoated) on Day 1, base was painted on Day 2, and the rest of the process I finished on Day 3, duh! There are just too many things going on at the moment, that it's hard to concentrate on doing nails. Anyway, I'm glad I have one Halloween mani done this year. I've seen so many purple and orange manis this month already, so tried staying away from those colours. No a typical Halloween mani, but that's what I like about this mani.

この時期になると、世界中のネイルアーティストさんたちは少なくとも1つぐらいはハロウィンネイルを作成済みのことと思います。季節もののネイル作成が苦手な私としては、「何も思い浮かばないし、今年は無理かな~」なんて思っていたのですが、前回Pueenのハロウィンプレートをレビューしたときにちょっとやる気が出て1つ作ってみました。出来上がりはこちら。
Finished product. In the sun

中指と薬指: ベースはSinful Colors Cold Leather (中指) と JOSS Dazzling (薬指)。Sinful Colors Cold Leatherはマットポリッシュなのですが、decalはマットな表面には貼りつかないので事前にトップコートを塗っておく。Pueen Halloween Party 01プレートの2つのスカル柄をPueen Pure Whiteでスタンプし、赤 (JOSS Dazzling)、グレー (A-England Wuthering Heights)、ネイビー (Sinful Colors Cold Leather) で色付けしてdecal作成。decalが乾いたらスタンパーから剥がし、この2本の爪に配置。仕上げはHK Girlトップコート。

親指、人差し指、小指: ベースはRimmel Gray Matter。同じプレートの水しぶき柄をネイビー (Ya Qin An Navy)、赤 (Pueen Exotic Red)、白 (Pueen White) でスタンプしてトップコートで仕上げ。

使用ポリッシュはこちら。
Polishes used

左から、

JOSS Dazzling
Sinful Colors Cold Leather
Rimmel Gray Matter
A-England Whuthering Heights
Pueen Exotic Red
Pueen Pure White
Ya Qin An Navy
What do you think of this gray-navy-red combo? I reckon they work quite well together

このネイル、1日で完成することが出来ず3日に及んでしまいました。1日目はdecalをトップコート塗る直前まで仕上げ、2日目は爪にベースを塗っただけで終わり、3日目に残りのプロセスを終わらせました。最近はいろいろやることがあり、ネイルの時間をまとまって取るのが難しい。。。しかも、実際ネイルを作成する時間よりも、デザインや色の組み合わせを考える方が何倍も時間が掛かるわけで。
By the way, this midi ring is from Luna Pyxis. I bought 3 recently, and am keen to get more!

ともあれ、ハロウィン定番の紫やオレンジを捨ててネイビー・グレー・赤という新しい色合わせに挑戦できたのは何より。メインの2本(中指と薬指)以外の爪は同じ3色を使って簡単に水しぶき柄をポンポンとスタンプ。ハロウィンぽくないけどちょっと新鮮で自分では気に入っています。ちなみに中指のミディリングはLuna Pyxisで購入しました。もっといろんな種類欲しいな~。


Pueen Cosmetics Halloween Party & Double Fun Plate Review

Monday, October 17, 2016 2 Comments A+ a-

I have 2 new plates to show you today. They are newest release from Pueen Cosmetics, and one is Halloween plate and the other is a layering plate called Double Fun. 

As usual, here are the links to Pueen Cosmetics store and SNS:


今日はまたPueen Cosmeticsの新作スタンピングプレート2枚のご紹介。1枚目はハロウィンプレートで、もう1枚はDouble Funというレイヤリングプレートです。

いつものように、Pueen CosmeticsのショップとSNSへのリンクはこちら。


These are what I received. Product page is here and here. Price is $4.99 each.

こちらが受け取った品。製品ページはこちらこちら。価格は1枚$4.99。


This is what the plates look like after taking the blue film off. Plate measures 12.5cm x 6.5cm.

ブルーフィルムを剥がすとこんな感じ。プレートのサイズは12.5cm x 6.5cm。


As with other rectangle plates from Pueen, they have pretty plastic backing as shown above. It's quite thick and makes the plate sturdy. Below, I'll show you each plate pic followed by paper swatch. Swatches are done with a regular polish (Sinful Colors Savage). As the images vary in size, I included measurement of some of the images for reference.

Pueenの他の長方形プレートと同様、上のような可愛らしいプラスチックの台座が付いています。かなり厚めの台座なのでプレートが安定します。以下、プレートの画像と紙swatchを続けてお見せします。Swatchには通常ポリッシュ(Sinful Colors Savage)を使用。柄のサイズはまちまちなので、一部の柄についてサイズも明記しました。


First up is Halloween Party 01 plate. Great variety of Halloween images perfect for this season. Full size images are all 2.4cm x 1.7cm, so they are great for long nail gals. Smaller image are not too small, not to big, just the right size. Everything stamps wonderfully.

最初のプレートはHalloween Party 01プレート。この季節に最適なハロウィン柄が満載のプレートです。フルサイズの柄は2.4cm x 1.7cmなので、長い爪の方に最適です。小さ目の柄は大きすぎず小さすぎず、ちょうどいい大きさ。どの柄も綺麗にスタンプしました。


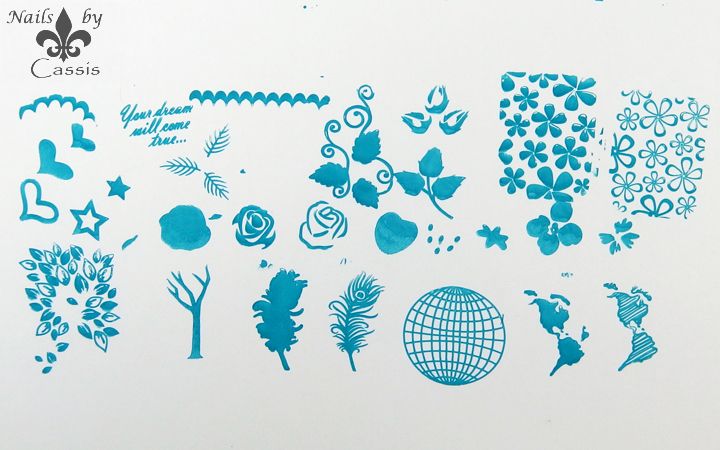
And this is Double Fun 01 plate. As you can see, this is a 'layering plate'. If you don't know what a layering plate is, I recently reviewed one on this post with some example so you can get an idea. You can get tree+leaves, feathers, strawberry, globe, rose, flowers etc out of this little plate. It sure is a fun plate, and again everything stamps beautifully.

そしてこちらがレイヤリングプレートのDouble Fun 01プレート。レイヤリングプレートって何?という方は、こちらのポストで最近レビューしたときに使用例をご紹介しているのでご参考まで。このプレートから木と葉っぱ、羽、イチゴ、地球、薔薇、花などの重ねスタンプが可能です。こちらも楽しげなプレートですね。そしてどの柄も綺麗にスタンプしました。

So what do you think about these plates? I only have a few Halloween plates and layering plates, so I'm excited to have these in my collection. I haven't done any Halloween manis yet this year, and am hoping to create one soon.

というわけでこの2枚のプレート、いかがでしたでしょうか。ハロウィンプレートもレイヤリングプレートも数枚しか持っていなかったので、使うのが楽しみです。今年はまだハロウィンネイルを1つも作成していないので、近々作成できればと思います。


*Products sent for honest review
*記事中の製品はレビュー目的で送っていただいたものです

Urban Geometrics Mani

Thursday, October 13, 2016 0 Comments A+ a-

I feel a bit better for the last couple of days, so I decided to create a design using one of the Cici & Sisi acrylic plates that I showed you on previous post

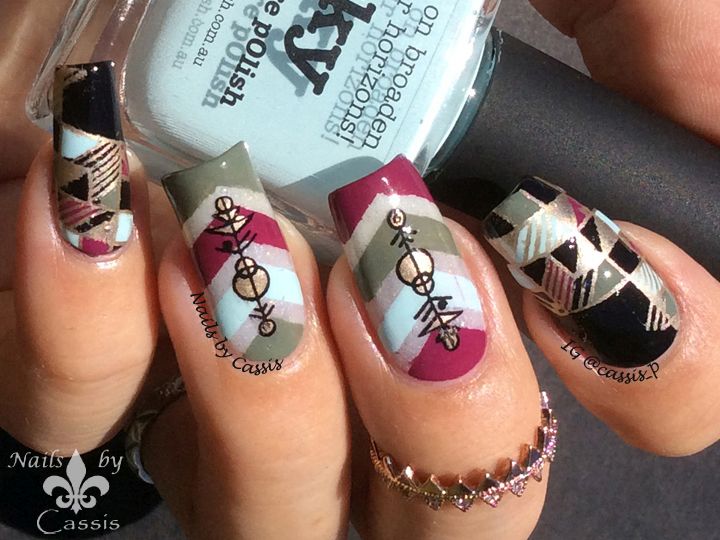
Thumb, middle & ring finger: Base is one thin coat of Picture Polish Lakodom. I placed 3 sets of regular chevron tape from What's Up Nails, and painted Picture Polish bonkers, camo & sky on each divided section. I peeled off the tapes as I painted them. Next, I made a stamping decal out of arrow geometric image on Cici & Sisi Geometry 01 plate using Messy Mansion Carbon, coloured in with Messy Mansion Soft Gold. I peeled off the decal and placed it onto these 3 nails. Finished off with Glisten & Glow HK Girl topcoat.

Pointer & pinkie: Base is Face of Australia Don't Judge Me (black). I made a stamping decal out of a different geometric image on the same plate using Messy Mansion Soft Gold, coloured in with Picture Polish shades used above, and placed it onto these nails. 

All 4 plates are fabulous, but I couldn't resist using this Geometry 01 plate first. As for colours, I simply used a few more of my untried Picture Polish shades (bonkers, camo & sky), and I was surprised they go so well together. I'm happy with the end result. 

ここ数日体調がよかったので、さっそく前回のポストでご紹介したCici & Sisiのアクリルプレートを使ったネイルを1つ作成してみました。出来上がりはこちら。
Finished product, taken in the sun

親指、中指、薬指 : ベースはPicture Polish Lakodomを薄く一度塗り。 What's Up Nailsのシェブロンテープを3つ爪に置き、Picture Polish bonkers、camo、skyを各セクションに塗ってテープを剥がす。次にCici & Sisi Geometry 01プレートの矢印風の柄をMessy Mansion CarbonでスタンプしてMessy Mansion Soft Goldで色付けし、decal作成。decalが乾いたらこの3本の爪に貼り付けてGlisten & Glow HK Girlトップコートで仕上げ。

人差し指と小指 : ベースはFace of Australia Don't Judge Me (黒)。同じプレートの別の幾何学模様をMessy Mansion Soft Goldでスタンプし、上記のPicture Polish3本を使って色付けしてdecal作成。この2本の爪に貼り付ける。

使用ポリッシュはこちら。
Polishes used

上段左から、

Picture Polish Lakodom
Picture Polish sky
Picture Polish camo
Picture Polish bonkers

下段左から、

Face of Australia Don't Judge Me!
Messy Mansion Carbon
Messy Mansion Soft Gold
I had a hard time coming up with a name for this mani. When I googled 'urban color palette',
the colours shown match the colours I used here, hence the name 'Urban Geometrics' mani

どれも素敵なプレートでしたが、特にGeometry 01プレートがカッコよかったのでこれをまず使ってみました。色合いは少し迷ってまたPicture Polishの中からまだ使ったことのなかった3本(bonkers、camo、sky)をチョイス。なかなかまとまりある感じに仕上がって自分でもびっくり。
I was planning to go for negative space look, but decided to use Lakodom as base instead

最初はnegative space(素爪を一部見せるネイル)にしようと思ったのですが、デザイン的に爪の線がだいぶ見えてしまうのでLakodomをベースに薄く塗って「なんちゃってnegative space」風にしました。V字テープの部分がもっとすっきりとした直線になれば言うことなかったですが、それ以外は満足な仕上がりになりました。


Cici & Sisi Acrylic Plate Review

Saturday, October 08, 2016 6 Comments A+ a-

After I did my first review on their acrylic plate, Cici & Sisi released a bunch more plates for us to drool over. I received some of them in the mail for review, and would like to show the swatches and share my thoughts.

Before I go into review, here are the links to Cici & Sisi store and SNS:


Cici & Sisiの最初のアクリルプレートを以前にレビューしましたが、それ以降も続々とアクリルプレートがリリースされています。レビュー用に数枚届いたので、その感想と共にswatchをお見せしたいと思います。

レビューに入る前に、Cici & SisiのショップとSNSへのリンクはこちら。

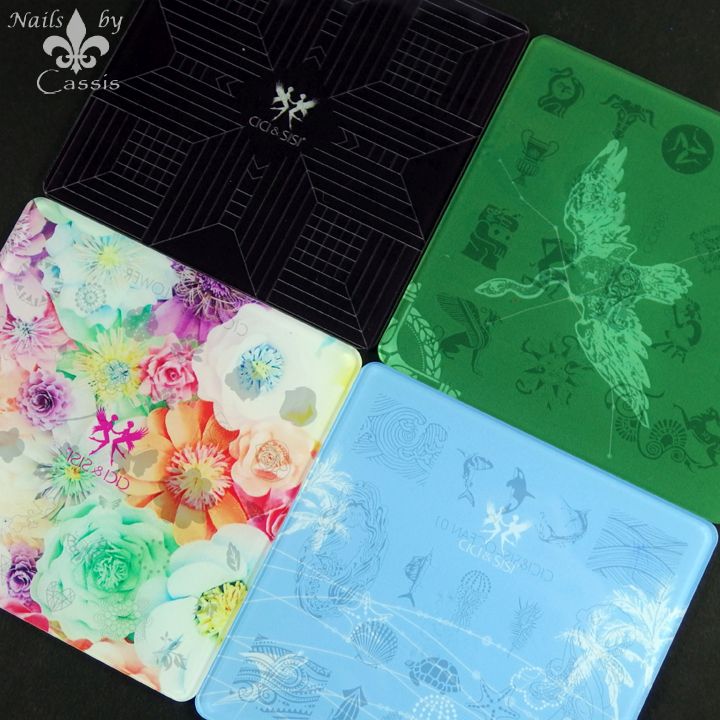
So these are the plate I received. You can find all the acrylic plates under this page. Each plate measures 9.5cm x 9.5cm, and is priced at $5.99. 

こちらが届いたプレートたち。アクリルプレートの製品ページはこちら。各プレートのサイズは9.5cm x 9.5cmで、価格は$5.99です。

This is the back of the plates. How pretty are these!? Makes me want to collect all the themes.

プレートの裏側はこんな感じ。可愛いですね~。全テーマ集めたくなります。

Below I'll show you each plate pic followed by paper swatch. For some of the images, I included a measurement as well so you can get an idea of the size of the stamp. Swatch is done with a regular nail polish (Sinful Colors Savage) and Messy Mansion pink stamper. 

以下、各プレートの写真と紙swatchを続けてお見せします。柄の大きさは一定ではないので、参考までに一部の柄のサイズも記載しています。swatchは通常ポリッシュ(Sinful Colors Savage)とMessy Mansionピンクスタンパーで行っています。


First up is Greek Myth 02 plate. So super gorgeous and unique. I have a soft spot for cultural plates, and this one is just perfect. All the images stamp beautifully.

最初のプレートはGreek Myth 02プレート。ゴージャスかつユニークでたまらんですね~。こういう文化テーマのプレートには本当に弱いです。どの柄も綺麗にスタンプしました。


Next up is Geometry 01 plate. OK folks, I freaking LOVE this plate! I have a lot of geometric plates, but this one is so intricate and unique. Most of the images are 1.6cm x 2.0cm, so it's a great size. 

お次はGeometry 01プレート。このプレート、一目見て思わず目がハートになってしまいました。幾何学模様プレートはたくさん持ってますが、なんと複雑かつ精緻な模様たちなんでしょう・・。ほとんどの柄は1.6cm x 2.0cmというちょうどいい大きさです。

I have one issue with this plate however. The pic above is after I applied polish and scraped. Can you see the vertical lines and Cici & Sisi logo appearing on the surface? Somehow back printing of the plate shows through the surface as a dent. Does this affect stamping? Yes it does a little bit. It's not very obvious in paper swatch, but being a fussy stamper I am, I did notice it. 

このプレート、残念な点が1つだけあります。上の画像はポリッシュを塗ってスクレイプした後の状態なのですが、無数の縦線とCici & Sisiのロゴが浮かび上がっているのが見えるでしょうか?どうもプレートの裏側のプリントが表面に窪みとして出てきてしまっているようです。別にスタンピングに影響がなければ問題ないのですが、これが多少影響あります。紙swatchではあまり見えないかもしれませんが、クオリティにうるさい人は少し気になるレベルです。


Moving onto next plate, this is Ocean 01 plate full of sea creatures and wavy patterns. There are 2 images that are quite big, that you might want to use across multiple nails. All other images are of nice size. Everything stamps nicely.

お次は海の生物や波模様が満載のOcean 01プレート。かなり大き目の柄が2つありますが、複数の爪にまたがるようにして使うと良いかと思います。その他はどれも使いやすい大きさです。どの柄も綺麗にスタンプしました。


Last but not least, Flower plate. This one is typically called 'layering plate' or 'layered plate' and has a different use than other plates. You stamp one image, then stamp (layer) another with different colour on top of the previous stamp using clear stamper. I'll show you some examples below. As for the quality, I mis-stamped a few images which I repeated on the very right. Everything looks great.

最後にFlowerプレート。このプレートは一般的に「レイヤリング(重ね使い)専用プレート」と呼ばれていて、他のプレートとは使い方が少し異なります。1つ目の柄をスタンプし、その上にクリアースタンパーを使って別の色で別の柄を重ねる、という使い方になります。以下でデモしますのでご参考まで。プレートのクオリティに関しては、ミススタンプをしてしまったものがあるのでいくつかやり直しました(右端)。どれも綺麗にスタンプしています。

Above is the example of how you use this layering plate. This enables you to use multiple colours without resorting to advanced stamping (decals). Lining up multiple images needs a bit of a practice, but once you get used to it, it saves time and still gives fun effect.

このレイヤリングプレートの使用例が上の画像のとおり。ご覧のようにdecalに頼らずに複数の色を組み合わせることができます。複数の柄を重ねていくので初めは少し練習が必要ですが、慣れると時間短縮にもなりカラフルに仕上げることができます。

So there you have it. Another fun plates from Cici & Sisi, and I'm excited to have these in my collection. (Updated to add: As for cleaning acrylic plates, make sure you use acetone-free remover so you don't risk melting the plates.) I'm slowing down with my nail activity due to my health problem, but I'll create some nail arts when I feel better.

というわけで、Cici & Sisiのアクリルプレート4枚のご紹介でした。(追記:アクリルプレートのクリーンアップについて書き忘れてしまいましたが、アセトン入りではなくアセトンフリーのリムーバーを使うようにしてください。プレートが溶けてしまうのを避けるためです。)どれも楽しいプレートばかりなので、気になるものがある方はショップを覗いてみてください。現在、体調に問題がありネイル頻度がだいぶ落ちていますが、具合のいいときにこれらのプレートを使ったネイルを作成してみたいと思います。


*Products sent for honest review
*記事中の製品はレビュー目的で送っていただいたものです

Heart 'n Lace Stamping & Nail Vinyl Mani

Sunday, October 02, 2016 4 Comments A+ a-

Awww what a bummer. I caught the flu. I wasn't in great condition as is, and now flu decided to join. I've been in bed for days but I got sick of it and decided to crawl out of bed yesterday to do my nails. Only my left hand though, I didn't have the energy to do my right. For this mani, I used a stamping plate and nail vinyls that Ejiubas sent me for review (see previous post for review).

Middle & ring finger: I started off with base coat. I placed a piece of striping tape horizontally on nail, and painted Picture Polish blush on the bottom part of the nail. Then I made stamping decal out of lace pattern on Ejiubas EJB-01 plate using Messy Mansion Dogwood Pink (review post here), and painted Picture Polish allure on it. I peed off the decal, cut into shape and placed it vertically on nail. Next I used the heart vinyls from Ejiubas ES-020. I placed the vinyl on Simply Neat Miracle Mat by Bliss Kiss, painted Picture Polish muse over it, and immediately peeled the vinyl off the mat. I applied Daiso topcoat to make a decal and waited for it to dry. I peeled it off and placed it onto the nail just above the stamp. Finished off with HK Girl topcoat.

Thumb, pointer & pinkie: Base is PP muse. I used the star vinyl from Ejiubas ES-020 this time. I placed the vinyl on the mat, painted PP blush over it, and immediately peeled the vinyl off the mat. Rest of the process is the same with above, except that I placed it vertically on nail.

I told you on the previous review post, but I'm loving this heart & star vinyls on Ejiubas ES-020. They are so unique and pretty. Middle & ring fingers turned out exactly what I envisioned. I couldn't decide what to do with other fingers until at the last moment, but decided to use star vinyls. I'm happy with the overall look.

ちょっと更新が空いてしまいました。最悪なことに風邪をひいてしまい、鼻水ズルズル&酷い咳でしばらく寝込んでいました。ただでさえ体が弱っているところにダブルパンチ(-_-) 咳するたびに横隔膜も痛いし、喉が焼けるよう。でもあまり寝てばかりも飽きるので、昨日ベッドから這い出て久々に爪を塗ってみました。気力がないので左手だけ(笑。前回のポストでご紹介したEjiubasのネイルスティッカーとスタンピングプレートを組み合わせたネイルです。出来上がりはこちら。
Finished product with HK Girl topcoat

中指と薬指: ベースコートでスタート。ラインテープを爪に水平に置き、爪の下半分にPicture Polish blushを塗る。Ejiubas EJB-01プレートのレース柄をMessy Mansion Dogwood Pink(レビューはこちら)でスタンプし、スタンパー上でPicture Polish allureを塗ってdecal化。decalを剥がして形を整え、爪に垂直に置く。次にEjiubas ES-020のハートスティッカーを使用。Bliss KissのSimply Neat Miracle Matにスティッカーを貼り付け、Picture Polish museを上から塗ってすぐマットからスティッカーを剥がす。ダイソートップコートを塗ってdecal化し、乾くのを待つ。乾いたら剥がしてスタンプ柄のすぐ上に水平に配置。仕上げはHK Girlトップコート。

親指、人差し指、小指: ベースはPP muse。今度はEjiubas ES-020の星スティッカーを使用。マットにスティッカーを貼り付け、上からPP blushを塗ってすぐスティッカーを剥がす。残りのプロセスは上と同じ、ただしdecalは垂直に配置。

使用ポリッシュはこちら。
Polishes used

左から、

Picture Polish blush
Picture Polish allure
Picture Polish muse
Messy Mansion Dogwood Pink
I normally don't come up with this colour combo, but I simply picked some untried Picture Polishes.
They work pretty good together I reckon

レビュー記事でも書きましたが、ES-020シートの柄はユニークで可愛いので早速使ってみました。頭で思い描いた通りの出来になってくれて嬉しい限り。他の指はノープランで始めてしまったのですが、結局同じシートの星のスティッカーを使うことにしました。
There are a lot of steps involved in this mani as you can see in the tutorial. Some people might say, 'Nobody has time for that!', but wait, a sick girl can do it so why can't you?

このネイル、ちょっと手順が多くて動画をまとめるのが大変でした。今回みたいにちょっと手の込んだネイルをすると、「そんな時間ないよww」なんて陰で言われることがあるのですが、本当にそうかね?病人でもできるんだから、普通の人ならチョチョイとできるよたぶん。
There are so many other fun designs on this Ejiubas nail vinyl set. Go have a look at their website
if you're interested

こういう色の組み合わせ、あまりやった覚えがないのですが、Picture Polishの中から単純に未使用ポリッシュを選んでみました。なかなか悪くない組み合わせかと。

というわけでスタンプとスティッカーの組み合わせネイルでした。Ejiubasの製品が気になる方はショップを覗いてみてください。

Ejiubas Nail Vinyls (ES-013~ES-020) Review

Thursday, September 22, 2016 0 Comments A+ a-

Anyone who's into stamping should know the brand Ejiubas by now. They make fabulous stamping plates which I reviewed on this post before, but they also sell other nail art necessities such as gel nail polish, stamping mat, and nail vinyls. Today I'm reviewing their nail vinyls.

Before I go into review, here are the links to Ejiubas shop and SNS:

スタンピングをされる方であればEjiubasというブランドをどこかで耳にしたことがあるのではないかと思います。このブランドは素敵なスタンピングプレートを作る会社で、私も以前に一度レビューしたことがありますが、ジェルやスタンピングマット、それからネイルスティッカーなどのその他ネイルアート製品も多数リリースしています。今回レビューするのはネイルスティッカーです。※ちなみに英語ではnail vinyls(発音は「ヴァイナル」)なのですが、日本語で何と呼ばれているのかよく分かりません。便宜上「スティッカー」としますが、決まった訳があるのであればどなたか教えてください。

レビューに入る前に、EjiubasのショップとSNSへのリンクはこちら。

This is what I received. 8 sheets of nail vinyls that contain heaps of different designs. You can purchase this set from here or here, and the price is $12.99 as of this writing.

こちらが受け取った品。さまざまなデザインのネイルスティッカー8シートです。この商品はこちら、またはこちらから購入でき、価格は執筆時点で$12.99。


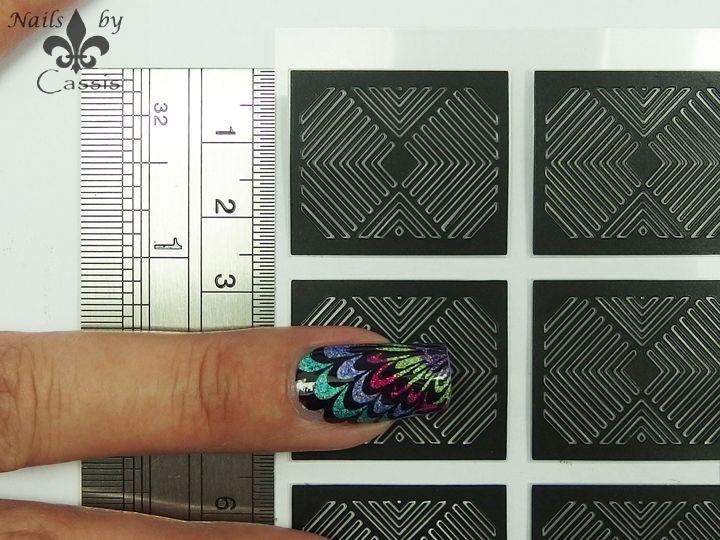
Each sheet is separated into 12 sections, and each section measures 2.5 x 3.0cm as shown above. My nail is about 2.0cm, so you can see it's fairy large.

各シートは12のセクションに分かれており、各セクションは2.5 x 3.0cmです。私の爪の長さが2.0cmなので、かなり大きいのがお分かりいただけると思います。


For those of you who are not familiar with the use of nail vinyls, the packet comes with an instruction you can refer to. Now, I'll show you each individual sheet followed by a close-up shot.

製品の使い方がよく分からないという方のためにこのような指示書が同封されています。迷ったら参考にしてみてください。それでは、中身のシートを1枚ずつご紹介します。


ES-013 sheet contains 2 different geometric patterns. It has 6 stickers per design, meaning you can only do 6 nails to do the same design. I really wished there are at least 10 stickers. I usually play around with nail vinyls to practice on nail stick, then to my right hand before I do the main hand. This means by the time I get to do my left hand, I'm only left with 1 or 2 stickers depending on how much I use beforehand.

ES-013シートには2種類の幾何学模様が含まれています。1つのデザインに付きスティッカーは6枚、つまり同じデザインを作成するのに6本の爪にしか使えないということになります。ここはせめて10枚は欲しいところ。私は通常ネイルを作成するときにまずネイルスティックで練習してから右手を仕上げ、本番の左手に取り掛かります。ということは、事前にどれだけ使ったかにもよりますが左手をやる頃にはスティッカーが1~2枚しか残らない計算になります。


ES-014 sheet contains 2 designs, one looking like UK flag, and the other like a curtain. If I ever do a UK mani, I'll probably reach for this one. Again, 6 stickers for each design.

ES-014シートはイギリス国旗のような柄とカーテンのような柄の2つのデザイン。イギリスネイルを今後やる場合に使いたいシートですね。こちらも1デザインにつき6枚です。


ES-015 contains another fun looking geometric designs. I especially like the one on the right hand side.

ES-015はまた別の幾何学模様2種類。右側のデザインなんか、楽しい使い方ができそうです。


ES-016 sheet has yet another geometric designs. Ohhh I love this one! Those triangles will make a fab designs for sure.

ES-016も幾何学模様です。このシートいいですね~。右側の三角形なんか、使い道がいろいろありそうです。


ES-017 contains gorgeous roses. Whole 12 stickers are the same pattern, which I reckon is great. Also note that the sticker is fairy large, so if you have smaller nails, you may get 2 uses out of one sticker. I have a feeling this sheet is going to be very popular.

ES-017は豪奢な薔薇のデザイン。12枚すべて同じ柄なのでちょっと練習したいときにも安心して使えます。また、スティッカー自体大きめなので、小爪な方は1枚で2つの爪に使えるかもしれません。このシートは人気が出るんじゃないでしょうか。


ES-018 is a butterfly nail vinyl. Again 12 stickers for the same design. I'll explain later, but you can cut this sticker in two parts and do 2 separate nails if necessary.

ES-018はチョウチョのデザイン。こちらも12枚すべて同じ柄です。後で説明しますが、1枚を2つに切り分けて2つの爪に使うこともできます。


ES-019 contains random zigzag shape. I'll use this one for demo later.

ES-019はランダムな形状のジグザグ模様。後でデモをお見せするときにこのシートを使います。


Last one, ES-020 contains 4 different designs, 3 of which has star, heart, and butterfly in thin lines, and the other is like a heartbeat pattern. This sheet is so unique and pretty. For the star/heart/butterfly stickers, you can potentially get 15 uses out of one design. 

最後のシート、ES-020には4つのデザインが含まれており、そのうちの3つは星、ハート、チョウチョの柄が直線の中に入ったもので、もう1つは心拍のような柄。ユニークなシートですね。星、ハート、チョウチョのスティッカーは小さめなので、それぞれ15回分使えることになります。

Next, I'll be showing you a quick demo on how to use these vinyls. I'll show you 2 ways, one using a silicone mat and the other using directly on nails.

それでは次に、これらのスティッカーの使い方を簡単にお見せします。やり方は2通り、シリコンマットを使う方法と爪に直接使う方法をデモします。


First I'll show you how to use nail vinyls using silicone mat. For this demo, I use ES-019. 
  1. Peel vinyl off the sheet using tweezers.
  2. Stick it onto clean surface of the silicone mat.
  3. Apply nail polish of your choice to the vinyl.
  4. Peel the vinyl off the mat. Make sure you do this while polish is still wet.
  5. Apply topcoat on the design on the mat to make a decal.
  6. Peel the decal off the mat.
  7. Stick the decal onto your nail and apply topcoat.
まずシリコンマットを使用したネイルスティッカーの使い方をご紹介します。このデモではES-019を使用。
  1. ツイーザーなどを使用してシートからスティッカーを剥がす。
  2. シリコンマットが汚れていないことを確認し、スティッカーを貼り付ける。
  3. お好きなポリッシュをスティッカーの上から塗る。
  4. スティッカーをマットから剥がす。ポリッシュが乾く前にこれをやること。
  5. マット上のデザインにトップコートを塗ってdecal化する。
  6. マットからdecalを剥がす。
  7. decalを爪に貼り付けてトップコートを塗る。

Next, I'll show you how to use nail vinyls directly on nails. For this demo, I use ES-018. I still have watermarble mani on, so I just use that as a base.
  1. Peel vinyl off the sheet using tweezers.
  2. Apply it onto your nail. Make sure your nail is completely dry.
  3. If the vinyl is too big, cut it off so it sticks better to your nail.
  4. Apply nail polish of your choice to your nail. You can also use sponge here.
  5. Peel the vinyl off while the polish is still wet, and apply topcoat.
  6. (Optional) The other part of the vinyl that's left on the sheet can also be used. Simply apply it on your nails and topcoat.
次に、爪に直接ネイルスティッカーを貼って使う方法をご紹介します。このデモではES-018を使用。前回のウォーターマーブルネイルをベースに使います。
  1. ツイーザーなどを使用してシートからスティッカーを剥がす。
  2. スティッカーを爪に貼り付ける。このとき、爪は完全に乾いた状態であることが重要です。
  3. スティッカーが大きすぎる場合は、ハサミで切り取って爪の表面にぴったりと貼りつくようにする。
  4. お好きなポリッシュをスティッカーの上から塗る。またはスポンジを使っても可。
  5. ポリッシュが乾かないうちにスティッカーをすぐに剥がしてトップコートを塗る。
  6. (オプション) シートに残った残りのスティッカーも形状や大きさによっては使えます。爪に貼り付けてトップコートを塗れば完成。
I only used these two vinyls to do the test so far, but they both worked great. Out of two methods, my favourite is the one using silicone mat. Applying polish on the flat surface on the mat rather than on curvy nails give much cleaner outline, and in case it doesn't come out great, you can simply discard that and do it again. If you do it on your nails and the design didn't come out nice, then you risk having to redo the base and start all over again. Besides, polish on your nail has to be completely dry, otherwise the vinyl will peel off the base, where if you use silicone mat, it doesn't really matter if the polish on nail is still tacky.

上記のデモで使った2種類のスティッカーしかまだ試していませんが、どちらも使用感は良好です。2つの方法のうち、私のお勧めはシリコンマットを使う方法。マットの平たい表面にポリッシュを塗る方がカーブのある爪の上で塗るよりもデザインの輪郭がはっきりするのと、万が一輪郭が綺麗にならなくてもまたやり直せばいいだけです。一方、爪の上でスティッカーにポリッシュを塗ってうまくいかない場合、ベースからやり直す羽目になります。また、爪に直接使う場合はベースが完全に乾いていないとスティッカーがベースを剥がしてしまうことになりますが、マットを使えば爪の上のポリッシュは完全に乾いていなくても問題ないという利点もあります。

So there you have it! Hope this review is helpful to those who are unsure about how to use nail vinyls, and to those who are wondering what this particular vinyl set is like. This nail vinyl set from Ejiubas offers a nice variety of designs, so if you are interested, be sure to check out their store. I can't wait to do some designs with them.

ということで、Ejiubasのネイルスティッカーのご紹介でした。使い方が分からなかった方、興味はあるけど使い勝手はどうだろうと悩んでいた方たちの参考になれば幸いです。今回ご紹介したセットはデザインのバラエティも豊富でいろいろ楽しめると思います。気になる方はショップを覗いてみてください。これからどんな風に使おうか考えてみます。


*Products sent for honest review
*記事中の製品はレビュー目的で送っていただいたものです