
Ejiubas Nail Vinyls (ES-013~ES-020) Review
Anyone who's into stamping should know the brand Ejiubas by now. They make fabulous stamping plates which I reviewed on this post before, but they also sell other nail art necessities such as gel nail polish, stamping mat, and nail vinyls. Today I'm reviewing their nail vinyls.Before I go into review, here are the links to Ejiubas shop and SNS:
- Store : http://www.ejiubas.com/
- Store (Amazon) : https://www.amazon.com/
- Instagram : https://www.instagram.com/ejiubas/
- Facebook : https://www.facebook.com/ejiubas
スタンピングをされる方であればEjiubasというブランドをどこかで耳にしたことがあるのではないかと思います。このブランドは素敵なスタンピングプレートを作る会社で、私も以前に一度レビューしたことがありますが、ジェルやスタンピングマット、それからネイルスティッカーなどのその他ネイルアート製品も多数リリースしています。今回レビューするのはネイルスティッカーです。※ちなみに英語ではnail vinyls(発音は「ヴァイナル」)なのですが、日本語で何と呼ばれているのかよく分かりません。便宜上「スティッカー」としますが、決まった訳があるのであればどなたか教えてください。
レビューに入る前に、EjiubasのショップとSNSへのリンクはこちら。
- ショップ : http://www.ejiubas.com/
- ショップ (Amazon) : https://www.amazon.com/
- インスタグラム : https://www.instagram.com/ejiubas/
- Facebook : https://www.facebook.com/ejiubas

This is what I received. 8 sheets of nail vinyls that contain heaps of different designs. You can purchase this set from here or here, and the price is $12.99 as of this writing.
こちらが受け取った品。さまざまなデザインのネイルスティッカー8シートです。この商品はこちら、またはこちらから購入でき、価格は執筆時点で$12.99。
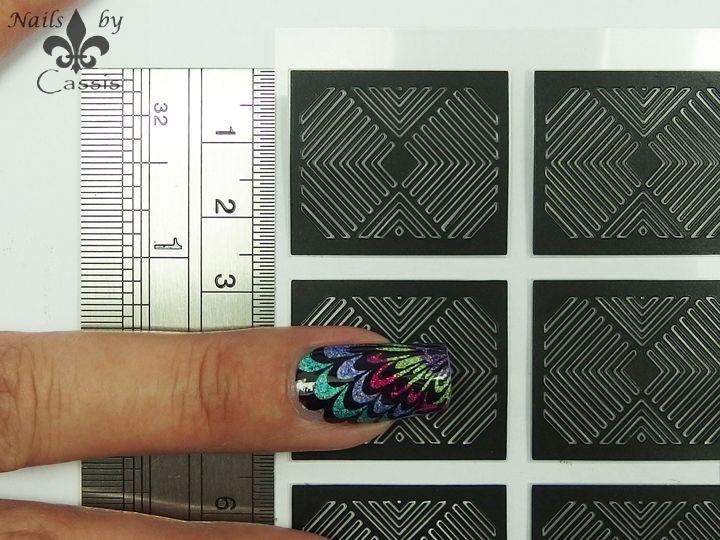
Each sheet is separated into 12 sections, and each section measures 2.5 x 3.0cm as shown above. My nail is about 2.0cm, so you can see it's fairy large.
各シートは12のセクションに分かれており、各セクションは2.5 x 3.0cmです。私の爪の長さが2.0cmなので、かなり大きいのがお分かりいただけると思います。

For those of you who are not familiar with the use of nail vinyls, the packet comes with an instruction you can refer to. Now, I'll show you each individual sheet followed by a close-up shot.
製品の使い方がよく分からないという方のためにこのような指示書が同封されています。迷ったら参考にしてみてください。それでは、中身のシートを1枚ずつご紹介します。


ES-013 sheet contains 2 different geometric patterns. It has 6 stickers per design, meaning you can only do 6 nails to do the same design. I really wished there are at least 10 stickers. I usually play around with nail vinyls to practice on nail stick, then to my right hand before I do the main hand. This means by the time I get to do my left hand, I'm only left with 1 or 2 stickers depending on how much I use beforehand.
ES-013シートには2種類の幾何学模様が含まれています。1つのデザインに付きスティッカーは6枚、つまり同じデザインを作成するのに6本の爪にしか使えないということになります。ここはせめて10枚は欲しいところ。私は通常ネイルを作成するときにまずネイルスティックで練習してから右手を仕上げ、本番の左手に取り掛かります。ということは、事前にどれだけ使ったかにもよりますが左手をやる頃にはスティッカーが1~2枚しか残らない計算になります。


ES-014 sheet contains 2 designs, one looking like UK flag, and the other like a curtain. If I ever do a UK mani, I'll probably reach for this one. Again, 6 stickers for each design.
ES-014シートはイギリス国旗のような柄とカーテンのような柄の2つのデザイン。イギリスネイルを今後やる場合に使いたいシートですね。こちらも1デザインにつき6枚です。


ES-015 contains another fun looking geometric designs. I especially like the one on the right hand side.
ES-015はまた別の幾何学模様2種類。右側のデザインなんか、楽しい使い方ができそうです。


ES-016 sheet has yet another geometric designs. Ohhh I love this one! Those triangles will make a fab designs for sure.
ES-016も幾何学模様です。このシートいいですね~。右側の三角形なんか、使い道がいろいろありそうです。


ES-017 contains gorgeous roses. Whole 12 stickers are the same pattern, which I reckon is great. Also note that the sticker is fairy large, so if you have smaller nails, you may get 2 uses out of one sticker. I have a feeling this sheet is going to be very popular.
ES-017は豪奢な薔薇のデザイン。12枚すべて同じ柄なのでちょっと練習したいときにも安心して使えます。また、スティッカー自体大きめなので、小爪な方は1枚で2つの爪に使えるかもしれません。このシートは人気が出るんじゃないでしょうか。


ES-018 is a butterfly nail vinyl. Again 12 stickers for the same design. I'll explain later, but you can cut this sticker in two parts and do 2 separate nails if necessary.
ES-018はチョウチョのデザイン。こちらも12枚すべて同じ柄です。後で説明しますが、1枚を2つに切り分けて2つの爪に使うこともできます。


ES-019 contains random zigzag shape. I'll use this one for demo later.
ES-019はランダムな形状のジグザグ模様。後でデモをお見せするときにこのシートを使います。


Last one, ES-020 contains 4 different designs, 3 of which has star, heart, and butterfly in thin lines, and the other is like a heartbeat pattern. This sheet is so unique and pretty. For the star/heart/butterfly stickers, you can potentially get 15 uses out of one design.
最後のシート、ES-020には4つのデザインが含まれており、そのうちの3つは星、ハート、チョウチョの柄が直線の中に入ったもので、もう1つは心拍のような柄。ユニークなシートですね。星、ハート、チョウチョのスティッカーは小さめなので、それぞれ15回分使えることになります。
Next, I'll be showing you a quick demo on how to use these vinyls. I'll show you 2 ways, one using a silicone mat and the other using directly on nails.
それでは次に、これらのスティッカーの使い方を簡単にお見せします。やり方は2通り、シリコンマットを使う方法と爪に直接使う方法をデモします。

First I'll show you how to use nail vinyls using silicone mat. For this demo, I use ES-019.
- Peel vinyl off the sheet using tweezers.
- Stick it onto clean surface of the silicone mat.
- Apply nail polish of your choice to the vinyl.
- Peel the vinyl off the mat. Make sure you do this while polish is still wet.
- Apply topcoat on the design on the mat to make a decal.
- Peel the decal off the mat.
- Stick the decal onto your nail and apply topcoat.
まずシリコンマットを使用したネイルスティッカーの使い方をご紹介します。このデモではES-019を使用。
- ツイーザーなどを使用してシートからスティッカーを剥がす。
- シリコンマットが汚れていないことを確認し、スティッカーを貼り付ける。
- お好きなポリッシュをスティッカーの上から塗る。
- スティッカーをマットから剥がす。ポリッシュが乾く前にこれをやること。
- マット上のデザインにトップコートを塗ってdecal化する。
- マットからdecalを剥がす。
- decalを爪に貼り付けてトップコートを塗る。

Next, I'll show you how to use nail vinyls directly on nails. For this demo, I use ES-018. I still have watermarble mani on, so I just use that as a base.
- Peel vinyl off the sheet using tweezers.
- Apply it onto your nail. Make sure your nail is completely dry.
- If the vinyl is too big, cut it off so it sticks better to your nail.
- Apply nail polish of your choice to your nail. You can also use sponge here.
- Peel the vinyl off while the polish is still wet, and apply topcoat.
- (Optional) The other part of the vinyl that's left on the sheet can also be used. Simply apply it on your nails and topcoat.
次に、爪に直接ネイルスティッカーを貼って使う方法をご紹介します。このデモではES-018を使用。前回のウォーターマーブルネイルをベースに使います。
- ツイーザーなどを使用してシートからスティッカーを剥がす。
- スティッカーを爪に貼り付ける。このとき、爪は完全に乾いた状態であることが重要です。
- スティッカーが大きすぎる場合は、ハサミで切り取って爪の表面にぴったりと貼りつくようにする。
- お好きなポリッシュをスティッカーの上から塗る。またはスポンジを使っても可。
- ポリッシュが乾かないうちにスティッカーをすぐに剥がしてトップコートを塗る。
- (オプション) シートに残った残りのスティッカーも形状や大きさによっては使えます。爪に貼り付けてトップコートを塗れば完成。
I only used these two vinyls to do the test so far, but they both worked great. Out of two methods, my favourite is the one using silicone mat. Applying polish on the flat surface on the mat rather than on curvy nails give much cleaner outline, and in case it doesn't come out great, you can simply discard that and do it again. If you do it on your nails and the design didn't come out nice, then you risk having to redo the base and start all over again. Besides, polish on your nail has to be completely dry, otherwise the vinyl will peel off the base, where if you use silicone mat, it doesn't really matter if the polish on nail is still tacky.
上記のデモで使った2種類のスティッカーしかまだ試していませんが、どちらも使用感は良好です。2つの方法のうち、私のお勧めはシリコンマットを使う方法。マットの平たい表面にポリッシュを塗る方がカーブのある爪の上で塗るよりもデザインの輪郭がはっきりするのと、万が一輪郭が綺麗にならなくてもまたやり直せばいいだけです。一方、爪の上でスティッカーにポリッシュを塗ってうまくいかない場合、ベースからやり直す羽目になります。また、爪に直接使う場合はベースが完全に乾いていないとスティッカーがベースを剥がしてしまうことになりますが、マットを使えば爪の上のポリッシュは完全に乾いていなくても問題ないという利点もあります。
So there you have it! Hope this review is helpful to those who are unsure about how to use nail vinyls, and to those who are wondering what this particular vinyl set is like. This nail vinyl set from Ejiubas offers a nice variety of designs, so if you are interested, be sure to check out their store. I can't wait to do some designs with them.
ということで、Ejiubasのネイルスティッカーのご紹介でした。使い方が分からなかった方、興味はあるけど使い勝手はどうだろうと悩んでいた方たちの参考になれば幸いです。今回ご紹介したセットはデザインのバラエティも豊富でいろいろ楽しめると思います。気になる方はショップを覗いてみてください。これからどんな風に使おうか考えてみます。
*Products sent for honest review
*記事中の製品はレビュー目的で送っていただいたものです


