Turquoise Diamond Mani for Debbie's Birthday Collage

Friday, July 31, 2015 2 Comments A+ a-


August 16th Update: I replaced the video at the end of this post with YouTube version.

July 30th was my IG friend Debbie @ladyandthe_stamp's birthday, and Tracy @scarletohara65 contacted Debbie's friends including me to do a birthday mani for her. The theme wasn't set, just whatever we think Deb will like. Some created a recreation of one of her designs, but I decided to do a fresh mani using her favourite colour, turquoise.

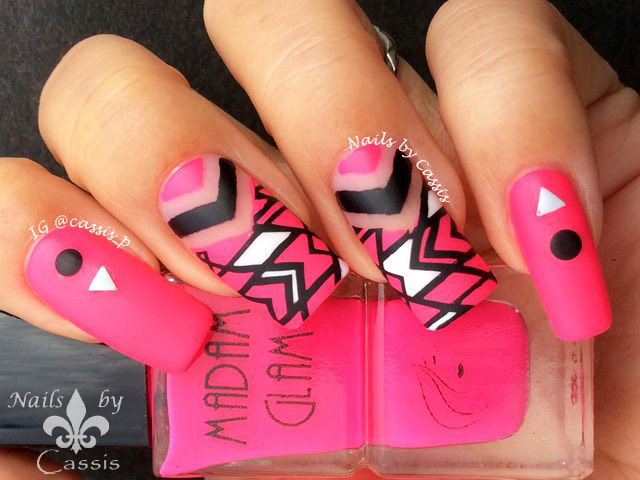
Thumb, middle finger & ring finger : I started off with Dance Legend Holy Diver. I used a diamond pattern from BP-L009 plate sent by Harunouta using Mundo de Uñas Black. I painted roughly half of these nails in black diagonally, then stamped a floral pattern from hehe 043 using MdU Gold (for middle finger) and Reddish (for ring finger). I finished off with Glisten & Glow HK Girl topcoat.


Pointer & pinkie : Base is the same and I used the same diamond pattern from BP-L009, but only half the pattern using a metal template from Messy Mansion (review post here). Finished off with the same topcoat.


This Holy Diver is such a fabulous turquoise holo, and I knew Debbie has it and loves it. This mani was created about 2 weeks ago when we had cloudy days on end. I kept putting off creating this because I wanted to take pics in full sun. Debbie was so excited about our creations, and that made us all really happy!


8/16更新:記事最後の動画をYouTube版に置き換えました。 

7/30はインスタのお友達Debbie @ladyandthe_stampの誕生日でした。Debbieの親友の Tracy @scarletohara65が私を含む共通の友達に声を掛けてくれて、彼女のためにネイルを作成しようということに。バースデーネイルのテーマは特になかったので、Debbeのネイルの再現ネイルをやった人もいれば、彼女の好きな「ターコイズ」を使ったネイルをした人もいました。私は後者です。出来上がりはこちら。

Finished product, with Glisten & Glow HK Girl topcoat. In the sun

親指、中指、薬指 : ベースはDance Legend Holy Diver。春の歌からいただいたBP-L009のダイヤ柄をMundo de Uñas Blackでスタンプ。爪の半分ほどを斜めに黒で塗りつぶし、hehe 043の花柄をMdU Gold(中指)およびReddish(薬指)でスタンプ。仕上げはGlisten & Glow HK Girlトップコート。

人差し指と小指 : ベースは同じ。BP-L009の同じ柄をスクレイプしてMessy Mansionのメタルテンプレート(レビュー記事はこちら)を置き、その上からピックアップして爪に転写。仕上げは同じトップコート。

使用ポリッシュはこちら。

Polishes used

左から、

Dance Legend Holy Diver
Face of Australia Don't judge me!
Mundo de Uñas Black
Mundo de Uñas Gold
Mundo de Uñas Reddish

And this is the birthday collage for Debbie. All look amazing!

ちなみにこれがバースデーコラージュ。Debbieはたくさんの方に愛されているのが分かりますね♡

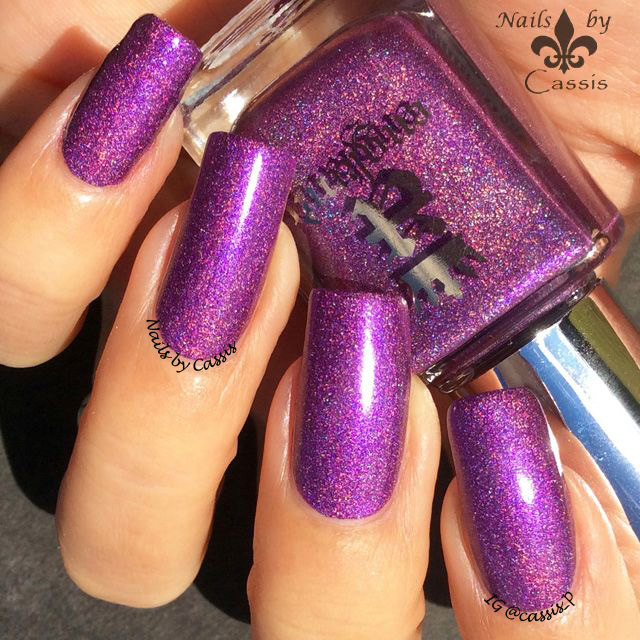
I also took pics just the base alone because... just look at this! *swoon*

久々にHoly Diverを塗ったので単体での写真も撮りましたよ。このホロのプリズムはいつ見てもヤバい(゚∀゚) Debbieもこのポリッシュを持っていて、大好きなポリッシュだと言っていたので今回採用。

When I use sparkly polish like, I sometimes don't know what colours to match it.
Black & gold works great for any colour, but surprisingly red goes quite well also

こういうキラキラすぎるポリッシュを使うときってどんな色と合わせるか非常に迷うのですが、とりあえず定番の黒と金を合わせてみて、最後に赤を追加。花スタンプの土台となる部分を黒で塗りつぶしたのはこうした方がその上の花が映えるから。でないとたぶんベースのキラキラに負けます。

I used Messy Mansion metal template for the first time. You can use thick paper for the same purpose, but I like that it's much sturdier and reusable

今回、Messy MansionのAccessory Kitに入っていたメタルテンプレートを初めて使ってみました。ちょっと厚めの紙でも同じ使い方ができますが、ボロボロになったりしないしアセトンで綺麗にして再利用できるのが◎。もっと活用していきたいですね。

このネイルを作ったのはちょうど2週間前。ず~っと曇りの日が続いていたので作成を先延ばしにしていました。やっぱりこのホロは晴天下で撮りたかったので。工程はあっけないほど簡単でDebbieに気に入ってもらえるか心配でしたが、嬉しいコメントをいただけたので一安心♪


にほんブログ村 美容ブログ 自爪ネイルへ

Crane & Flowers Stamping Mani

Thursday, July 23, 2015 4 Comments A+ a-

August 10th Update: I replaced the video at the end of this post with YouTube version.

Finally the day has come that I put this idea into creation. I've had this design in mind ever since I saw hehe 048 plate, which has flying crane stamp. Flying crane is an essential element in traditional Japanese designs including kimonos, and I've been searching everywhere for a stamp like this to be able to create another kimono inspired mani. 

Now that I have hehe 048, I finally decided to work on this design last week. I made a few samples, but couldn't possibly decide on what colours to use for flowers. I decided on black/red/gold/white quite easily, as they are traditional Japanese colours, but I needed more colours that perfectly complement the look. I don't know how many polishes I pulled out from my Helmer, but none of them I didn't think was right. Then when I received my order from Color4Nails, and tried two A-England polishes, I thought 'THIS IS IT!!' and sure enough, these two were simply perfect for this design.

Thumb, middle finger & pinkie - I started off with Face of Australia 'Don't judge me!' (black), and dabbed JOSS More Nail Gold (gold) lightly on each nail with makeup sponge. Then I added a wavy pattern from hehe 023 plate with Mundo de Uñas Reddish, then crane (except for pinkie) from hehe 048 with Mundo de Uñas White using decal method. I finished off with Glisten & Glow HK Girl topcoat.

Pointer & Ring finger - I started off with the same black, added wavy pattern from hehe 023 with Mundo de Uñas Gold, then flowers from hehe 051 plate using decal method. For flowers, I used 2 A-England shades in addition to red & white to colour in. I finished off with the same topcoat.

I can't tell you how happy and relieved I finally created this design. I've been spending whole week just to decide on the right colours! This mani is like dream-come-true for me, and I didn't want to spoil it by using odd colours. It has a perfect Japanese feel to it, and I couldn't be happier with the result.

8/10更新:記事最後の動画をYouTube版に置き換えました。 

ついについに、鶴スタンプを使ったネイルを作成する日がやってきました。念願のhehe 048プレートを手に入れてからずっと構想を練っていました。まず出来上がりはこちら。

Finished product, with Glisten & Glow HK Girl topcoat. In the sun

親指、中指、小指 - ベースはFace of Australia 'Don't judge me!'(黒)。JOSS More Nail Gold(ゴールド)を三角スポンジにとり、軽く爪に乗せる。次に、hehe 023プレートの波型模様をMundo de Uñas Reddishでスタンプしてから、hehe 048プレートの鶴をMundo de Uñas Whiteでdecal方式で乗せる(小指以外)。仕上げはGlisten & Glow HK Girlトップコート。

人差し指、薬指 - ベースは同じ黒。hehe 023プレートの波型模様をMundo de Uñas Goldでスタンプし、hehe 051プレートの花柄をdecal方式で乗せる。花の色付けにはA-England 2本と赤・白を使用。仕上げは同じトップコート

使用ポリッシュはこちら。

Polishes used

上段左から、

Face of Australia Don't judge me!
A-England Crown of Thistles
A-England Fotheringhay Castle
JOSS Will Not
JOSS Dazzling
JOSS More Nail Gold

下段左から、

Mundo de Uñas Reddish
Mundo de Uñas Gold
Mundo de Uñas White

I used these 3 hehe plates to achieve this look. I had a bit of trouble transferring thin crane legs
directly onto my nails, so I decided to go with decals

今回のネイルに使った3つのプレートがこちら。すべて春の歌で購入できるheheプレートです。023はこのネイルをやるために自分で追加購入したもの。048が喉から手が出るほど欲しかった鶴プレート。鶴の細い足を爪に転写するのにやや手こずったため、直接転写はやめてdecalにしました。

Can you see the fabulous sparkles on the flowers by A-Englands? *swoon*

このネイルなんですが、デザインの作成に取り掛かってから約1週間ほど時間を費やしました。赤・白・黒・金以外の色がどうしても決まらなかったのです。Helmerからポリッシュを取り出してサンプルを作っては、「この色じゃない!ヽ(`Д´)ノウワァン」とちゃぶ台を返したくなること数知れず・・・。でも、ずっとずっとやりたかった鶴ネイルなので妥協したくなかったのです。

This wasn't a messy job, but I used Crystalline Nail Veil by Color4Nails for the first time.
It works great, and I know I will be using it for more messy jobs like gradient

完成が先延ばしになることを覚悟し始めたときに届いた2本のA-England。Swatchしたときから「もうこれしかない!」と直感しました。A-Englandのポリッシュって不思議と和柄に合うんですよね。自分のデザインながら、サンプルの仕上がりを見て痺れました(笑。

I also tried mattifying, and I like this look also. Which is your fav? 

ちなみにマット化もしてみました。こちらも趣がありますね(゚∀゚) インスタにはマット化前の写真を載せました。

というわけで念願かなっての鶴ネイル、出来栄えに非常に満足です。長い時間掛けて構想を練っていたこともあり、出来上がった時は本当にほっとしました。大好きな和柄ネイル、またちょくちょくやっていきたいです。

それでは動画をどうぞ。今回Color4NailsのCrystalline Nail Veilを初めて使ってみました。乾きも早いし簡単に剥がれるのでなかなかいいと思います。グラデーションネイルなんかで積極的に使っていきたいですね。

追記:今回のネイルに使用したheheプレートは「春の歌」サイトで購入できます。7/23~26にHeHe、BP、QA、QGIRL、Yのシリーズのプレートすべて50%オフというキャンペーンをやっていますのでこの機会にどうぞ。


にほんブログ村 美容ブログ 自爪ネイルへ

My First Color4Nails Haul & Review

Tuesday, July 21, 2015 8 Comments A+ a-

Last week was a horrible one for me. I had headache most of the week, and on Wednesday I received a text from my sister that one of our cats, Kuromame died. She had been sick for a while, and the vet told us that she had anemia and won't live very long. She was such a sweet girl, never gone into fight with our other cats  (we have 13 cats including her). She was only 3 years old. My heart was so heavy and I didn't feel like doing anything.

I had a good start this week though, as one of my nail mails arrived today. It was from Color4Nails. I took advantage of the 4th of July 20% off deal and placed my first order. Here's how the order went.
  • Paid: July 6th
  • Shipped: July 7th
  • Arrived: July 20th
They shipped my order in a day and it only took me 2 weeks to get here. It's worth noting that the shipping cost was only $11 for 5 items. I could be wrong, but last time I checked their website, the shipping was like $20 for international orders. They must have changed it, and lucky I checked because none of the other indie polish shops offer that low shipping cost. Anyway, let's see what I got.

先週はかなり精神的にも肉体的にも落ちてました。酷い頭痛があったのと、水曜日にうちの猫の1匹「くろまめ」を亡くしました。くろまめはずっと具合が悪かったようで、獣医さんの話では極度の貧血だったとのこと。姉から経過を聞いて覚悟はしていましたが、それでも信じられない思いでした。2012年に母が土手から拾ってきて飼い始め、まだ3歳の若さ。他の猫と喧嘩することもなく、大人しい本当にいい子でした。

なので先週はまったくネイルをする気力も起きませんでした。今週はいいことあるといいな・・と思っていた矢先、Color4Nailsからの初オーダー到着。Colors4NailsはLlaroweやHypnotic Polishと同じくインディーズポリッシュを扱うショップで、ちょうど独立記念日の20%セールをやっていたときにオーダーしました。到着まではこんな感じ。
  • 支払い : 7/6
  • 発送 : 7/7
  • 到着 : 7/20
翌日発送とはすばらしいですね。到着まで2週間しかかかりませんでした。1つ特筆すべきことは、送料が非常に安かったです。今回5点購入して送料たったの$11。確か以前は一律$20だったような記憶があるので、だいぶ安くなりましたね。他の似たようなショップと比べても格別に安いと思います。では購入したものを紹介します。


My order came like this. They were securely double-wrapped with bubble wraps

オーダーはこんな感じで到着。緩衝材で二重に包装されてきました。


2 A-Englands, Crystalline Nail Veil, and 2 Glisten & Glow HK Girl topcoats. My HK Girl topcoat is half the bottle now, and I was desperately in need of backups.

中身がこちら。A-England 2本、Crystalline Nail Veil、それからGlisten & Glow HK Girlトップコート2本。HK Girlトップコートは今使っているものがボトル半分になってきたので、バックアップとして買いました。


Here's Crystalline Nail Veil by Color4Nails. It only costs $6 for 8ml. This is my first latex-based cleanup assistant product. I used to use my PVA glue for messy job like watermarbles & gradients, but PVA glue dries super slow and I grew frustrated with it.

This product has a long & thin applicator as you can see in the photo. This may have both pros and cons. If you want to cover big area of your cuticles and skin, as you do with water marbles, this applicator may not be effective, but if you need precise application like going very close to your cuticles, this will surely help.

まずこちらがColor4NailsのCrystalline Nail Veil。8ml入りで$6。ウォーターマーブルやグラデーションネイルをするときにクリーンアップを楽にするためのものです。PVAグルーベースのものはDIYしたことがありますが、ラテックスベースのものは初めてです。PVAグルーはとにかく乾きが遅く、イライラすることが多くなってきたのでラテックスベースのものが欲しかったのです。

写真を見てお分かりのように、細長いアプリケーターが付いています。ウォーターマーブルのように広範囲を塗らなければいけない場合には不向きかもしれませんが、キューティクルの際の際まで塗りたい場合などには便利。


I was curious to see how fast it dries. I applied around my thumb and watched my clock. It mostly dried in 2 minutes, and there was one patch that I applied multiple layers and that part took 3 minutes to completely dry. As you can see, the colour turns to dark yellow once it's dry. My PVA glue takes about 15 minutes to dry, and I have to apply thick to be able to peel off in one nice piece. I'm so impressed with how quickly this Nail Veil dries.

一番興味があったのが「何分で乾くか」。親指の周りに薄く塗り、時計とにらめっこ。2分経過するとほとんどの部分が乾いてきました。1箇所、少し厚めに塗った部分は3分かかりました。乾いたかどうかは黄色の液が透明になるので判断できます。私が使っていたPVAグルーは乾くのに15分はかかり、しかも綺麗に剥がすためには厚塗りをしなくてはいけなかったので余計に時間がかかりました。このNail Veilは短時間で済むので使いやすそうです。


OK, how easily does it peel off? I applied fairly thin, but it came off in one nice piece, not like my PVA glue where bits and pieces always get stuck to my skin. 

Overall, I'm so happy with this product, just as I expected from a latex-based cleanup aid tool. I can't wait to start using it.

剥がれ方はどうでしょう?かなり薄く塗ったのですが、綺麗に一度にすべて剥がれました。PVAグルーを使うときは一度に剥がれず肌に少し残ったりしたのですが、そういうこともなし。

というわけでCrystalline Nail Veil、かなり好印象です。ラテックスアレルギーのある方は使えませんが、こういうのが1つあると便利だと思います。使うのが楽しみです。


Onto A-England swatches. I was going to simply show you swatch on nail stick, but these looked too pretty not to wear immediately! This is two coats of Crown of Thistles, no topcoat.

最後にA-Englandのswatchを。いつものようにネイルスティックのswatchをお見せして終わろうかと思ったのですが、あまりにも美麗なので爪に塗りたくなってしまいました。これはCrown of Thistles 2度塗り、トップコートなし。


These holo particles are simply divine. Adina's creations are pure magic.

ここのポリッシュは本当に複雑な、形容しがたい美しさがあります。Adinaさんの感性には本当に頭が下がります。


And this is two coats of Fotheringhay Castle, no topcoat. Such a unique colour, I can't think of any other polish like this one.

そしてこちらがFotheringhay Castle 2度塗り、トップコートなし。こちらも本当にユニークな色ですよね。こんな感じのホロ、他では見たことがありません。


Application is a breeze as with all A-Englands I have. You can get away with one thick coat or 2 thin coats. My dream is to add all A-Englands to my collection. lol

これまで何度も言っていますが、A-Englandは本当に塗っていて気持ちがいいです。厚く1度塗りか薄く2度塗りできちんと発色し、ムラになることもありません。A-England、これからも少しずつ買い揃えていきたいですね。

My first purchase at Color4Nails was a very positive experience, and I know I will be buying more from them in the future.

そんな感じでColor4Nailsでの初のお買い物でした。発送も早く送料も安いので、これからもちょくちょく覗いて利用していこうと思います。


I'll finish this post with a picture of Kuromame. This was taken in 2012 when she was less than one year old. Rest in peace sweetie, you will be dearly missed.

最後にくろまめの写真を1枚。2012年に撮ったものです。このときまだ1歳未満。本当に可愛い、いい子でした。まめちゃん、今までありがとう。先にいった猫たちと仲良く過ごしてね。

にほんブログ村 美容ブログ 自爪ネイルへ

Purple Stripe Lace Mani Featuring Madam Glam Polishes

Monday, July 13, 2015 10 Comments A+ a-

August 4th Update: I replaced the video at the end of this post with YouTube version.

I created another design using Madam Glam polishes. This time I used 'Lilac Madness' (lilac) and 'Midnight' (deep purple) together.

Middle & ring finger - I started off 2 with coats of 'Lilac Madness', and applied a fast drying topcoat (I used Essie Good to Go). Once that's dry, I placed 4 sets of striping tapes across the nail near the tip, painted JOSS Will Not (white) over the tapes, and peeled them off immediately. Then I made a stamping decal out of a lace pattern from BP-44 (sent by Harunouta) using Mundo de Uñas Cream, and painted 'Midnight' over it on the stamper. I left it for 30 minutes to dry then peeled off the stamper, cut the excess off and placed it near the top of those nails. I finished off by applying Glisten & Glow HK Girl topcoat.

Thumb, pointer & pinkie - 2 coats of 'Lilac Madness' topped with two pink pearls kindly gifted by my amazingly talented friend Minnie @Nailbee. Same topcoat.

Because this lilac polish is such a cute colour, I wanted to create something sweet and girly. It's such an easy mani, but I like the effect. I keep repeating myself but these two Madam Glam polishes have such a fabulous formula. They go on so smooth and butterly, and I'm not sure if I want to go back to my other cremes after trying these out!

8/4更新:記事最後の動画をYouTube版に置き換えました。 

Madam Glamポリッシュを使ったネイルもう1つ。今回は'Lilac Madness'(ライラック)と'Midnight'(濃い紫)を一緒に使ってみました。出来上がりはこちら。

Finished product, with Glisten & Glow HK Girl topcoat. In the sun

中指と薬指 - ベースは'Lilac Madness'を2度塗り。いったんトップコートを塗り(Essie Good to Goを使用)、乾いたらラインテープを4本ほど爪先付近に斜めに乗せ、上からJOSS Will Not(白)を塗ってすぐに剥がす。次に、だいぶ前に春の歌さんからいただいたBP-44プレートのレース柄をMundo de Uñas Creamでスタンプし、スタンパー上で'Midnight'を塗ってdecalを作成。30分ほど乾かしたらスタンパーから剥がし、余分な部分は切り取って爪の上部に乗せる。仕上げはGlisten & Glow HK Girlトップコート。

親指、人差し指、小指 - 同じく'Lilac Madness'を2度塗りし、いつも素晴らしいネイルを披露してくださるMinnie @Nailbeeからいただいたピンクのパールを2つずつ乗せてトップコート仕上げ。

使用ポリッシュはこちら。

Polishes used

左から、

Madam Glam Lilac Madness
Madam Glam Midnight
JOSS Will Not
Mundo de Uñas Cream

It was already 4 in the afternoon when I took these pics, so they have a bit of yellow tone
on my skin and the polish colour. My swatch here shows more accurate colour

今回のネイルはポリッシュの色が可愛らしいのでそれに合わせて少しガーリーにしてみました。直前までな~んにもデザインが浮かんできませんでしたが、突然頭にピコーンと電球が光ってこのレースとストライプをクロスさせるデザインを思い立ちました。

いつもは人差し指と小指はスタッズを付けるのですが、今回はガーリーな仕上がりに合わせてMinnieからいただいた可愛いピンクパールを追加♡ 改めて可愛い贈り物をくださったMinnieに感謝 *^^*

This design came to my mind at the last moment, so I quickly started creating it to
take pics in the sun. Hope you like it! :)

作り始めるのが遅くなってしまって、出来上がったのが夕方4時ごろになってしまい、陽も傾き始めていたので写真もちょっと黄色みが強く出てしまいました。こちらのSwatchの色の方が正確です。スタジオライト下で撮るとまたまったく違う色味になるし、写真って本当に難しい~。

というわけでMadam Glamポリッシュをフィーチャーしたネイルを3つ連続でお届けしました。5フリーであることに加えてフォーミュラも最高にいいので、機会があったら少しずつ増やしていきたいなと思います。


にほんブログ村 美容ブログ 自爪ネイルへ

Neon Pink Geometrics Mani Featuring Madam Glam 'Be My Baby'

Friday, July 10, 2015 4 Comments A+ a-

July 31st Update: I replaced the video at the end of this post with YouTube version.

When you see a particular colour, does that remind you of some patterns or designs? I don't know why, but when I see bright pink, that reminds me of geometrics. Same thing happened with this mani I did a year ago.

Today's mani features Madam Glam 'Be My Baby', a fabulous neon pink that gets opaque in 2 easy coats or 1 thick coat. You don't need a white base to enhance the colour, it's amazingly bright on its own.

Middle finger & ring finger - I started off with just base coat, and placed 2 sets of chevron tape I bought from What's Up Nail Art Store. I painted the top part of the nails with Madam Glam 'Be My Baby', and middle part with JOSS Little Black Dress, and the bottom part with 'Be My Baby'. I then made a stamping decal out of geometric pattern from BP-L009 plate kindly sent by Harunouta, and coloured in partly with white. I cut the decal to match the bottom part of these nails (that is V shaped), and placed it on them. I finished off with Glisten & Glow HK Girl topcoat, followed by Essie Matte About You to mattify the look.

Thumb, pointer & pinkie - I painted 2 coats of Madam Glam 'Be My Baby', topped with black round stud (bought from eBay) and white triangle stud (bought in Japan).

This was my first time doing negative space mani, and I quite like it! The V lines didn't come out nice, but it was easy to just fix with acetone and brush. One thing that bugged me was that none of my cameras could capture the accurate colour of this fabulous neon pink. It's actually more neon thank you can imagine. Again, formula was a dream. This makes me want to try every neons Madam Glam carries!

7/31更新:記事最後の動画をYouTube版に置き換えました。 

「色から柄を連想する」ということってありますでしょうか?カシスはなぜかショッキングピンクを見ると「幾何学模様」を思い浮かべます。1年前にやったこのネイルなんかもそうですが。今回もそんなネイルです。出来上がりはこちら。

Finished product, mattified with Essie Matte About You. Cloudy shot

中指と薬指 - ベースコートでスタート。What's Up Nail Art Storeのシェブロンテープを2つ置き、 上の部分をMadam Glam 'Be My Baby'、真ん中の部分をJOSS Little Black Dress、下の部分を'Be My Baby'で塗り、テープを剥がす。春の歌から送っていただいたBP-L009の幾何学模様でdecalを作成し、一部を白で色付け。爪の下側のVの形にdecalを切り取ってこの部分に乗せる。仕上げはGlisten & Glow HK Girlトップコートを塗り、次にEssie Matte About Youでマット化。

親指、人差し指、小指 - Madam Glam 'Be My Baby'を2度塗りし、eBayで買った黒の丸スタッズと楽天で買った白の三角スタッズを乗せる。

使用ポリッシュはこちら。

Polishes used

左から、

Madam Glam Be My Baby
JOSS Little Black Dress
JOSS Will Not
Mundo de Uñas Black

I'm happy about how bold the stamping came out. Harunouta (Japanese version of Born Pretty Store)
carries some nice and affordable stamping plates

今回negative spaceネイル(自爪が少し見えているネイル)を初めてやってみましたが、結構気に入りました。何がいいかって、テープのラインがガタガタになってもアセトンでさっと修正出来るから(゚∀゚) これが色付きポリッシュの上だとそう簡単にはいかないでしょう。negative space、また是非やろう。

Keeping it simple with pink, black & white. How do you like it? :)

このMadam Glam 'Be My Baby'はネオン中のネオンピンク。写真だとただの明るいピンクになってしまうのがもどかしい(;▽;) 実際にはサングラスが必要か?ってぐらいの眩いピンクです。ネオンって下に白ポリッシュを塗らないときれいに発色しないものも多いのですが、このポリッシュは単体で1度塗り、または薄く2度塗りでばっちり発色します。フォーミュラは最高。別のネオンも欲しいなぁ。


にほんブログ村 美容ブログ 自爪ネイルへ

Two-Toned Swirly Mani Featuring Madam Glam Polishes

Monday, July 06, 2015 4 Comments A+ a-

July 25th Update: I replaced the video at the end of this post with YouTube version.

It took all Sunday morning to do the swatching you see on my previous post, and right after that, I started to create my first design featuring 2 of the Madam Glam polishes. 

Thumb, middle finger & ring finger - I started off with 2 coats of Madam Glam 'Sea, Swing and Sun', and I made stamping decal out of swirly pattern from UberChic Beauty 1-03 plate using Mundo de Uñas White, painted half of it with Madam Glam 'Midnight', and placed onto those nails. I added three dots using 'Midnight' and three clear rhinestones on each. I finished off with Glisten & Glow HK Girl topcoat.

Pointer & pinkie - Base is the same, and I simply added purple & clear rhinestone.

I was planning to use two purples for this look, but changed my mind and went with these two. I'm glad I did! I just love the contrast. Now, there was a little accident in the making of this mani. I told you I spent all morning swatching, and I started on this mani straight after, so while I had the decals drying, I thought 'Oh, I'd better check the chickens to see if they laid any eggs' (I usually go check every 1-2 hours). So I went out to the backyard but no eggs there. I tried to get back in the house only to realise the door locked itself....! 

My husband had left hours ago on his business trip, and I was on my own. No relatives or friends around. I was horrified, and 2 things came to my mind. 1) I HAVE to get back in, otherwise my decals will dry out and I have to do it all over again!, 2) Will I still be able to finish this mani to take pics in the sun!? (It was about 3 in the afternoon when this happened). Forget about the possibility of having to spend a night outside, THIS is the nail artist's priority! LOL 

Well, luckily I was able to get back in with the help of our neighbour just in time for the decals to be ready! So I quickly resumed my manis, still panting and sweating, and with shaky hands. You may notice a horrible shake on my hand in the video after the decal part, and you now know why!

7/25更新:記事最後の動画をYouTube版に置き換えました。 

前回の記事に載せたSwatchは日曜の午前中いっぱい掛けて塗装・撮影・編集・ポストしたのですが、その直後にすぐMadam Glamポリッシュを2本使ったネイルを作成しました。出来上がりはこちら。

Finished product, with Glisten & Glow HK Girl topcoat. In the sun

親指、中指、薬指 - ベースはMadam Glam 'Sea, Swing and Sun'を2度塗り。UberChic Beauty 1-03の渦巻き模様をMundo de Uñas Whiteでスタンプし、その半分をMadam Glam 'Midnight'で塗ってdecalを作成。この3本の指に乗せ、同じく'Midnight'でドットを追加し、ラインストーンを置いてGlisten & Glow HK Girlトップコートでフィニッシュ。

人差し指と小指 - ベースは同じ。紫とクリアのライストーンを乗せてトップコートでフィニッシュ。

使用ポリッシュはこちら。

Polishes used

左から、

Madam Glam Sea, Swing and Sun
Madam Glam Midnight
Mundo de Uñas White

I'm such a sucker for good opaque cremes like these polishes. If you use sheer polish to make decals,
you'll need heaps of coats and will end up with thick lumpy decals.  

ここで小話を1つ。このネイルの作成中、ちょっとしたアクシデントがありました。午前中いっぱいSwatchにかかりきりで、さらにこのネイルもSwatch後にすぐ作り始めたので、まったく一息つける時間がありませんでした。decalを作って乾かしているときにようやく時間ができたので、「そういえば今日ニワトリさん卵生んだかな?」と思って庭に出て小屋を見に行ったんです。(いつもは1-2時間おきに見に行く。)今日は卵なしか~と思って家に戻ろうとしたら・・・・鍵がかかってる。。。何かの拍子でひとりでにかかってしまったらしい。旦那殿はもう何時間も前に出張に出かけてしまっている。この田舎町には知り合いもいなければ、引っ越したばかりで友達もいない。愕然とする私。ここで真っ先に頭をよぎった2つのこと。1)早く戻らないと!decalが乾ききったら一からやり直しになってしまう・・!2) 太陽がまだ出ているうちにこのネイルを終えて写真を撮れるだろうか!?(この事件が起きたとき3時を回っていました。)

I can't wait to use my other Madam Glam polishes. They are so pleasant to wear!

「もしかしたらこの寒い夜を外で過ごすことになるかもしれない」なんてことよりも先にネイルの心配をする、とことんのネイルバカ(笑。でもこのときは早く戻らねば!と必死でした。家の周りをぐるぐる回っているとお隣さんがちょうど歩いているのが見えたので事情を話し、その旦那さんが窓をチェックしてくれてたまたま鍵のかかりが甘い窓があったのでそこから無事中に入ることができました(笑。それでなければドアを壊してでも入ろうかと本気で思ったぐらい。ご夫婦に5回ほどお礼を言い、時間をチェックしたらちょうどdecalが乾く時間だったので急いで作業再開。息は上がり汗もひどくかいて手もぶるぶる震えている。。。でも無事作業も終えて写真もその日のうちに撮れました(;▽;)

そんなわけでもしかすると動画で手が震えているのが見えるかもしれませんが、そういう事情ですので1つよろしくお願いします(爆。


にほんブログ村 美容ブログ 自爪ネイルへ

Madam Glam Polish Swatches

Sunday, July 05, 2015 4 Comments A+ a-

I have 4 beautiful polishes to share with you today. Laura from Madam Glam contacted me through my YouTube channel if I'd like to review their polishes. I have heard their brand through Instagram but have never tried them, so I went to their website and did a quick research. Madam Glam is U.S. based cosmetic brand, and their polishes are 5 free (free of formaldehyde, dibutyl phthalate, toluene, camphor, and formaldehyde resin), cruelty free (meaning they never test on animals), and vegan (meaning their polish does not contain any animal ingredients). Sounds great! So I said yes and picked 4 out of their vast collection.

Laura immediately sent out the package and I received it in 2 weeks. Before I show you what I've got, here are the links to their social media:

Madam Glam Web site: https://madamglam.com/
Facebook: https://www.facebook.com/madamglam
Instagram: http://instagram.com/madam_glam

今月はレビュー案件が少し多めです。今日はMadam Glamの製品レビュー。Madam GlamのLauraさんから私のYouTubeチャンネル宛てに「うちのポリッシュレビューしてみませんか?」という連絡をいただきました。Madam Glamという名前はインスタグラムでちらほら見聞きはしていましたが、試したことはなかったので早速Webサイトに行ってリサーチ。Madam Glamは米国ベースのコスメブランドで、ポリッシュラインはすべて5フリー(ホルムアルデヒド、フタル酸ジブチル、トルエン、カンファー、ホルムアルデヒド樹脂を含まない)であり、crueltyフリー(動物実験をしない)であり、vegan(動物由来の成分を使用しない)を特徴としています。いいことずくめですね。というわけで「是非お願いします」と連絡し、4本好きな色を選ばせていただきました。

Lauraさんはすぐさま発送の手続きをしてくださり、約2週間で到着。Swatchをお見せする前にMadam GlamのSNSへのリンクはこちら。

Madam Glam Webサイト : https://madamglam.com/
Facebook : https://www.facebook.com/madamglam
インスタグラム : http://instagram.com/madam_glam


My beauties arrived neatly packed in a box like this. 

ポリッシュたちはこのような箱で届きました。


They were all carefully wrapped with bubble wraps to avoid breakage during transit.

輸送中の破損を防ぐため、2本ずつ緩衝材で厳重に包装されています。


Here are the 4 I picked, all creme - from left 'Sea, Swing and Sun', 'Midnight', 'Lilac Madness' and 'Be My Baby'. All swatches shown below are 2 coats each, without topcoat. Pictures taken in the natural sunlight. 

私が選んだ4本がこちら。すべてクリーム。左から、'Sea, Swing and Sun'、'Midnight'、'Lilac Madness'、'Be My Baby'。以下、お見せするswatchはすべて2度塗り、トップコートなし、屋外撮り。


This is 'Sea, Swing and Sun', beautiful pastel blue. Such a refreshing colour, and I was expecting this to be a bit sheer, but not at all. It was completely opaque in 2 coats.

爽やかなパステルブルーの'Sea, Swing and Sun'。少しシアーかと想像していたらまったくそんなことはなく、2度塗りでしっかり発色。


'Midnight', gorgeous deep purple. Again, fabulously opaque, and you can get away with one thick coat.

濃い紫クリームの'Midnight'。こちらも2度塗りでしっかり発色。うまく塗れば1度塗りでも行けるぐらい。


'Lilac Madness'. I've been looking for a good lilac colour, and this is just perfect. Again nice and opaque and glide like butter.

優しいライラック色の'Lilac Madness'。こんな感じのライラック色、ずっと欲しいと思って探しておりました。こちらも抜群の発色でバターのようにするする塗れます。


Last one, 'Be My Baby', neon pink. This is so neon as neon can be! All my cameras freaked out trying to capture the true colour of this and I had such a hard time. This is such a blinding pink and almost glows in the dark. I just hope when I do a nail tutorial video, I can finally capture its awesomeness.

最後にネオンピンクの'Be My Baby'。これはネオンの中のネオンともいうべき色なんですが、どのカメラでも正確な色が撮れませんでした。目が眩みそうな、暗闇で光るんじゃないかというぐらいのネオンピンク。ネイル動画を撮るときに正確な色が撮れるといいなぁ~。

Formula on these are great, they dry fast, self-levelling, and apply beautifully. I actually had this neon pink on the night before, with the intention of taking swatch photos with my studio light. But I decided to take pics under natural sunlight after all, so while I had this on (without topcoat, mind you), I had a shower, went to bed, and woke up to find only one tiny dent on my pointer. I'm so impressed. 

I'll be showing you nail arts featuring these polishes in my subsequent posts, so stay tuned!

フォーミュラはすべて二重丸。乾きも早く塗り心地もいいです。実はSwatchを夜やろうと思ってこのネオンピンクを夜塗ってスタジオライトで撮ろうとしたのですが、正確な色が出なかったので結局朝写真を撮ることにしたんです。なのでトップコートも塗っていない状態でシャワーも浴びて寝て翌朝、人差し指に小さなへこみが出来た以外はまったく無傷。正直言って、悪いところが見つからないです。

今回はswatchのみですが、今週これらのポリッシュを使ったネイルアートを作っていく予定ですのでお楽しみに。

* Products sent for honest review.
* 記事中の製品はレビュー目的でお送りいただいたものです。

にほんブログ村 美容ブログ 自爪ネイルへ