Showing posts with label Marianne Nails. Show all posts

Green & Gold Lace Mani

My first design in 2016. Now that 9 Picture Polish shades were added to my collection, I wanted to create something using some of them.

Thumb, middle finger & ring finger: I started off with base coat, then placed a straight wide tape from What's Up Nails. I painted Picture Polish kryptonite & honeymoon on the divided sections, and peeled off the tape. Then I made a stamping decal out of lace pattern on Marianne Nails No.27 plate (review here) using Ya Qin An White, coloured in with JOSS More Nail Gold, and placed the decal on each nail. Finished off with G & G HK Girl topcoat.

Pointer & pinkie: I used striping tape and masking tape to cover parts of the nails, then painted 2 Picture Polish shades over the tapes and peeled off.

As you can see on my video, my right hand has the same design with different colours. I always do my right hand before doing video on the left. Although the colours I chose for right hand were pretty, there was something that didn't appeal to me. I was so close to giving up on this design and not posting, but I decided to change the colours for my left and see how it goes.

I've already done few lace manis in the past (here, here and here), and wanted to make it a bit different this time, so I went with a not-so-typical-for-a-lace colour combo - green and gold. It worked out quite well and I really loved it. Coming up with colour combo is always so difficult, but I'm glad I finally found the right one that I felt good enough to post.

2016年最初のデザイン。新たに加わった9本のPicture Polishを使って何かやりたいなと思って作ったデザインがこちら。
Finished product, outdoor shot. Sparkles in kryptonite are just so incredible!

親指、中指、薬指 : ベースコートで開始。What's Up Nailsのワイドテープを斜めに置いて、上からPicture Polish kryptoniteとhoneymoonを塗ってテープを剥がす。次にMarianne Nails 27プレート(レビューはこちら)のレース柄をYa Qin An Whiteでスタンプし、JOSS More Nail Goldで色付けしてdecalを作成。decalを斜めに置いてG & G HK Girlトップコートで仕上げ。

人差し指と小指 : ラインテープとマスキングテープを爪に斜めに置いて上から上記の2本のPicture Polishを塗ってテープを剥がす。

使用ポリッシュはこちら。
Polishes used

左から、

Picture Polish kryptonite
Picture Polish honeymoon
JOSS More Nail Gold
Ya Qin An White
One thing I'm bummered about this mani is that the topcoat caused the white stamping polish to bleed.
I've never had trouble with Ya Qin An bleeding upon topcoat, so no clue why

動画を見ていただくと分かると思いますが、右手は同じデザインですが色が違います。いつも右手を仕上げてから左手の動画に取り掛かるのですが、仕上がった右手を見て「可愛いんだけどこれじゃない・・」感をものすごく感じまして。危うくボツにするところだったんですが、色を変えてみようかな?と思い立ちこれに落ち着きました。過去に何度かレースネイルはやっているので(これとかこれとかこれ)、今回はありきたりなデザインにならないようレースっぽくない色を選んでみました。いや~、色変えてよかった!グリーンとゴールドって意外に合いますね。
I'm obviously a bit obsessed with negative space look lately.
Glad my stains are gone, so I can do more :)

というわけでボツになりかけたこのデザイン、色を変えたおかげで日の目を見ることが出来ました。1つだけ残念な点は、トップコートしたときに白のスタンピングポリッシュが溶けて流れてしまったこと。ところどころ白い筋が見えるかと思います。Ya Qin Anで今までこんなこと起きたことなかったのになんでかなぁ?ちょっとショボーンです。


Magenta Brocade Mani Using Marianne Nails Plate

The incredibly busy October is almost coming to an end, and in a couple of days I'll be flying back to Japan for 3 weeks. I really can't wait! I haven't seen my family for 2 years, and I miss them so much. Here's one last mani before I'm off to holiday.

Thumb, middle finger & ring finger: I started off with base coat. I stamped a floral pattern on Marianne Nails No.97 (review post here) with Hit the Bottle Hello Buttercup (review post here), and coloured in with Madam Glam Blue is the One (review post here). I painted Madam Glam Temptation over the stamp and let it dry for 30 mins. I peeled the decal off, cut it and placed on my nails. I added some pearls I bought from Bundle Monster, and finished off with Glisten & Glow HK Girl topcoat.

Pointer & pinkie: I painted Madam Glam Temptation and added a pearl and gold bullions around it.

I just love this magenta colour so much. It looks pink in the photo but it's more purple in real life. Such a pleasant colour to wear! I couldn't help pairing it up with this bright yellow stamping polish which is Hit the Bottle Hello Buttercup. This mani reminds me of some oriental dress, and I'm super happy with the result.

日本への帰国日があと数日に迫ってきました。待ち遠しい、本当に待ち遠しい(;▽;) 帰国は2年ぶり。約3週間ほど、仕事もネイルも忘れて思いっきり羽を伸ばしてきます。

さて、帰国前にMarianne Nailsのプレートを使ったネイルをもう1つ作っておこうということで考えたのがこちら。

Finished product, with Glisten & Glow HK Girl topcoat

親指、中指、薬指: ベースコートでスタート。Marianne Nails No.97(レビューはこちら)の花柄をHit the Bottle Hello Buttercup(レビューはこちら)でスタンプし、Madam Glam Blue is the One(レビューはこちら)で色付け。Madam Glam Temptationをスタンプ柄の上に塗り、30分ほど乾かす。decalをスタンパーから剥がして切って爪に乗せる。Bundle Monsterで買ったパールを乗せ、仕上げはGlisten & Glow HK Girlトップコート。

人差し指と小指: Madam Glam Temptationを塗り、パールとブリオンを追加。

使用ポリッシュはこちら。

Polishes used

左から、

Madam Glam Blue is the One
Madam Glam Temptation
Hit the Bottle Hello Buttercup

Everything went smoothly except for the gold bullions. Those little things are hard to apply!

このベースのマジェンタなんですが、前も言ったように写真はだいぶピンク寄りです。実際はもっと深いセクシーな紫なんです。塗っていて本当に気持ちのいい色。Hit the Bottle Hello Buttercupとの色の相性も抜群ですね(゚∀゚)。

I was debating whether to use swarovski crytals or pearls.
I don't use pearls often so it was nice for a change

タイトルの「Brocade」なんですが、「錦織」という意味だそうです。インスタに「素敵なBrocadeデザインね!」とコメントしてくださった方がいて、Brocadeってなんぞ?と辞書で調べたのですw いつもネイルの命名に苦労するんですが、Brocadeいいじゃん!と思ってMagenta Brocadeと命名。それまでは何も思いつかなかったので危うく「パールと花ネイル」とかいう名前になるところでしたよ(笑。ちょっと中華風のドレスっぽい感じがなかなか気に入っています。

ではでは1か月後に♪


にほんブログ村 美容ブログ 自爪ネイルへ

Vintage Delicate Print Mani Using Marianne Nails Plate

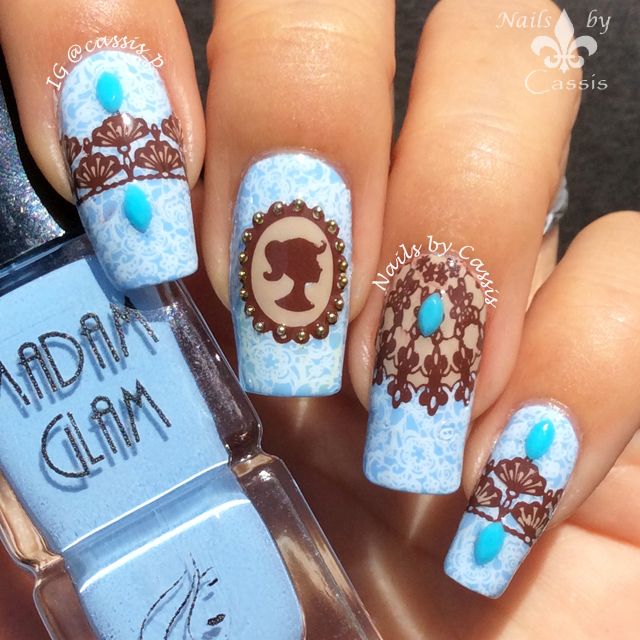
Out of 8 beautiful plates kindly sent by Marianne Nails (review post here), I chose plate No.68 to create my first design.

Base is my favourite blue, Madam Glam Sea Swing and Sun (swatch shown here) for all my nails. Apply Simply Peel around my nails. I stamped a floral design from Marianne Nails No.68 using Urban Nail Art White stamping polish (review post here). Then I made a stamping decals out of different images on the same plate using Ya Qin An Chocolate, coloured in with BC Co. shade #26, and placed them on each nail. For middle finger I added some gold beads fom Harunouta around the lady silhouette, and for other nails I added blue decorations my super talented and sweetest friend Minnie @nailbees kindly gifted me. Finished off with Glisten & Glow HK Girl topcoat.

I'm super thrilled with how it turned out. This simple colour scheme gives such a nice vintage feel. This Marianne Nails plate is all about elegance, and I recommend this to anybody who likes elegant lady-like manis.

Marianne Nailsから送られてきた8枚のプレート(レビューはこちら)の中から、今回No.68を使ってデザインを作成してみました。出来上がりはこちら。

Finished product with Glisten & Glow HK Girl topcoat

ベースは全爪Madam Glam Sea Swing and Sun(swatchはこちら)。キューティクル周りにSimply Peelを塗ってからMarianne Nails No.68プレートの花柄をUrban Nail Art White(レビューはこちら)でスタンプする。同じプレートのさまざまな柄をYa Qin An Chocolateでスタンプし、BC Co. shade #26で色付けしてdecalを作成し、各爪に乗せる。中指は春の歌のゴールドブリオンを女性のシルエットの周りに配置し、他の爪にはいつもいつもお世話になっているMinnie @nailbeesが送ってくださった青のデコレーションを配置。仕上げはGlisten & Glow HK Girlトップコート。

使用ポリッシュはこちら。

Polishes used

左から、

Madam Glam Sea Swing and Sun
BC Co. shade #26
Urban Nail Art White
Ya Qin An Chocolate

I just LOVE this Madam Glam polish. It really makes me feel great wearing this fresh colour.
The blue decorations Minnie gave me were a great match to this look also!

このネイル、久々に満点あげてもいいかなというぐらいの出来になりました。このベースのMadam Glamのブルーが本当に気持ちいい色なのと、その上の白スタンプの主張しすぎない感じが好き。それからdecalの茶xベージュと青のコントラストがビンテージっぽい雰囲気を醸し出しているのも好き。もちろんMarianne Nailsのこのプレートの柄もエレガントで素敵だし、Minnieからいただいたブルーのデコレーションがベースの青に完璧にマッチしていて、全体的に本当によく調和がとれた仕上がりになったと思います。

Those gold beads needed a bit of patience to apply, but I'm glad they all stuck well after topcoating

このネイル、割とさくさくっと出来上がりましたが、最後のブリオンを乗せるところがちと大変でした。すぐ取れてしまうだろうと思ってトップコート後さっさと写真を撮りましたが、お風呂入ってもまだ1つも取れませんでした。今後もっと活用していこうかな。

さて、10月ももうすぐ終わり。今月はレビューの依頼が多くて充実しながらも大変忙しい月でした。11月は2年ぶりに日本に一時帰国するので、ネイルもブログもお休みして少しのんびりさせていただきます。インスタには猫の写真とか載せるかもしれませんがw YouTubeの動画作成が遅れているので日本でぼちぼちアップします。


にほんブログ村 美容ブログ 自爪ネイルへ

Marianne Nails Stamping Plates Review

I'm back with a review for some beautiful stamping plates. This time, Marianne Nails. Marianne Nails is a French based stamping plate brand run by lovely Ghislaine Debray. This brand has been around for few years now, but this is my first time trying out their products so I was super excited when Ghislaine contacted me about reviewing the products.

Before I go into review, here are the links to Marianne Nails store and SNS:

今日はまた素敵なスタンピングプレートのご紹介。今回はMarianne Nailsです。Marianne Nailsはフランスを拠点とするスタンピングプレートのブランドで、オーナーはGhislaine Debrayさん。設立されて1年半程度の比較的新しいブランドで、設立当時から名前も知っていましたが実は使うのは今回初めてです。そんなわけで、オーナーのGhislaineさんからレビューの打診をいただいたときは大変光栄に思いました。

レビューに入る前に、Marianne NailsのショップとSNSへのリンクはこちら。


These are the 8 plates I received. I've heard about it a lot, but each plate is enclosed in a beautiful paper sleeve.

こちらが今回受け取った8枚。前から聞いていましたが、こちらのブランドのプレートはこんな感じでオシャレな紙スリーブに入ってやってきます。


Each plate is stuck to paper which shows the brand logo and plate number. Each plate is priced at 6.5 €.

中身を取り出したところ。こんな感じでロゴ入りの紙にくっついており、紙にはプレート番号が書かれています。各プレートの値段は6.5ユーロ。


Plate size is 13cm x 7cm including plastic backing.

プレートのサイズは台座も含めて13cm x 7cm。


Size of the actual plate is the same as MoYou London plate, but Marianne Nails has a slightly bigger plastic backing.

プレート自体の大きさはMoYou Londonのプレートと同じですが、Marianne Nailsの方が台座がやや大きいです。

Now, I'll show you the actual scan of the plate followed by a paper swatch. Paper swatch is done by either Ya Qin An Navy or Mundo de Uñas Reddish stamping polishes.

それでは、実際のプレートのスキャンと紙swatchを続けてお見せします。紙swatchで使用したスタンピングポリッシュはYa Qin An NavyとMundo de Uñas Reddishです。