Showing posts with label Sinful Colors. Show all posts

Monochrome Patchwork Typography Mani

July 10th Update: I replaced the video at the end of this post with YouTube version.

What a long & tongue twisting name I gave to today's mani. lol. I always have difficulty coming up with a name for my manis, but I need one when I put the tutorial video on YouTube. I try my best to avoid generic name like 'reverse stamping mani' or 'cute pink mani' or the like. It's just my preference.

Anyway, for this mani I started off with Sinful Shine Steel Reserve (charcoal gray, almost black) for thumb, middle finger & ring finger. I stamped a typography pattern from UberChic 3-01 plate with Mundo de Uñas White. Then I stamped another typography stamp on the same plate using Mundo de Uñas black and made a decal by applying JOSS Will Not (white). I peeled it off the stamper, cut into random shapes and placed those bits on those nails. For pointer and pinkie, I simply painted white and stamped the same pattern with Mundo de Uñas Black.

I thought this would be a total fail at first. Instead of Steel Reserve, I first tried with JOSS Black Dress, my most opaque blackest black, on my right hand, then stamped white on it. When I topcoated, the white stamp faded! This was the first time I experienced it and I didn't like it. I tried different topcoats to see if it makes any difference, but it turned out that JOSS black was the culprit, so I had to switch to Steel Reserve.

The white stamp on Steel Reserve remained bold after topcoating, but it sort of killed the contrast between it and the white decal on top if you know what I mean. Hmm, I wasn't sure if I liked it or not but I posted on Instagram anyway and got so many positive comments lol! Glad people like it, as their sweet comments helped me gain confidence with this mani :)

7/10更新:記事最後の動画をYouTube版に置き換えました。 

今日のネイル、インスタには数日前にアップしたのですが記事を書くのが遅くなってしまいました。とりあえず出来上がりはこちら。

Finished product, with Glisten & Glow HK Girl topcoat. In the sun

親指、中指、薬指のベースはSinful Shine Steel Reserve(黒にほど近いチャコールグレー)。UberChic 3-01プレートの文字スタンプをMundo de Uñas Whiteでこの3本の指にスタンプ。次に、その隣の文字スタンプをMundo de Uñas Blackでスタンプし、JOSS Will Not(白)を塗ってdecal作成。スタンパーから剥がしたらランダムな形に切って爪に載せる。人差し指と小指は白をベースに同じ柄をMundo de Uñas Blackでスタンプ。仕上げはGlisten & Glow HK Girlトップコート。

使用ポリッシュはこちら。

Polishes used

左から、

JOSS Will Not
Sinful Shine Steel Reserve
Mundo de Uñas White
Mundo de Uñas Black
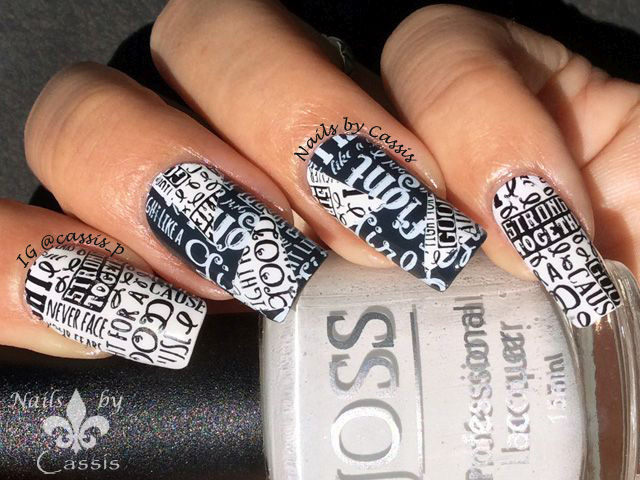
Can you see the patchwork part? It didn't look obvious to me and I was worried that
people would not recognise it either

このネイルなんですが、色々と紆余曲折がありました。まず、白と黒のくっきりコントラストにしたかったので、このSinfulではなくJOSS Black Dressでまず試したんです。JOSS Black Dressは黒というより「漆黒」と呼びたいぐらいの色です。これをベースにして白スタンプし、その上に白decalを乗せてトップコートしたところ・・・なぜか白スタンプの色が薄くなってしまった。。。トップコートが悪かったかな?と思って別のも試したのですが、結局Black Dressのせいだと分かり、黒ではないけれど黒に近いSinfulのSteel Reserveにチェンジ。

I haven't used typography stamps for along time! These stamps from UberChic plate are
one of the coolest I have in my stash

で、チェンジした結果トップコート後も白スタンプがきちんと浮き上がってくれたのですが、今度は色を反転したdecalとのコントラストがあまりなくなってしまった・・・。一見して、decalが乗っているのを気付かない人が多いんじゃないかな~と思いましたが、「ちゃんと見えてるよ!」との暖かいコメントをいただいてホッ。それまでは正直、「いや~失敗した。このネイル、アップしたくないわー。。」なんて思ってましたよw どんなネイルでも優しいコメントを残してくださるいつもの皆さんはともかく、知らない方たちからもたくさんコメントをいただいて意外と好評でした。自分の自信作にはあまり「いいね」が付かず、イマイチな作品が好評だとちょっと自分の感性を疑うんですが(;▽;)

というわけでモノトーンパッチワークネイルでした。文字スタンプはかなり久々でしたが、このUberChicの文字スタンプはちょっとオサレな感じで気に入っています。


にほんブログ村 美容ブログ 自爪ネイルへ

Green x Gray Geometrics Mani

May 25th Update: I replaced the video at the end of this post with YouTube version.

Time flies so quickly lately. I thought I only did the last mani few days ago, but that was 5 days ago already. Creating only one mani every 5 days is getting a bigger task for me unfortunately. Will this change? I don't know. There are too many things I tend to at the moment, and my nail hobby is pushed aside *sad face* :(

Anyway, here's a mani I created yesterday. Base is Sinful Shine Steel Reserve, very dark gray, almost black colour, and I stamped a geometric pattern from Fab Ur Nails FUN 15 plate with Mundo de Uñas Light Gray for thumb, middle and ring fingers. Then I picked up the same pattern using Mundo de Uñas Cream, and painted Sinful Colors Innocent (fresh green) over the stamp quite thick. I waited for about 30 mins and peeled off the stamper, cut in strips diagonally, then placed 2 or 3 sets on those nails, matching the base stamp. For other fingers, I simply added round pastel green studs I bought from eBay and finished off with Glisten & Glow HK Girl topcoat.

I've had this colour combo in mind for quite a while, and I'm glad I finally found a good stamp to do this. Unlike my previous mani, I used the same pattern for both the base stamp and the decal, and trying to line up the patterns was a bit hard. Some parts are not aligned properly, so I recommend not have a close look at it please. lol

5/25更新:記事最後の動画をYouTube版に置き換えました。

やや・・最近時間が経つのが本当に早いですね。前回のネイルやってからまだ2日ぐらい?と思ったらもう5日も経っていた件。ネイル以外のところでやることが多すぎて、今の状況では5日に1つネイル作るのもいっぱいいっぱいという感じ。しばらくはこんな感じかなぁ :(  とりあえず昨日作成したネイルがこちら。

Finished product, with Glisten & Glow HK Girl topcoat. In the sun

ベースはSinful Shine Steel Reserve(黒にほど近い濃いグレー)。親指、中指、薬指にFab Ur Nails FUN 15の幾何学模様柄をMundo de Uñas Light Grayでスタンプ。その後、同じ柄をMundo de Uñas Creamでピックアップし、その上にSinful Colors Innocent (若草色)をたっぷり塗る。30分ほど乾かしてからスタンパーから剥がし、斜めに帯状に切って2-3セットをこの3本の爪に載せる。このとき、ベースのスタンプと柄を合わせています。他の爪にはeBayで買ったパステルグリーンの丸スタッズを載せてGlisten & Glow HK Girlトップコートでフィニッシュ。

使用ポリッシュはこちら。

Polishes used

左から、

Sinful Shine Steel Reserve
Sinful Colors Innocent
Mundo de Uñas Light Gray
Mundo de Uñas Cream

Dark Gray, light gray, fresh green and cream. What do you think of this colour combo?
I'm secretly loving it. It's such an unusual combo, but also has a chic look as well

濃いグレー、薄いグレー、若草色、クリームというこの4色の組み合わせ、いかがでしょう?個人的に非常に気に入っています。この組み合わせを使うべく、かなり前からどの柄を使おうか模索していました。

I chose this geometric stamp that shows these four colours at equal amount. I'm so loving this
green polish I'm holding, but oh boy it stains like hell!

この柄を採用したのはこの4つの色を良いバランスで見せられるためです。まずサンプルを作ってみたときに思わず「お~!」と声が出ましたよ(゚∀゚) ちなみにこの手に持っているInnocent、非常に綺麗な色でよく手が伸びるのですが、ありえないぐらいのstainer(=爪を黄色くするポリッシュ)です。これのおかげで私の爪はまっ黄っ黄(悲。どなたか黄変を防ぐベースコートのおススメあったら教えてください(。-_-。)

By the way, here are the samples I created. See how the base stamp and the decal matches perfectly? (right one). It was difficult to do this on my curvy nails though lol.
I love the flower version too, but decided to go for geometrics :)

ちなみに実際に爪にデザインする前にいつもサンプルを作るんですが、今回作ったサンプルがこちら。右のやつが今回採用した柄ですが、ベースの柄とdecalの柄がきちんと合ってますよね?しかしこれがカーブのある爪でやるのが難しかった・・・^_^; 爪の方は柄がきちんと合ってないので薄目で見てやってくださいw お花の方も可愛かったのですが、幾何学模様の方がグッときたのでそちらを採用しました。


にほんブログ村 美容ブログ 自爪ネイルへ

Colourful Tribal Mani

Feb 6th Update: I replaced the video at the end of this post with YouTube version.

I'm having a break from wearing holos and decided to go for something different from usual. I have so many untried plates, among which are my Dashica Infinity plates (haul post here), and was so eager to use them.

For this mani, I started off with Sinful Shine Pragmatic (which is also an untried), and picked up a tribal-ish pattern from Dashica Infinity 70 on my stamper with Mundo de Uñas Reddish. I applied Sally Hansen Mellow Yellow on stamper relatively thick, then peeled off, cut it in triangle shape, and put it onto my nails. I added pastel green studs I bought from eBay and finished off with Essence Better than Gelnails topcoat.

I looked at my finished mani and paused for a while. I couldn't decide whether I liked it or not, but it started to grow on me after a while. I love those bright colours that are perfect for the sunny weather here. I'm so curious to see this design in other colour schemes also!

1/31更新:記事最後の動画をYouTube版に置き換えました。

先日、旦那殿が2週間の出張に旅立っていきました。私は車を運転しないのと、バスや電車がすぐ近くを通っているわけでもないので2週間籠城作戦を敢行します(笑。トイレットペーパーも食べ物も豊富に買ってあるのでなんとかなるさね。

さて、最近ホロが続いたので久々にクリーム系を塗ろうかな~となんとなく考えて作った今日のネイル。出来上がりはこちら。

Finished product, with Essence Better than Gelnails topcoat

ベースはSinful Shine Pragmatic。まだ一度も本番ネイルには使ったことのなかったDashica Infinity 70のトライバルっぽい柄をMundo de Uñas Reddishでスタンパーにピックアップし、その上からSally Hansen Mellow Yellowを厚めに塗る。1時間乾かしてから剥がして三角形になるよう切って爪に乗せる。eBayで買ったパステルグリーンのスタッズを斜めに置いてEssence Better than Gelnailsトップコートでフィニッシュ。使用ポリッシュはこちら。

polishes used

左から、

Sally Hansen Mellow Yellow
Sinful Shine Pragmatic
Mundo de Uñas Reddish

I didn't use clear coat this time for decals to avoid getting too thick

スタンパーにポリッシュを塗るタイプのdecalを作るときはいつもクリアーも上から塗るんですが、今回試しにポリッシュだけでやってみました。decalを貼り付けたときに下の紫が透けないようにMellow Yellowを割と厚めに塗っておいたので、クリアーはなくても扱いやすかったです。薄めにするとヘナヘナになって切るのが大変になるかと。

What do you think of the way I placed those studs?
Dunno why but this design reminds me of bandana :P

このパステルスタッズ、色が6種類あるんですが、どれがいいかな?と1つずつ爪に置いて色を確認しました。意外や意外、この色が一番しっくりきましたね。最初は1つずつの予定だったのですが、遊び心を出してもう1つずつ斜め方向に置いてみました。なんかバンダナみたいって思ったの私だけ?(゚∀゚)

いつも使う色合いとはだいぶ違うので、出来上がりを眺めてしばらく思考停止してました。とりあえず写真撮るか・・と外に出てパシャパシャ撮っているうちに、なかなかいいじゃない?!と少しずつ好きになってきました。こういう冒険ネイルもたまにはいいですね。


にほんブログ村 美容ブログ 自爪ネイルへ

New Year's Sunrise Stamping Mani

Happy New Year! Last year was an incredible year for me as I got to connect with so many nail artists, opened Instagram account and gained 14K followers, and last but not least, have my own YouTube channel! It was such a busy year but fun. 

This year I'm thinking of slowing down just a little bit. I have a full time job (I'm not a nail tech, mind you), and most of my time outside work was dedicated to coming up with nail designs, creating them, filming the process as I create manis, writing up blog posts in 2 languages, and editing video tutorials. And oh yes, I do most of the housework too! It was like having two full time jobs. It's sometimes quite exhausting and I know I can't keep this pace up very long. I love seeing my Instagram account and YouTube channel grow, but that's not the purpose of my nail painting. 

So this is one of my new year resolutions - slow down to my comfortable pace. Hopefully this will also give me time to practice what I'm not good at, freehand, watermarble, etc. I looked back on my last year's new year resolutions on this post (although I only wrote this in Japanese) and it says:

1. Try not to buy too many polishes
2. Use all the untried
3. Do some frankening

At that time, I had 120 polishes but now.... about 240!! Haha! Well, I really need to slow down on this too. I have unbelievable number of untried also. *_* At least I got to franken quite a few polishes though!

Well, enough talk. Let's have a look at today's mani, shall we? I posted this mani on my Instagram on New Year's eve. In Japan, watching sunrise on New Year's Day is thought to bring good luck, so I created this mani for my friends and followers who may miss out on a real thing. 

I started off with white base, and applied PVA glue around my cuticles and placed masking tape on about 1/3 of each nail near the tip. I then did sponge gradient using pinkish red, orange and yellow, peeled off the glue and masking tape. I painted Sinful Colors Cinderella (light blue) near the tip and the base is done. Next, I made stamping decal using Torii gate image from Dashica Infinity 81 stamped with Mundo de Uñas Black, and placed it onto middle finger. I added birds from MoYou London Kitty 11 and painted the sunrise image in red and handpainted sun reflection in water using this detail brush from Born Pretty Store.

For pointer and ring finger, after the gradient, I painted A England Dancing With Nureyev near the tip and stamped trees and branches from MoYou London Suki 02 (ring finger) and Chez Delaney Asiatique 001 (pointer). I added some white dots on the trees and branches to represent snow. For pinkie, I added Kanji stamp from Chez Delaney Asiatique 001 plate, meaning 'happiness'.

This took me few hours to create but I'm so happy with the result. I have seen so many NYE manis featuring fireworks, but this is so different and I'm glad to share a piece of Japanese tradition in my mani. 

明けましておめでとうございます。昨年は私にとって大きな変化のあった年でした。たくさんのネイルアーティストさんたちと知り合うことができ、インスタグラムの開設に続いて自分のYouTubeチャンネルを持つまでになりました。年初には思いもよらなかったことです。忙しく、実りの多い1年でした。

新しい年を迎えて考えたのは、もう少し自分らしいペースで行こうかな、ということ。インスタを始めてから、毎日のようにネイルをアップされている皆さんのポストにつられて、自分のネイルチェンジのペースも少し早まった気がします。フルタイムの仕事と家事に加えて、ネイルデザインを考えて動画を撮って編集して、2か国語でブログも書いてインスタとYouTubeにアップ・・・という作業は思いのほか重労働で時間もかかります。他に自由になる時間はほとんど残りません。他のネイルアーティストさんたちのところにゆっくりお邪魔する時間もままなりません。インスタのフォロワーやYouTubeの登録者が増えていくのを見るのは楽しいですが、それが目的ではなかったはずです。

なので、今年は自分らしいペースで行こう、というのが新年の抱負の1つ。余った時間で苦手な手描きやウォーターマーブルの練習もしていきたいと思います。ちなみに昨年の新年の抱負がこの記事に書いてありますね。いわく、

一、新しいポリッシュの購入はほどほどに
二、未使用ポリッシュをゼロにしよう
三、自作に挑戦しよう

ふっ・・・・・。ちょうど1年前はポリッシュ所持数120本だった模様。この前数えたら240本あったよ・・・(フランケン、スタンピングポリッシュ、トップコート類除く)。それに伴い未使用ポリッシュも激増。自作(=フランケン)だけ唯一頑張った点ですかね。今年も引き続き、「せめてHelmer1つに収まる程度のポリッシュ数に留めよう」という抱負を掲げたいと思います。あとは先ほど言ったように苦手分野を頑張っていきたいと思います。

では今日のネイル。インスタに大晦日にアップしたネイルです。出来上がりはこちら。

Finished product, with Essence Better than Gelnails Top coat. Outdoor shot

白ベースでスタート。まずPVAグルーをキューティクル付近に塗っておき、爪先1/3程度をマスキングテープで隠しておく。三角スポンジにピンク寄りの赤、オレンジ、黄色の3色を塗り、爪にぽんぽんと数回乗せてグラデーション作成。グルーとマスキングテープを剥がして爪先にSinful Colors Cinderella(薄い青)を塗ったらベースは完成。次にDashica Infinity 81の鳥居柄をMundo de Uñas Blackでスタンプして中指に配置。その上にMoYou London Kitty 11から鳥をスタンプし、朝日を赤で塗りつぶして水面に朝日の反射を手描き。この時に使用したのは「春の歌」さんのこちらのブラシです。

人差し指と薬指はグラデーション後、A-England Dancing With Nureyevを爪先付近に斜めに塗り、その上にMoYou London Suki 02 (薬指)とChez Delaney Asiatique 001 (人差し指)から木や枝を追加。その上に雪を表す点をドット棒で追加。小指はChez Delaney Asiatique 001から「幸福」の文字をスタンプ。仕上げはNail of This WeekのChiroさんからいただいたEssence Better than Gelnailsトップコート。

使用ポリッシュはこちら。

Polish used

上段左から、

Layla Softtouch Effect 05 (for gradient)
Ciate hopscotch (for gradient)
Sally Hansen Mellow Yellow (for gradient)
Sinful Colors Cinderella
A-England Dancing With Nureyev

下段左から、

Mundo de Uñas Reddish (for sunrise & reflection in water)
Sally Hansen White On
Mundo de Uñas Black

This is A-England Dancing With Nureyev. Used for the rocks and ground.
Look how sparkly it looks in the sun!

テーマは言わずもがなですが「初日の出」です。日本では初日の出を見るとご利益があるといわれていることをインスタに書いて、「実際の初日の出が見られないかもしれない人のために作ったよ!」と一言添えてアップしました。すると「そんないわれがあるなんて知らなかった、日本の伝統を教えてくれてありがとう」とか「実際の初日の出が見られなかったらこのネイル見させてもらうね!」などなど、反応をいただけてこちらまで嬉しくなりました。漢字スタンプもベタではありますが、これを見た皆さんに幸福が訪れますように、の意味を込めました。

Can you imagine yourself watching sunrise coming up behind Torii gate on a frosty day,
where all you can hear is birds fluttering in the distance?

ちなみにこのキラキラしている青いポリッシュはA-England Dancing With Nureyev。これとSinful Cinderellaの組み合わせってどこかで見ませんでしたっけ?w またチョイ役で使ってしまったよ(゚∀゚;)

というわけで新年第1弾の初日の出ネイルでした。ニューイヤーネイルって海外では花火が定番なんですが、そもそも花火って日本人の感覚では夏の風物詩ですよね。シドニーの大晦日花火のネイルもやりたかったのですが、今回は「和」で攻めてみました。出来上がりに満足です。


にほんブログ村 美容ブログ 自爪ネイルへ

Mint & Chocolate Mani

Dec 23rd Update: I replaced the video at the end of this post with YouTube version.

Now that I finished writing up the Dashica haul, I can finally have a play with my Infinity plates! I felt like using Mint & Chocolate colour combo, and this is what I created.

For this mani, I started off with Sinful Colors Mint Apple and stamped a Celtic-like pattern from Dashica Infinity 70 with Mundo de Uñas Cafe for middle finger, ring finger and thumb. I applied topcoat before placing regular chevron tape from What's Up Nail Art Store (so it wouldn't peel off the stamp), then painted Sally Hansen Mint Sorbet toward the tip of my nails. Then I added three SS3 black rhinestones I bought from this online shop in Japan. For pointer and pinkie, I simply painted with Dior Dune.

This is my first time going with Mint x Chocolate combo, but I quite like it! Also my first time using Mundo Cafe. I tend to use Black too often, but Cafe give such a soft and yummy look. Will definitely use this more often.

12/23更新:記事最後の動画をYouTube版に置き換えました。

Dashicaの買い物記事をようやく書き終えたので、Infinityプレートを使ったネイルを早速作ってみました。「Infinityのプレートを使って」「色はチョコミントで」「decal以外の方法で」できるネイルは何かないかな~と思って考えたのがこちら。

Finished product, with Face of Australia Aussie Night topcoat

中指、薬指、親指のベースはSinful Colors Mint Apple。Dashica Infinity 70のケルト文様のような柄をMundo de Uñas Cafeでスタンプ。一度トップコートしてからWhat's Up Nail Art Storeで買ったChevronテープを爪に置き、上からSally Hansen Mint Sorbetを塗り重ねる。こちらのお店で買ったSS3サイズのストーンを3つ置いてFace of Australia Aussie Nightトップコートで仕上げ。人差し指と小指はDior Duneを2度塗り。

使用ポリッシュはこちら。

Polishes used

左から、

Sinful Colors Mint Apple
Sally Hansen Mint Sorbet
Dior Dune
Mundo de Uñas Cafe

I got so many comments on Instagram saying this mani looks yummy :D

チョコとミント色を一緒に使うのは実は初めてでした。というか、このDior使ったのいつ以来だろう?というのと、Mundo Cafeを使ったのも初めてでした。黒スタンプより柔らかい印象になっていいですな~。

Pitty the stamp is a bit crooked, otherwise I like it

インスタにこのネイルを載せたら、「美味しそう」「チョコミントアイスが食べたくなった」「チョコ食べてくる」とか食べ物連想の反応をたくさんいただきました。今度この色の組み合わせで食べ物スタンプしてみようかな?

では最後に動画をどうぞ。ちなみに、Chevronテープを置く前にトップコートを塗っているのは、下のスタンプが剥がれないようにするためです。ここと最後の仕上げには今回Face of Australia Aussie Nightというベースコート兼トップコートを使いました。特に意味はありません。手近にあったから。塗りたてはまあまあですが、時間が経つと艶がなくなって爪の表面がボコッとしてきます。でも厚みが出ないので仕上げではなく途中に挟むトップコートとしては使えそうです。

それから今回のスタンプ、いつもよりMundoの乾きがやや早いと感じました。いつもはカメラのフォーカスを調整したり柄が真っ直ぐスタンプされるよう一呼吸置いてスタンプするのですが、今回それをやったら爪に乗せたときに転写されず、スタンパー上で乾いてしまっていました。Mundo Cafeの特徴なのか、それともベースカラーの表面が乾きすぎてたのかは不明。なので、動画にはないですがスタンプ前にもトップコートして柄が転写されるようにしています。


にほんブログ村 美容ブログ 自爪ネイルへ

Subtle fairy stamping with MoYou London Fairytale 02

Another MoYou stamping today. Here is a subtle stamping mani using MoYou London Fairytale 02 plate, which is inspired by a mani I saw on Pinterest.

I started off with Sinful Snow Me White as a base, then used 4 colours to do sponge gradient. For the pegasus on the middle finger, I scraped off the unwanted lines around the pegasus before stamping onto my nail. The rest of the fingers are stamped with swirly patterns from the plate. I finished off with clear glitter topper.

This is so subtle, it's not very noticeable from the distance but super cute close-up. Before the sponged gradient, I put PVA glue around my cuticles to make the cleanup easier, but I think I had it on too long - my cuticles are looking all wrinkly and dry :( They look great again after putting cuticle cream on though. Phew!

BTW, if you have some MoYou plates and an instagram account, head over to MoYou's account. They are hosting nail art challenge throughout the month: http://instagram.com/p/ndJ2S5wGPH/. I opened an account to join this (http://instagram.com/cassis_p). For those of you who will participate, good luck!! For those who will just look, have fun :D

5月に入ってMoYou LondonがInstagram上でコンテスト始めましたね。1万フォロワーを記念したネイルチャレンジみたいです。詳細はこちら→ http://instagram.com/p/ndJ2S5wGPH/

一応私も参加してみることにしました(http://instagram.com/cassis_p)。お題が毎日出されて、それにインスパイヤされたMoYouプレートを使ったネイルをその日のうちに投稿。全部ではなくやれるやつだけでOK。いいねの数ではなく、MoYouチームが3名の勝者を選ぶということらしい。

PCからInstagramに画像をアップできないのがネックで今までアカウント持ってませんでしたが、一時利用のため開設しました。アカウントとMoYouプレートお持ちの方、参加してみては?(o^∇^o)ノ

そんなわけけで今日もスタンピングネイルです。使用したプレートはMoYou London Fairytale 02。 このプレート、一見して「柄が少ないな~」という印象だったんですが、逆に柄が少ない=1つ1つの柄が大きめ=不要な部分がスタンパーに入り込みにくい、ということで割と使いやすいんじゃないかと思い直し、購入を決定。

まず出来上がりはこちら。

Finished product - excuse my weird camera setting.
I'm still struggling with my new camera

ベースはSinful Colors Snow Me White。その上に4色の色でスポンジグラデーション。最後にクリアのグリッターポリッシュで仕上げました。

Macro shot - Love the pegusus <3

マクロショット。タイトルの「Subtle stamping」というのは「繊細なスタンピング」みたいな意味で、ベースの色と近い色のスタンピングポリッシュを使ってほのかな色合いを楽しむというもの。今回はパステル系4色の上に白なので近くで見ないとあまり柄がよく見えません。

I'm holding the Dior glitter topper here

ちょっとカメラの設定がまたおかしくて色が飛んでますが(汗。中指以外は渦巻き柄をスタンプしています。

使用したポリッシュはこちら。

Polish used - Blue one is my franken 'Sumire' (detail here)

左から、

Sinful Colors Snow Me White
Sinful Colors Unicorn
Ulta3 Corsican Rose
フランケン '菫' (スミレ) → 詳細はこちら
Sinful Colors Hazard
Dior Addict 403

This is before cleanup after sponged gradient.
Don't have the PVA glue too long on your fingers! lol

ちなみにキューティクルがしっわしわに見えると思いますが、原因はこれ。スポンジグラデーションの前にPVAグルーをキューティクル周りに塗っておいたのです(こちらを参照)。グラデーションするのにちょっとモタモタしてグルーを長時間付けたままにしてしまったので、剥がしたときにキューティクルがカッピカピになってしまいました(;▽;)。クリーム塗り込んで翌日は復活してましたが。

Looks pretty simple, but took 3 attempts to have the pegasus centered ^^;

中指のペガサスなんですが、プレートを見ていただくと分かるように周りが線で囲まれています。線は要らなかったのでスタンパー上で線を削り取ってからスタンプしています。しかし、こんな簡単そうなネイルなのにペガサスをうまく中央にスタンプできなくて3度やり直したよ・・orz

このネイルはこの記事がアップされる1週間ぐらい前にしていたものです。先にFacebookのスタンピンググループに画像を載せたら非常に好評でした。パステル系の色合いが私の浅黒い肌色と全然合ってないですが、まぁたまにはこういうのもいいですね(゚∀゚)

にほんブログ村 美容ブログ 自爪ネイルへ