Showing posts with label Taped mani. Show all posts

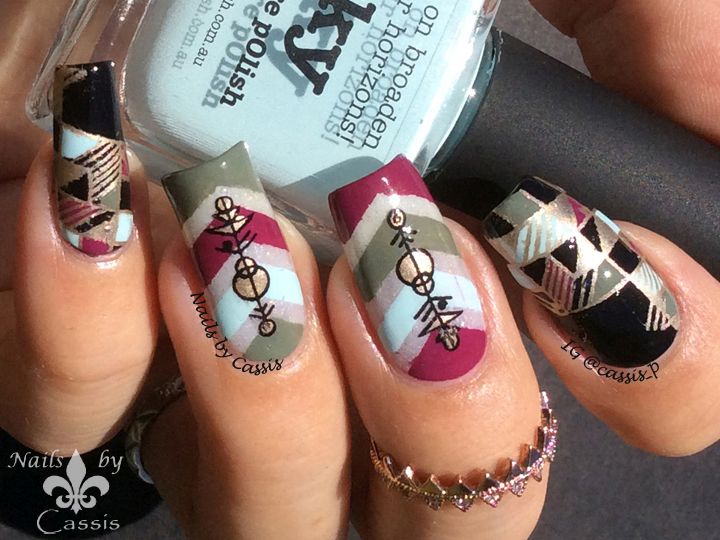
Urban Geometrics Mani

I feel a bit better for the last couple of days, so I decided to create a design using one of the Cici & Sisi acrylic plates that I showed you on previous post. 

Thumb, middle & ring finger: Base is one thin coat of Picture Polish Lakodom. I placed 3 sets of regular chevron tape from What's Up Nails, and painted Picture Polish bonkers, camo & sky on each divided section. I peeled off the tapes as I painted them. Next, I made a stamping decal out of arrow geometric image on Cici & Sisi Geometry 01 plate using Messy Mansion Carbon, coloured in with Messy Mansion Soft Gold. I peeled off the decal and placed it onto these 3 nails. Finished off with Glisten & Glow HK Girl topcoat.

Pointer & pinkie: Base is Face of Australia Don't Judge Me (black). I made a stamping decal out of a different geometric image on the same plate using Messy Mansion Soft Gold, coloured in with Picture Polish shades used above, and placed it onto these nails. 

All 4 plates are fabulous, but I couldn't resist using this Geometry 01 plate first. As for colours, I simply used a few more of my untried Picture Polish shades (bonkers, camo & sky), and I was surprised they go so well together. I'm happy with the end result. 

ここ数日体調がよかったので、さっそく前回のポストでご紹介したCici & Sisiのアクリルプレートを使ったネイルを1つ作成してみました。出来上がりはこちら。
Finished product, taken in the sun

親指、中指、薬指 : ベースはPicture Polish Lakodomを薄く一度塗り。 What's Up Nailsのシェブロンテープを3つ爪に置き、Picture Polish bonkers、camo、skyを各セクションに塗ってテープを剥がす。次にCici & Sisi Geometry 01プレートの矢印風の柄をMessy Mansion CarbonでスタンプしてMessy Mansion Soft Goldで色付けし、decal作成。decalが乾いたらこの3本の爪に貼り付けてGlisten & Glow HK Girlトップコートで仕上げ。

人差し指と小指 : ベースはFace of Australia Don't Judge Me (黒)。同じプレートの別の幾何学模様をMessy Mansion Soft Goldでスタンプし、上記のPicture Polish3本を使って色付けしてdecal作成。この2本の爪に貼り付ける。

使用ポリッシュはこちら。
Polishes used

上段左から、

Picture Polish Lakodom
Picture Polish sky
Picture Polish camo
Picture Polish bonkers

下段左から、

Face of Australia Don't Judge Me!
Messy Mansion Carbon
Messy Mansion Soft Gold
I had a hard time coming up with a name for this mani. When I googled 'urban color palette',
the colours shown match the colours I used here, hence the name 'Urban Geometrics' mani

どれも素敵なプレートでしたが、特にGeometry 01プレートがカッコよかったのでこれをまず使ってみました。色合いは少し迷ってまたPicture Polishの中からまだ使ったことのなかった3本(bonkers、camo、sky)をチョイス。なかなかまとまりある感じに仕上がって自分でもびっくり。
I was planning to go for negative space look, but decided to use Lakodom as base instead

最初はnegative space(素爪を一部見せるネイル)にしようと思ったのですが、デザイン的に爪の線がだいぶ見えてしまうのでLakodomをベースに薄く塗って「なんちゃってnegative space」風にしました。V字テープの部分がもっとすっきりとした直線になれば言うことなかったですが、それ以外は満足な仕上がりになりました。


Green & Gold Lace Mani

My first design in 2016. Now that 9 Picture Polish shades were added to my collection, I wanted to create something using some of them.

Thumb, middle finger & ring finger: I started off with base coat, then placed a straight wide tape from What's Up Nails. I painted Picture Polish kryptonite & honeymoon on the divided sections, and peeled off the tape. Then I made a stamping decal out of lace pattern on Marianne Nails No.27 plate (review here) using Ya Qin An White, coloured in with JOSS More Nail Gold, and placed the decal on each nail. Finished off with G & G HK Girl topcoat.

Pointer & pinkie: I used striping tape and masking tape to cover parts of the nails, then painted 2 Picture Polish shades over the tapes and peeled off.

As you can see on my video, my right hand has the same design with different colours. I always do my right hand before doing video on the left. Although the colours I chose for right hand were pretty, there was something that didn't appeal to me. I was so close to giving up on this design and not posting, but I decided to change the colours for my left and see how it goes.

I've already done few lace manis in the past (here, here and here), and wanted to make it a bit different this time, so I went with a not-so-typical-for-a-lace colour combo - green and gold. It worked out quite well and I really loved it. Coming up with colour combo is always so difficult, but I'm glad I finally found the right one that I felt good enough to post.

2016年最初のデザイン。新たに加わった9本のPicture Polishを使って何かやりたいなと思って作ったデザインがこちら。
Finished product, outdoor shot. Sparkles in kryptonite are just so incredible!

親指、中指、薬指 : ベースコートで開始。What's Up Nailsのワイドテープを斜めに置いて、上からPicture Polish kryptoniteとhoneymoonを塗ってテープを剥がす。次にMarianne Nails 27プレート(レビューはこちら)のレース柄をYa Qin An Whiteでスタンプし、JOSS More Nail Goldで色付けしてdecalを作成。decalを斜めに置いてG & G HK Girlトップコートで仕上げ。

人差し指と小指 : ラインテープとマスキングテープを爪に斜めに置いて上から上記の2本のPicture Polishを塗ってテープを剥がす。

使用ポリッシュはこちら。
Polishes used

左から、

Picture Polish kryptonite
Picture Polish honeymoon
JOSS More Nail Gold
Ya Qin An White
One thing I'm bummered about this mani is that the topcoat caused the white stamping polish to bleed.
I've never had trouble with Ya Qin An bleeding upon topcoat, so no clue why

動画を見ていただくと分かると思いますが、右手は同じデザインですが色が違います。いつも右手を仕上げてから左手の動画に取り掛かるのですが、仕上がった右手を見て「可愛いんだけどこれじゃない・・」感をものすごく感じまして。危うくボツにするところだったんですが、色を変えてみようかな?と思い立ちこれに落ち着きました。過去に何度かレースネイルはやっているので(これとかこれとかこれ)、今回はありきたりなデザインにならないようレースっぽくない色を選んでみました。いや~、色変えてよかった!グリーンとゴールドって意外に合いますね。
I'm obviously a bit obsessed with negative space look lately.
Glad my stains are gone, so I can do more :)

というわけでボツになりかけたこのデザイン、色を変えたおかげで日の目を見ることが出来ました。1つだけ残念な点は、トップコートしたときに白のスタンピングポリッシュが溶けて流れてしまったこと。ところどころ白い筋が見えるかと思います。Ya Qin Anで今までこんなこと起きたことなかったのになんでかなぁ?ちょっとショボーンです。


Red x Black Stripe Mani for Tracy's Birthday Collage

June 14th Update: I replaced the video at the end of this post with YouTube version.

June 3rd was my IG friend Tracy @scarletohara65's birthday, and Debbie @ladyandthe_stamp secretly contacted a bunch of us nail artists to do a birthday mani for her. I got to know Tracy about a year ago and she's not only a talented nail artist, but also one of the sweetest ladies I know on IG. The theme was 'Red' as it is her favourite colour, and I couldn't think of using any appropriate polish for this occasion other than Picture Polish o'hara. She told me long time ago that she absolutely loved this polish and recommended to me, and I remember it the whole time. That's why I decided to place my first order at Picture Polish to get this polish, and luckily the order arrived in time to do this mani.

For this mani, I started off with JOSS Will Not (white) for thumb, middle finger, and ring finger. I then placed 2 sets of striping tapes vertically on my nails, painted Picture Polish o'hara (red holo) and darcy (black holo) over them, and peeled them off immediately. Once that's dry, I stamped a swirly pattern from Bundle Monster BM-718 using Mundo de Uñas White, and added a silver rhinestone. I finished off with Glisten & Glow HK Girl topcoat. For pointer and pinkie, I simply painted o'hara topped with rhinestones.

It's such a simple stamping mani but I love the contrast with red and black. Picture Polish o'hara is a true stunner, and I'm so happy Tracy recommended this polish to me! The compliment I received from her made me smile :DD

6/14更新:記事最後の動画をYouTube版に置き換えました。 

6/3はインスタのお友達Tracy @scarletohara65の誕生日でした。Tracyの親友のDebbie @ladyandthe_stamp が2週間ぐらい前に私を含む共通の友達に声を掛けてくれて、彼女のためにネイルを作成しようということに。Tracyとは1年前ぐらいにインスタで知り合って以来、頻繁にやり取りさせていただいています。バースデーネイルのテーマは彼女の大好きな色「赤」。実はかなり前にTracyと話をしたときに、「Picture Polishのo'haraが本当に好きで」ということを聞いていて、いつかo'haraを買いたいな~とずっと思っていたのですが、今回の話をいただきいい機会なのでPPで初オーダーしようということに。出来上がりがこちら。

Finished product, with Glisten & Glow HK Girl topcoat. In the sun

親指、中指、薬指のベースはJOSS Will Not (白)。ラインテープを2セット爪に縦に置き、その上からPicture Polish o'hara (赤ホロ)とdarcy (黒ホロ)を塗ってすぐに剥がす。乾いたらBundle Monster BM-718の渦巻き模様をMundo de Uñas Whiteでスタンプ。シルバーのラインストーンを置いてGlisten & Glow HK Girlトップコートで仕上げ。人差し指と小指にはo'haraを塗ってラインストーンを追加。

使用ポリッシュはこちら。

Polishes used

左から、

JOSS Will Not
Picture Polish o'hara
Picture Polish darcy
Mundo de Uñas White

And this is the birthday collage for Tracy. 21 nail artists collaborated on this. WOW!

ちなみにこれがバースデーコラージュ。21人ものネイルアーティストが参加しました。圧巻ですね(゚∀゚)

It's such a stunning red, and I couldn't stop looking at my nails.
Lucky the sun was out to see the pretty holo sparkles too

3色使っただけの簡単なネイルですが、やっぱりこのo'hara、とても映えますね。光が当たるとホロ粒子がチラチラ輝いて何とも言えず美麗。

I had a bit of a trouble with this BM plate, and some parts didn't transfer very well.
I used one of the detail brushes Minnie sent me to touch up. It would have been
impossible without that detail brush!

ボトルを真っ直ぐ持つ「Picture Polish持ち」にも挑戦w このショット、商品ページにいかがですか?PPさん(笑。ちなみにこのBundle Monsterのプレート、きちんと柄が転写されなくてちょっと苦労しました。かなり欠けた部分が出てきてしまったので、Minnieが贈ってくださった極細ブラシを使ってちょいちょい描き足しています。線の細いスタンプなので、あのぐらい細いブラシでないとムリでしたね。Minnie、改めて素敵なブラシをありがとう(;▽;)

そんなこんなのTracyのバースデーネイルでした。本人にも喜んでいただけて何よりです♪( ´▽`)


にほんブログ村 美容ブログ 自爪ネイルへ

Blue Star Cross Stamping Mani

June 10th Update: I replaced the video at the end of this post with YouTube version.

When I woke up this morning, it was freezing 2 degrees. Brrr... winter is coming. I wish I could move to northern hemisphere just during winter time. 

Anyway, I created a mani using some Picture Polish shades that I recently purchased. For this mani I started off with cyan for thumb, middle finger & ring finger. Then I made a stamping decal with a cross sign from MoYou London Gothic 11 plate using Mundo de Uñas Gold, coloured in with freya's cats, and placed it on upper part of these three nails. For the colouring, I used a brush Minnie kindly sent me (the pink handle one you can see on this post) and of course it worked amazingly. I topcoated and placed two sets of chevron tape from What's Up Nail Art Store, painted freya's cat over the tapes and immediately peeled them off. I added square gold stud on the chevron part and finished off with Glisten & Glow HK Girl topcoat. For pointer and pinkie, I painted freya's cats and topped with gold studs.

I just love this colour combination. cyan is such a bright sky blue, and freya's cats is such a deep midnight blue, and both so beautiful. They are completely opaque after 2 thick coats, and dry pretty quick. Why didn't I try Picture Polish earlier?? Pity they are a bit pricey, otherwise I would get more! 

By the way, this mani got the most likes of all my manis on Instagram (2500 likes so far). My second most liked is just under 1900 likes, so I am a bit overwhelmed that this one is soooo popular!   

6/10更新:記事最後の動画をYouTube版に置き換えました。 

今朝起きたら気温2度。さ・・・寒い。日本はだいぶ暑いみたいですが、ちょっと羨ましいです。冬の間だけ日本に帰りたいなぁ。

さて今日は早速Picture Polishを使ったネイルのご紹介。出来上がりはこちら。

Finished product, with Glisten & Glow HK Girl topcoat. In the sun

親指、中指、薬指のベースはcyan。MoYou London Gothic 11の十字架のような模様をMundo de Uñas Goldでスタンプし、freya's catsで色付けしてdecal作成。それをこの3本の指の上の方に乗せる。ちなみにここの色付けにはMinnieからいただいたブラシを使わせていただきました♡(ピンクのハンドルの方)。いったんトップコートし、What's Up Nail Art Storeのシェブロンテープを2つ置いて上からfreya's catを塗り、テープをすぐに剥がす。シェブロンの部分に金の四角スタッズを置いてGlisten & Glow HK Girlトップコートで仕上げ。人差し指と小指はfreya's catsを塗ってスタッズを追加。

It was a cloudy day and I was worried that I wouldn't be able to take a sun shot. While I wait for the sun to come out, I took some bottle shots in the backyard :)

この日は曇りだったのでいい写真が撮れないかな~と心配でした。太陽が顔を覗かせるのを待つ間、お庭に落ちた花とボトルをパシャリ。

The sun was out for about 5 minutes, and I quickly took that opportunity to take these photos.
You should be able to see pretty holo sparkles

cyanもfreya's catsもどちらもホロ粒子が入っています。濃い色を保つためかホロの量は少な目ですが、それでも太陽が当たるとチラチラっと光るので綺麗です。

2 bottles in one shot! This is a cloudy shot, so the holos are dimmed.

ボトル2本持ちに挑戦w Picture Polishのボトルって可愛いよな~。写真映りが良いというか。ブラシもいい感じだし乾きも早いし、もっと欲しくなっちゃいます。しかし高いんだよな・・。豪ドルがもっと安くなるのをじっと待ちます。

さて動画をどうぞ。このネイルの動画の方、インスタでの「いいね」数が私史上最高値でした。今2500いいねぐらいですが、2位のネイルは1900いいね弱なのでぶっちぎり。「青のネイルはいいねの数が多くなる気がする」ってLouiseが言ってましたが、本当にその通りだった。手順が多いネイルなのでインスタの15秒動画にまとめるのがすごく大変でしたが、苦労が報われた気がします。「いいね」してくださった皆様ありがとうございます。


にほんブログ村 美容ブログ 自爪ネイルへ

Pink Stripe mani

It's the middle of the winter here. I have three layers of socks on with heater going all day, but it's still freezing. I really needed something to bright me up, so I reached for China Glaze HeliYum, a bright pink creme, and created a striped mani.

I started off with Sinful Colors Snow Me White and once it's dry, I placed striping tapes vertically on my nails to create stripe patterns and painted HeliYum over them. I stamped a design from MoYou London Artist 09 plate, and added some gold studs.

This is such a cute colour, and it certainly brightened me up! I normally don't wear pink, but this HeliYum is so eye-catching and pleasant to wear. This polish is super opaque and almost a one-coater. I've heard lots of good things about China Glaze Up and Away collection and this is no exception. I will be adding some more colours from this collection in my next Mariposa order :)

寒い・・・非常に寒いです。靴下3枚履いてヒーター付けっぱなしにしても冷えるぐらい。こんなときは爪に元気カラーを載せたいと思い選んだポリッシュがChina Glaze HeliYum。これでストライプネイルにしてみました。出来上がりはこちら。

Finished product - this time I used Revlon Fast Dry Topcoat

人差し指と小指はHeliYum単色塗り。残りの爪はベースにSinful Colors Snow Me White、ラインテープを使ってストライプを作り、その上からHeliYumを重ね塗り。MoYou London Artist 09の柄を使ってスタンピングした上で金のスタッズを追加。

I think my camera freaked out a bit. This photo is a bit brighter than real life

いや~気持ちのいい色ですね(゚∀゚) ピンクってほとんど塗らないですが、こういう色は塗ってて楽しい。上の写真だけ少し実際より明るめですが、他の写真はほぼ実際の色味です。

This is how I made the striping pattern. Place the striping tapes like this...

ストライプの作り方はいたって簡単。こんな感じでラインテープを乗せて、

... and paint HeliYum over them

上からHeliYumを塗ってすぐはがすだけ。

I could use striping patterns from MoYou plate, but preferred to do this way

直線のプレートデザインを使うのは諦めましたw だって真っ直ぐスタンプできないから(;▽;) こっちのが多少時間は掛かりますが、確実に真っ直ぐにできるのでストレスなしです。

Stamping is minimal, so I used Revlon TC instead of Seche Vite.
It may not look obvious but it smeared the design a bit :(

いつもスタンプネイルするときはSeche Viteで仕上げるのですが、今回はスタンプの面積が少ないのでRevlon Fast Dryトップコートを使ってみました。案の定引きずったorz やっぱりセシェじゃないとだめか・・。

そんな感じで元気カラーを使ったネイルでした。こんな感じのネイル、もっと別のデザインでやっていきたいと思います♪

にほんブログ村 美容ブログ 自爪ネイルへ

A-England Saint George with his Cross

After seeing so many breathtaking swatches of other nail bloggers, I fell in love with A-England long before I actually bought them. I bought four holo A-Englands from Llarowe few months ago, and already swatched Briarwood and Sleeping Palace.

I'm showing you Saint George today. Like other A-England holos, this one is amazing one-coater. I'm wearing 2 coats here though. I just love that the holo particles give so much depth after 2 coats... just speechless.

I wanted to come up with something that matches the polish name, and added a cross (inspired by St. George's cross) on my accent finger. It's simple but I absolutely love this one! I took some shots with my husband's dragon sword. Now, doesn't it look like St George wielding his sword? :P

3月はホロ月間になるはずだったのに脇道に逸れまくりのカシスです(o^∇^o)ノ まだきちんとご紹介していないホロの数もだいぶ少なくなってきました。今日はその中の1本、A-England Saint Georgeのご紹介です。

Saint Georgeはご紹介済みのBriarwoodとSleeping Palaceとは別の「The Legend」というコレクションからの1本。日本語では「聖ゲオルギオス」というドラゴン退治の伝説で有名なキリスト教の聖人の1人。

聖ゲオルギオスのドラゴン退治を描いた絵画は無数に存在しますが、こんな人です。

Photo credit : Segnatura Fine Arts

盾にも使われている十字は聖ゲオルギウス十字。イギリスの国旗にも採用されています。それではSwatchをどうぞ。

2 coats of Saint George, no top coat, indoor shot

2度塗り、トップコートなし。A-Englandのポリッシュはどれもone-coaterとして有名ですが、一応2度塗りしました。細かいホロの粒子が2度塗りすることで深みを増して綺麗。上はトップコートなしですが、かなりつやつやです。

Macro shot. Look at these holo sparkles! *faints*

マクロショットはこんな感じ。室内の直射日光が当たるところで。なんだか吸い込まれそうな深い色とホロのきらめき・・・(溜息)

このSaint George、1本で抜群の存在感です。これだけでもよかったのですが、ちょっと考えて少しアートを追加。

Combination of Saint George and a cross

キリスト教の聖人の名前を冠するポリッシュなので、十字を合わせてみました。シンプルなんですがかなり気に入りました(゚∀゚)

This is with topcoat. So glossy!

十字追加後はRevlonのトップコートを塗っています。単体でもツヤツヤなんですが、さらにつるんとした仕上がりに(*´д`*)ハァハァ

十字の制作工程はこちら。

How to add the cross. Silver polish is Impala Festa!

マスキングテープを3mm幅に切り、このように十字に爪に貼り付けます。その上に重ねるポリッシュを塗り、乾ききる前にテープを剥がします。ちなみにここで使用したシルバーはImpala Festa!。

The 2mm round stud is from Born Pretty Store

スタッズはBorn Pretty Storeで買った2mmのもの。この十字アートなんですが、できる限り「真っ直ぐ」の線を「真ん中に」配置するよう気を遣いました。曲がった十字なんてかっこ悪いでしょ?

Impala Festa! plays well with St George in my opinion ;)

このSaint Georgeが非常に存在感のあるポリッシュなので、どのポリッシュを合わせようかちょっと迷いました。そんなときはImpala Festa!。同じように存在感の強いシルバーです。どんな色とも合うFesta、素晴らしすぎる\(^o^)/

Saint Georgeに十字も合わせた。あと足りないのは何かな?

My hubby's dragon sword

ドラゴンキターー!なんか家にこんなのありましたよw ハワイに行ったときに旦那殿が一目ぼれしたドラゴンをかたどった剣。

St George wielding the dragon sword :P

Saint George、ドラゴン刀を振るうの図。[壁]・m・) プププ お、重い・・w

カシスはいつも規則正しく4日に1度ネイルを塗り替えているのですが、このネイルだけはオフするのが惜しくて6日間塗ったままでした。

緑が好きなので、他ブランドで気になった濃い緑のポリッシュを2本ほど購入予定リストに入れていたのですが・・・。このSaint Georgeを塗ってからその2本をリストから削除しました。このポリッシュが素敵すぎて、その2本を同じように愛用できるか自信がなくなったためです。そのぐらい他とは一線を画すレベルの高いポリッシュです。

A-Englandのポリッシュを塗ると、「最高の素材で手間暇かけて作られてるポリッシュだな」ということが随所に感じられて非常に気持ちがいいです。「ちょっとでも安く作ろう」的な発想とは対極にあるブランドです。次回のLlaroweでの買い物でまた買い足そうと思います。

それにしても今回ポリッシュ名に合わせてアートを考えたり小道具使うの楽しかった~。今後も何か面白そうな絵が撮れそうなときはまたやってみたいと思います♪

にほんブログ村 美容ブログ 自爪ネイルへ