Showing posts with label UberChic Beauty. Show all posts

Two-Toned Swirly Mani Featuring Madam Glam Polishes

July 25th Update: I replaced the video at the end of this post with YouTube version.

It took all Sunday morning to do the swatching you see on my previous post, and right after that, I started to create my first design featuring 2 of the Madam Glam polishes. 

Thumb, middle finger & ring finger - I started off with 2 coats of Madam Glam 'Sea, Swing and Sun', and I made stamping decal out of swirly pattern from UberChic Beauty 1-03 plate using Mundo de Uñas White, painted half of it with Madam Glam 'Midnight', and placed onto those nails. I added three dots using 'Midnight' and three clear rhinestones on each. I finished off with Glisten & Glow HK Girl topcoat.

Pointer & pinkie - Base is the same, and I simply added purple & clear rhinestone.

I was planning to use two purples for this look, but changed my mind and went with these two. I'm glad I did! I just love the contrast. Now, there was a little accident in the making of this mani. I told you I spent all morning swatching, and I started on this mani straight after, so while I had the decals drying, I thought 'Oh, I'd better check the chickens to see if they laid any eggs' (I usually go check every 1-2 hours). So I went out to the backyard but no eggs there. I tried to get back in the house only to realise the door locked itself....! 

My husband had left hours ago on his business trip, and I was on my own. No relatives or friends around. I was horrified, and 2 things came to my mind. 1) I HAVE to get back in, otherwise my decals will dry out and I have to do it all over again!, 2) Will I still be able to finish this mani to take pics in the sun!? (It was about 3 in the afternoon when this happened). Forget about the possibility of having to spend a night outside, THIS is the nail artist's priority! LOL 

Well, luckily I was able to get back in with the help of our neighbour just in time for the decals to be ready! So I quickly resumed my manis, still panting and sweating, and with shaky hands. You may notice a horrible shake on my hand in the video after the decal part, and you now know why!

7/25更新:記事最後の動画をYouTube版に置き換えました。 

前回の記事に載せたSwatchは日曜の午前中いっぱい掛けて塗装・撮影・編集・ポストしたのですが、その直後にすぐMadam Glamポリッシュを2本使ったネイルを作成しました。出来上がりはこちら。

Finished product, with Glisten & Glow HK Girl topcoat. In the sun

親指、中指、薬指 - ベースはMadam Glam 'Sea, Swing and Sun'を2度塗り。UberChic Beauty 1-03の渦巻き模様をMundo de Uñas Whiteでスタンプし、その半分をMadam Glam 'Midnight'で塗ってdecalを作成。この3本の指に乗せ、同じく'Midnight'でドットを追加し、ラインストーンを置いてGlisten & Glow HK Girlトップコートでフィニッシュ。

人差し指と小指 - ベースは同じ。紫とクリアのライストーンを乗せてトップコートでフィニッシュ。

使用ポリッシュはこちら。

Polishes used

左から、

Madam Glam Sea, Swing and Sun
Madam Glam Midnight
Mundo de Uñas White

I'm such a sucker for good opaque cremes like these polishes. If you use sheer polish to make decals,
you'll need heaps of coats and will end up with thick lumpy decals.  

ここで小話を1つ。このネイルの作成中、ちょっとしたアクシデントがありました。午前中いっぱいSwatchにかかりきりで、さらにこのネイルもSwatch後にすぐ作り始めたので、まったく一息つける時間がありませんでした。decalを作って乾かしているときにようやく時間ができたので、「そういえば今日ニワトリさん卵生んだかな?」と思って庭に出て小屋を見に行ったんです。(いつもは1-2時間おきに見に行く。)今日は卵なしか~と思って家に戻ろうとしたら・・・・鍵がかかってる。。。何かの拍子でひとりでにかかってしまったらしい。旦那殿はもう何時間も前に出張に出かけてしまっている。この田舎町には知り合いもいなければ、引っ越したばかりで友達もいない。愕然とする私。ここで真っ先に頭をよぎった2つのこと。1)早く戻らないと!decalが乾ききったら一からやり直しになってしまう・・!2) 太陽がまだ出ているうちにこのネイルを終えて写真を撮れるだろうか!?(この事件が起きたとき3時を回っていました。)

I can't wait to use my other Madam Glam polishes. They are so pleasant to wear!

「もしかしたらこの寒い夜を外で過ごすことになるかもしれない」なんてことよりも先にネイルの心配をする、とことんのネイルバカ(笑。でもこのときは早く戻らねば!と必死でした。家の周りをぐるぐる回っているとお隣さんがちょうど歩いているのが見えたので事情を話し、その旦那さんが窓をチェックしてくれてたまたま鍵のかかりが甘い窓があったのでそこから無事中に入ることができました(笑。それでなければドアを壊してでも入ろうかと本気で思ったぐらい。ご夫婦に5回ほどお礼を言い、時間をチェックしたらちょうどdecalが乾く時間だったので急いで作業再開。息は上がり汗もひどくかいて手もぶるぶる震えている。。。でも無事作業も終えて写真もその日のうちに撮れました(;▽;)

そんなわけでもしかすると動画で手が震えているのが見えるかもしれませんが、そういう事情ですので1つよろしくお願いします(爆。


にほんブログ村 美容ブログ 自爪ネイルへ

Monochrome Patchwork Typography Mani

July 10th Update: I replaced the video at the end of this post with YouTube version.

What a long & tongue twisting name I gave to today's mani. lol. I always have difficulty coming up with a name for my manis, but I need one when I put the tutorial video on YouTube. I try my best to avoid generic name like 'reverse stamping mani' or 'cute pink mani' or the like. It's just my preference.

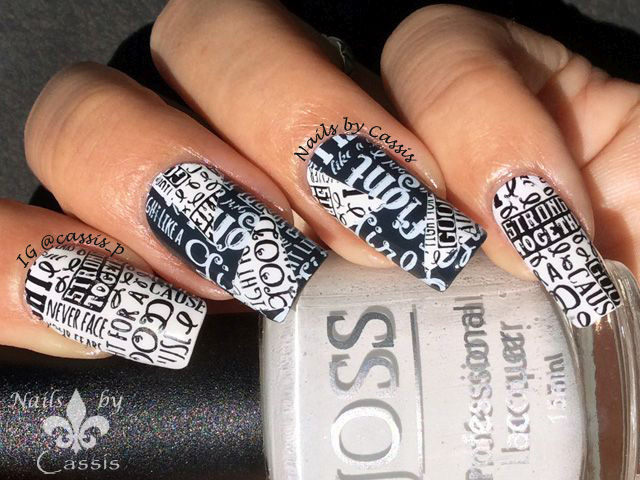
Anyway, for this mani I started off with Sinful Shine Steel Reserve (charcoal gray, almost black) for thumb, middle finger & ring finger. I stamped a typography pattern from UberChic 3-01 plate with Mundo de Uñas White. Then I stamped another typography stamp on the same plate using Mundo de Uñas black and made a decal by applying JOSS Will Not (white). I peeled it off the stamper, cut into random shapes and placed those bits on those nails. For pointer and pinkie, I simply painted white and stamped the same pattern with Mundo de Uñas Black.

I thought this would be a total fail at first. Instead of Steel Reserve, I first tried with JOSS Black Dress, my most opaque blackest black, on my right hand, then stamped white on it. When I topcoated, the white stamp faded! This was the first time I experienced it and I didn't like it. I tried different topcoats to see if it makes any difference, but it turned out that JOSS black was the culprit, so I had to switch to Steel Reserve.

The white stamp on Steel Reserve remained bold after topcoating, but it sort of killed the contrast between it and the white decal on top if you know what I mean. Hmm, I wasn't sure if I liked it or not but I posted on Instagram anyway and got so many positive comments lol! Glad people like it, as their sweet comments helped me gain confidence with this mani :)

7/10更新:記事最後の動画をYouTube版に置き換えました。 

今日のネイル、インスタには数日前にアップしたのですが記事を書くのが遅くなってしまいました。とりあえず出来上がりはこちら。

Finished product, with Glisten & Glow HK Girl topcoat. In the sun

親指、中指、薬指のベースはSinful Shine Steel Reserve(黒にほど近いチャコールグレー)。UberChic 3-01プレートの文字スタンプをMundo de Uñas Whiteでこの3本の指にスタンプ。次に、その隣の文字スタンプをMundo de Uñas Blackでスタンプし、JOSS Will Not(白)を塗ってdecal作成。スタンパーから剥がしたらランダムな形に切って爪に載せる。人差し指と小指は白をベースに同じ柄をMundo de Uñas Blackでスタンプ。仕上げはGlisten & Glow HK Girlトップコート。

使用ポリッシュはこちら。

Polishes used

左から、

JOSS Will Not
Sinful Shine Steel Reserve
Mundo de Uñas White
Mundo de Uñas Black

Can you see the patchwork part? It didn't look obvious to me and I was worried that
people would not recognise it either

このネイルなんですが、色々と紆余曲折がありました。まず、白と黒のくっきりコントラストにしたかったので、このSinfulではなくJOSS Black Dressでまず試したんです。JOSS Black Dressは黒というより「漆黒」と呼びたいぐらいの色です。これをベースにして白スタンプし、その上に白decalを乗せてトップコートしたところ・・・なぜか白スタンプの色が薄くなってしまった。。。トップコートが悪かったかな?と思って別のも試したのですが、結局Black Dressのせいだと分かり、黒ではないけれど黒に近いSinfulのSteel Reserveにチェンジ。

I haven't used typography stamps for along time! These stamps from UberChic plate are
one of the coolest I have in my stash

で、チェンジした結果トップコート後も白スタンプがきちんと浮き上がってくれたのですが、今度は色を反転したdecalとのコントラストがあまりなくなってしまった・・・。一見して、decalが乗っているのを気付かない人が多いんじゃないかな~と思いましたが、「ちゃんと見えてるよ!」との暖かいコメントをいただいてホッ。それまでは正直、「いや~失敗した。このネイル、アップしたくないわー。。」なんて思ってましたよw どんなネイルでも優しいコメントを残してくださるいつもの皆さんはともかく、知らない方たちからもたくさんコメントをいただいて意外と好評でした。自分の自信作にはあまり「いいね」が付かず、イマイチな作品が好評だとちょっと自分の感性を疑うんですが(;▽;)

というわけでモノトーンパッチワークネイルでした。文字スタンプはかなり久々でしたが、このUberChicの文字スタンプはちょっとオサレな感じで気に入っています。


にほんブログ村 美容ブログ 自爪ネイルへ

Exotic Arch Stamping Mani

June 6th Update: I replaced the video at the end of this post with YouTube version.

Another UberChic mani for you. I've keeping my eyes on some chic and ornamental patterns that are scattered around on their plates, and I couldn't resist using few of them.

For this mani, I started off with Sally Hansen Silk Onyx for all my nails, and stamped a damask pattern from UberChic 1-02 plate with Mundo de Uñas Black for thumb, middle & ring finger. I topcoated, and placed two sets of straight tape I bought from What's Up Nail Art Store, and painted China Glaze HeliYum (pink) between these tapes, and peeled them off immediately. Then I made a stamping decal from an arch-looking pattern from UberChic 3-01 using Mundo de Uñas Gold, and placed it onto pink part. I topped with pink rhinestone from MoYou London, then finished off with Glisten & Glow HK Girl topcoat. For pointer, I stamped the same damask pattern with Mundo de Uñas Gold, and for pinkie, I simply added a pink rhinestone.

I was going for subtle stamping for base, but it ended up being too subtle. I used this Silk Onyx & MdU Black combo on this Christmas mani, and I really liked the effect, but when I topcoated, Silk Onyx turned too dark. Duh! I also couldn't make up my mind about what designs/colours to go for pointer and pinkie, but it ended up like this. I wasn't too happy with the result and was going to redo these two nails, but I started to like them as I took photos. At least I'm quite proud that the stamping on pointer came out pretty neat and straight!

6/6更新:記事最後の動画をYouTube版に置き換えました。 

UberChicのプレートを使ったネイル、第2弾。出来上がりはこちら。

Finished product, with Glisten & Glow HK Girl topcoat. In the sun

ベースは全爪Sally Hansen Silk Onyx。親指、中指、薬指にUberChic 1-02プレートのダマスク柄をMundo de Uñas Blackでスタンプ。いったんトップコートし、What's Up Nail Art Storeで買ったストレートテープを2つ置いてその間をChina Glaze HeliYum (ピンク)で塗り、すぐにテープを剥がす。次に、UberChic 3-01のアーチのような柄をMundo de Uñas Goldでスタンプしてdecalを作成し、ピンクの部分に置く。MoYou Londonのラインストーンウィールからピンクの滴形ラインストーンを乗せてGlisten & Glow HK Girlトップコートで仕上げ。人差し指は同じダマスク柄をMundo de Uñas Goldでスタンプしてラインストーンを乗せ、小指にはラインストーンのみ。

使用ポリッシュはこちら。

Polishes used

左から、

Sally Hansen Silk Onyx
China Glaze HeliYum
Mundo de Uñas Black
Mundo de Uñas Gold

Someone commented on my Instagram that this has exotic look, thus I named it 'Exotic Arch' :)

このネイル、久々に大迷走しました。ベースのSilk Onyxは濃いグレーのサテン(セミマット)なのですが、これが黒スタンプ後にトップコートした時点で黒々と色が変化してベースのダマスクスタンプがほとんど見えない状態に・・。Silk Onyxと黒スタンプの組み合わせは以前こちらのクリスマスネイルで使ったことがあって、このさりげないエフェクトが好きだったのですが、トップコートしちゃうとダメですね(-_-) いや、ポリッシュ自体はトップコートしても綺麗なんですが、黒スタンプと合わせるのはイマイチかな。動画を撮りながらも、「あ~こりゃ失敗だわ」なんて思いながら進めていました。さらに人差し指と小指のデザインと色が決まらず、中指の動画撮り終えた後も「ピンク一色にするか」「黒にピンクスタンプにするのか」、頭の中で喧々諤々(ケンケンガクガク)の議論を繰り広げた挙句にこんな風になりました。バランス悪~・・・と思いつつ写真撮った後に少しやり直そうかと思ったのですが、不思議と写真撮っているうちに「あれ?意外といいじゃん」と思えるようになってきましたよ(笑。

I was worried that the arch on the pink part gets too thick, but after topcoat it levelled out and
I hardly noticed the thickness

アーチスタンプの載っているピンクの部分は他の部分より少し厚いので、ボコッとした感じになるかな~と思いきや、トップコートを厚めに塗ったらほとんど段差が感じられなくなりました。ちなみにこのピンクの部分ですが、このぐらい太目に塗っておくのが◎です。これより幅が狭いと金のアーチの裏に隠れて目立たなくなります。黒・金のシックな組み合わせに派手ピンクがいいアクセントになっているんじゃないかと。


にほんブログ村 美容ブログ 自爪ネイルへ

Multicolor Lilly Stamping Mani

June 1st Update: I replaced the video at the end of this post with YouTube version.

I'll show you my first UberChic mani today. With so many beautiful designs on their plates, it was hard to pick which image to use first.

For this mani I started off with JOSS Crystal Sunbeam for all my nails. Then I stamped an elegant swirly pattern from UberChic 1-02 plate using Mundo de Uñas Taupe. Then for middle and ring finger, I stamped a lilly pattern from the same plate using Mundo de Uñas Black, and filled in (leadlighted) with a bunch of homemade jellies plus Nfu-Oh JS33 (teal jelly). If you'd like to know how I made these jellies, please go over to this post and this YouTube video. This idea of using alcohol inks for leadlight technique isn't my original idea, but from a fellow nail blogger Shiki.

I actually used the same JOSS for leadlighting for this butterfly mani, and really love how it turned out. I did the Taupe stamp as a base this time, with the intention of doing lilly stamp just on half of my nail so the base stamp shows better, but I changed the plan and covered the whole middle & ring finger with lilly stamp. Compared to decals, leadlighting is super quick and easy, yet gives such a mesmerising look. Although it's a lilly stamp, I couldn't resist making it colourful and bright :)

6/1更新:記事最後の動画をYouTube版に置き換えました。

UberChicプレートを使った初ネイル。美麗な柄が多いので迷いに迷ってこんな風に仕上がりました。

Finished product with Glisten & Glow HK Girl topcoat. In the sun

ベースは全爪JOSS Crystal Sunbeam。UberChic 1-02プレートからエレガントな渦巻き模様をMundo de Uñas Taupeでスタンプ。中指と薬指にはその上に百合の模様をMundo de Uñas Blackでスタンプし、お手製ジェリーとNfu-Oh JS33(ティールジェリー)で色付け(=Leadlight)。お手製ジェリーについてはこちらのポストこちらのYouTube動画をご覧ください。このアルコールインクとクリアを混ぜるアイデアの出所は何度も紹介させていただいているように、「スキホウダイ」のシイキさんです。

使用ポリッシュはこちら。

Polishes used

左から、

JOSS Crystal Sunbeams
Homemade jelly - Orange
Homemade jelly - Purple
Homemade jelly - Blue
Nfu-Oh JS33

I decided to go for subtle base stamp, but then I was debating whether to us white, gold, or silver,
or this taupe. This taupe stamp appealed me, althought it's super photo shy

このベースのJOSSなのですが、以前にこのチョウチョネイルのベースに使ったことがあります。今回はベーススタンプにMundo Taupeを使った上に百合のスタンプをしてからLeadlight。本当は百合のスタンプは爪の半分程度にしてベースのスタンプがもう少し見えるようにする予定だったのですが、直前で計画変更して爪全面に百合スタンプをすることに。なのでTaupeスタンプがちょっと見にくいですね。このTaupeも白にするか金にするか銀にするかで大いに迷た挙句にこのTaupeにしました。上の日向ショットだと分かりにくいのですが、日陰で見るとベースのチラチラっとしたグリッターの上にほんのり乗った優しいベージュ色がなんとも言えず綺麗です。

What do you think of this multicolour lillies? I really enjoyed creating this mani!

カシスは百合という花が好きですよ。ブログを以前から読んでくださっている方は理由をお分かりでしょう。百合なのにこんな色・・・?という意見はナシで1つお願いしますw カラフルにした方が断然綺麗でしょ(゚∀゚)

それでは動画をどうぞ。今回はMessy Mansionのピンクスタンパーを使ってみました。


にほんブログ村 美容ブログ 自爪ネイルへ

UberChic Beauty Haul & Review

Another exciting and long-awaited nail mail arrived, this time from UberChic Beauty. UberChic Beauty is a fairly new stamping brand that's based in U.S. and run by lovely Brittany Hull. My interaction with Brittany is very limited but the way she responds to every single comment/question from her customers on Instagram or Facebook really impresses me, and I hear her customer service is superb. When I saw the first two collections that were released in January, I knew this brand was going to be a mega hit. 

It took me a while to buy their plates, as I still had heaps and heaps of untried that I wanted to use first. But then when they released 3rd and 4th collection, I finally decided to order. Here's how the order went:

  • Paid: April 27th
  • Shipped: May 6th
  • Arrived: May 13th

These new collections were preorder item, but it only took them a week to ship, then another week to arrive at my door. That was quick! Now let's see what I got.

nail mailはいつもワクワクするものですが、今回のはまた格別です。今日はUberChic Beautyのプレートのご紹介。UberChic Beautyは比較的新しいスタンピングプレート・ブランドで、U.S在住のBrittany Hullさんという方がオーナー。Brittanyさんと直接やり取りしたことはありませんが、インスタグラムやFacebookを見ていると1つ1つのコメントや質問に丁寧に返信していて、非常に好感が持てます。1月に最初に2つのコレクションがリリースされたときに「このブランドは大ヒットするだろうな」と思いましたが、案の定、本当にたくさんのスタンパーさんたちがこのブランドのプレートを使ったネイルを作成していますね。

私はというと、あまり人気が出ると急に興味をなくすというか、人と被りたくないというか、他にも未使用プレートがあるしということでずっと購入を先延ばしにしていました。しかし4月末に新コレクションのアナウンスがあったときに、今度こそは早めに買おうと思ってオーダー。注文から到着まではこんな感じ。
  • 支払い : 4/27
  • 発送 : 5/6
  • 到着 : 5/13
新コレクションはまだプレオーダーの段階だったのでしばらくかかると思っていたのですが、発送まで1週間、到着にさらに1週間と、合計2週間しか待ちませんでした。では買ったものがこちら。


My order came in a small box like this. I bought Collection 1 and 3.

オーダーはこんな感じの小さい箱に入って届きました。買ったのはコレクション1と3。


Each collection is a bundle of three plates and is sold for $24.99. This is Collection 1.

各コレクションは3枚で1セットで、お値段は$24.99。これはコレクション1。


And Collection 3, one of the newest release.

そして今回新しくリリースされたコレクション3。


Plate size is 9.5cm x 14.5cm, exactly the same size with Fab Ur Nails plates (review post here). The brand logo is printed at the back of each plate.

プレートのサイズは9.5cm x 14.5cmでFab Ur Nailsプレート(レビューはこちら)と同じ。各プレートの裏にはブランドロゴがプリントされています。


This is plate 1-01. Each full size image is 1.7cm x 2.1cm. It's amazing to see how many images are so neatly packed in this small plate.

プレート1-01。フルサイズの柄は1.7cm x 2.1cm。小さいスペースに所狭しと整然と並んでいて、無駄なスペースはほとんどありません。


Plate 1-02. This plate convinced me that this brand was going to be a great success. It has everything from swirls, geometrics, flowers, butterflies, peacock, and ornamental images that I adore. Moreover, they are so original - I don't see any dupes of other stamping brand plates. It's easy to see just by looking at this little plate that they have put so much thoughts into creating these plates.

プレート1-02。このプレートを見た瞬間、「このブランドは成功するな」と思いました。渦巻き柄、幾何学模様、花、チョウチョ、孔雀、そして私の大好物の豪奢な柄など、ありとあらゆる人気の柄が盛り込まれています。そして何より、その1つ1つがオリジナル。スタンピングプレート市場もやや飽和状態になってきて、新作が出ても「この柄、別のブランドで見たよ」という柄が非常に多くなってきましたが、この1枚のプレートだけ見てもUberChicのプレートは時間と手間と試行錯誤を重ねて丁寧に作られているなという印象を受けます。


Plate 1-03. More geometrics, swirls, flowers, hearts, etc etc. I really love their flower stamps. They are so different from any other flower stamps on the market. The rough outline flower image on this plate and realistic looking flowers on the previous plate are simply beautiful.

プレート1-03。こちらにも幾何学模様や渦巻きや花柄やハートなど。このブランドは花柄が秀逸ですね。他のブランドではあまり見ないです。たとえば、このプレートのラフなアウトラインの花柄や、前のプレートのちょっとリアルな質感のお花など。いいねいいね、本当に素敵。


Onto Collection 3. This is plate 3-01. Just getting better and better, right?

続いてコレクション3。こちらはプレート3-01。こっちのお花も綺麗だなぁ。


Plate 3-02. One of the things that I love about their plates is that it has such a variety and limited mirror images. I get sick of those plates with heaps of mirror images... C'mon, I can easily mirror stamp like this Safari mani and this Cupid mani. Gimme more variety! 

プレート3-02。このブランドの好感度が高い理由の1つに、左右反転柄が少ないということが挙げられます。左右反転柄で埋め尽くされたプレートを見ると軽くイラっとします。反転なんてこのサファリネイルキューピッドネイルみたいに簡単にできるんよ?もっとバリエーションをおくれヽ(`Д´)ノウワァン


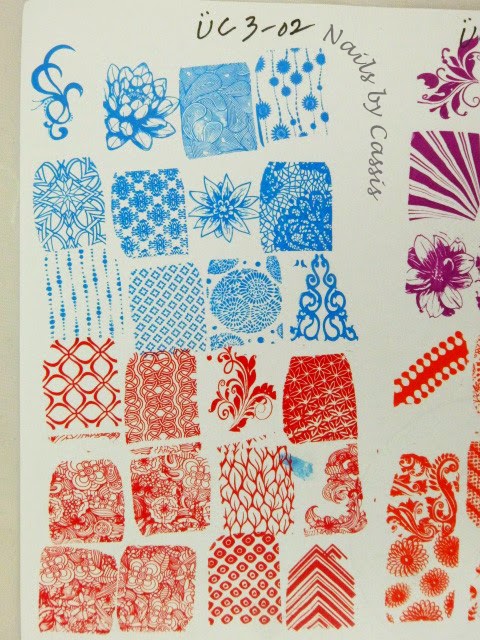
Last one, plate 3-03. Oh those paisley patterns! <3

最後の1枚、プレート3-03。ペイズリー柄ラブ(゚∀゚)


Now, exciting part. How do they stamp? I picked my most trusty stamper that is Messy Mansion rectangle, and a bunch of Mundo de Uñas polishes and started test stamps on paper. This is 1-01.

Hmmm.. do you see some missing spots in some of the images? Like two images on the right on the bottom row or the one just above? The images seem to be etched fine, so my head was full of '????' about this result then I suddenly had a light bulb moment.

さて最も肝心な点。きちんとスタンプするか。いつもテストスタンプに使用している信頼のMessy Mansion長方形スタンパーとMundo de Uñasを何色か取り出し、紙にテストスタンプ。これは1-01の結果。

んんん・・・なんかかすれてる柄がいくつかありますかね?一番下の行の一番右の2つの柄とか、そのすぐ上の柄とか。彫り自体は特に問題なさそうなのに、、、と頭の中が「???」状態でしたが、すぐさま電球が頭にピコーン。


When I peeled back the blue film, I noticed one thing. These plates are slightly warped like you see on the image above. Not sure if it's just mine or not, but if I hold one edge of a plate, you can see the other edge is lifted from the table. I assume this slight warp makes scraping slightly difficult and inconsistent, resulting in inconsistent stamping.

ブルーフィルムを剥がしているときに1つ気付いたことがあります。このプレートたち、少し歪んでいるんです。私のプレートがたまたまそうなのか他のもそうなのかは分かりませんが、テーブルに置いて片方の端を指で押さえると、もう片方の端がテーブルから浮いているのが分かると思います。想像するに、この歪みによってスクレイプが不均等になり、結果のスタンプにも影響しているのかなと。


For comparison, this is Fab Ur Nails plate, exactly the same size with UberChic plate. You can see it lies flat on the table, and the edge doesn't lift from the table when I hold down the other edge.

比較のため、まったく同じサイズのFab Ur Nailsのプレートで実験。こちらはテーブルに平らにぴったりくっついているのが分かるかと思います。端を押さえても、もう片方の端がテーブルから浮くことはありません。


So, what I did was simply hold down the plate so it flattened a bit, and tried scraping to different directions till I got a good and consistent stamp, and this is the result. It looks much better, and I'm glad it is something I can easily workaround.

そこで試したのが、プレートが平らになるよう少し押さえつけながら、いつもとは別の方向にスクレイプしてみること。その結果がこちら。完璧ではないですがだいぶましになりました。彫りの問題ではなくちょっとした工夫次第で避けられる問題のようなのでホッと一安心。


So I kept stamping with this method and my results are more consistent than my first try. This is plate 1-02. By the way, I only test stamped full size images, but there are some cute small sized images as well.

次のプレートもこのやり方でやってみました。最初の結果よりだいぶいい感じ。こちらは1-02プレート。ちなみにフルサイズの柄しかテストしていませんが、各プレートには小さい個別柄もいくつかあります。


Wanna see the close-up? O.M.G, those details!!

マクロで見てみましょうか。このディテール、ヤバす(゚∀゚)


Last one from Collection 1; 1-03 plate.

コレクション1の最後の1枚、1-03プレート。


I got so messy during test stamps, and the back of the plates got polishes all over. I wiped it with pure acetone and found out the printing faded :( Nothing to do with quality, but if they can change the printing to acetone-proof, I would be happier.

テストスタンプ中、プレートの裏までポリッシュがべったり付いてしまったのでいつものようにアセトンで落としていると、印字まで落ちてしまった(;▽;) プレートのクオリティとは関係ない部分ですが、アセトンで落ちないようにしてくれると嬉しいなぁ。


And these three are from Collection 3. 

そしてコレクション3の3枚。


Even the fine images like this Celtic looking pattern stamp so well!

こんなケルト文様風の細かい柄だってきちんとスタンプされてますよ\(^o^)/

There you have it. There are few things that they may want to improve, but all in all, I absolutely love what I got. I got so stoked doing these test stamps with fumes from acetone and Mundo de Uñas polishes, so I really hope this review is helpful to someone. Can't wait to play with these beauties!

そんな感じで、いくつか改善の余地がある点はありましたが、全体的に非常に気に入りました。テストスタンプ中にアセトンとMundoの臭いにクラクラしながら頑張ったので、どなたかの参考になれば幸いです。使うのが今から楽しみです(゚∀゚)

にほんブログ村 美容ブログ 自爪ネイルへ