Black x Silver Veil Mani

Sunday, February 28, 2016 4 Comments A+ a-

I have another mani created with Pueen Cosmetics Love Element collection to show you today. I've created a bunch of colourful manis lately, so I decided to go for something chic.

Thumb, middle finger & ring finger: Base is 2 coats of Picture Polish pharaoh. I used the elegant looking stamp on Love Elements 26-29 plate with Mundo de Unas Silver, and painted black on stamper. Then when that's dry, I peeled off stamper, cut it in triangle, and placed it onto these nails. I applied black striping tape to define the outline of the decal, applied topcoat, and finally placed ss8 swarovski crystal.

Pointer & pinkie: Base is the same. I applied striping tape diagonally and painted black over the tape.

It's a simple mani using only 3 colours, but I like the chic look. Picture Polish pharaoh is a nude gold colour and a bit sheer, but it's really elegant on it's own yet so sparkly. Love Elements collection is full of elegant images, so it wasn't hard to find an image that compliments this beautiful polish.

Pueen Cosmetics Love Elementコレクションを再度使ったネイルを作成してみました。出来上がりはこちら。
Finished product, with HK Girl topcoat

親指、中指、薬指: ベースはPicture Polish pharaohを2度塗り。Love Elements 26-29プレートのエレガントな柄をMundo de Unas Silverでスタンプし、スタンパー上で黒を塗って乾かす。完全に乾いたらスタンパーから剥がし、三角形に切って爪に乗せる。decalの外枠に黒のラインテープを置き、HK Girlトップコートで仕上げた後、ss8サイズのスワロフスキーを乗せる。

人差し指と小指: ベースは同じ。ラインテープを斜めに置いて上から黒を塗る。

使用ポリッシュはこちら。
Polishes used

左から、

Face of Australia Don't Judge Me!
Picture Polish pharaoh
Mundo de Unas Silver
This is the base on it's own. You may need 3 coats for full opacity, but I left it as 2 coats
as I wanted to keep the nudy, kind of negative space look.

ちなみにこちらがベースのみの状態。少しシアーなので完全に爪のラインを隠すには3度塗りが必要ですが、今回は2度塗りにとどめてちょっとnegative spaceっぽさを出しました。
I don't know why but I haven't worn holos much this summer.
I think this mani will bring me back some holo-love! 

最近カラフルなネイルが続いたので、少しシックな感じを目指してみました。カラフルなネイルは作るのは楽しいんですが、飽きるのも早い^_^;
I think I did a good job not covering this pretty base too much :)

今年の夏は何故かあまりホロを塗りませんでしたが、たまに塗るとテンション上がりますね。デザインを邪魔しないPPの控えめなホロ、なかなか癖になりそうです。

Bliss Kiss Simply Pure Cuticle Oil Review

Monday, February 22, 2016 4 Comments A+ a-

I recently purchased Simply Pure Cuticle Oil from Bliss Kiss when they had bi-annual sale in January. I've been using it for about 3 weeks now, and would like to share my experience with it.

Before I go into review, here are the links to the Bliss Kiss store and SNS:

1月にBliss Kissが半年に一度のセールをやっているのを皆さんご存知でしたでしょうか?そのときにSimply Pureネイルオイルを購入し、現在使用を開始して3週間ほど経過。そろそろ使用感や感想などをまとめようと思い、今回レビュー記事を書くに至りました。

レビューに入る前に、Bliss KissのショップとSNSへのリンクはこちら。


This is what I purchased. Product name is Starter Kit Simply Pure, and you can buy from this page. It comes with a 2ml nail oil pen, and a 15ml dropper bottle. You can choose the scent from either Crisp or fragrance free. I chose Crisp.

こちらが購入品。商品名はStarter Kit Simply Pureで、こちらのページから購入できます。2mlのネイルオイルペンと15mlのボトルのセットです。香りはCrispと無臭から選択可能で、私はCrispにしてみました。


Before I go into review on Simply Pure, I'll tell you a little story about my nails and my past nail care. These are the two products I've been using. Left is CND Solar Oil, and the right is Burt's Bees lemon butter cuticle cream. I think I've been using this combo about 2 years now, and I found them work very well. I use Burt's Bees once or twice a day, usually before bed and during the day when I feel the need to apply it. With CND Solar Oil, I mainly use it after I paint my nails and just before I take my nail photos. 

Since I started using them, my nails hardly break. They really do a great job in keeping my nails long and healthy. Then why did I decide to change this routine? Well, because Solar Oil is less than half a bottle now, and I really needed another bottle of oil. I could go on ebay to order another bottle of Solar Oil, but then I remembered that I've been wanting to try Simply Pure. I got to know this oil when I first did Bliss Kiss product review. I went to their website, came across the article about this oil and got really curious. Bi-annual sale started at the right time, so I jumped at the opportunity and finally became the happy owner of Simply Pure. 

Simply Pureについて書く前に、私のこれまでの爪の状態とネイルケアについて触れておきたいと思います。今まで使っていた製品がこの2つ。左がCND Solar Oil、右がBurt's Beesレモンバターキューティクルクリーム。この2点を約2年ほど愛用しており、使用感は非常に良好です。Burt's Beesは1日に1回か2回、寝る前と日中(必要に応じて)塗っています。CND Solar Oilは主に爪を塗り終わって写真を撮る直前に塗ります。

この2点を使い始めてから爪がほとんど割れなくなりました。爪を長く健康的な状態に伸ばせるようになったのはこれらの製品のおかげです。ではなぜこのルーチンを変えようと思ったのかというと、Solar Oilがボトル半分以下になってしまい新しいオイルが必要だったからです。ebayでSolar Oilをもう1本買うこともできたのですが、「そう言えば」と思い出したのがこのSimply Pure。このオイルについて知ったのはBliss Kissの製品を初レビューしたとき。Webサイトに行ってこちらの記事を読んで、「なんかすごいオイルがあるぞ」と釘づけになりました。そんな折に半年に一度のセールのお知らせが来たため、これをいい機会にと購入することになりました。


Let's have a good look at the product first, shall we? Both dropper bottle and pen have instruction on how to use and ingredient list on the label. This 2ml pen has nice soft white brush which makes application easy. This pen is meant for one-time use only, but you can also refill it. Once the oil in it runs out, you can pull it apart and refill it from the dropper bottle. You can find the refill instruction on this page.

Ingredients. You can see the ingredient list both on the label and the product page, but what's in Simply Pure are all natural ingredients that you can even eat. The key ingredient here is Jojoba Wax Ester. According to this article by Bliss Kiss owner Ana, only two molecules are small enough to move through the 100 layers of keratin that make up your nails—water and sebum (our body oil). Jojoba is almost identical in molecular structure to sebum. All the other oil molecules are too big to penetrate your nail plate. In other words, if nail oil doesn't contain Jojoba wax ester, it doesn't really do the job other than softening up your fingers. And what's great about Simply Pure is that it has the highest concentration of jojoba oil on the market. 

Smell. As I said before, you can choose from Crisp or fragrance free on the Starter Kit, and I chose Crisp. And the smell? Absolutely divine. When I first tried this oil on my nails and sniffed, I went like 'omg... citrus-y and sweet??' Yes, it has the fresh citrus-y lemon smell AND sweet vanilla like smell at the same time. Two contradicting smells in one. I seriously couldn't stop sniffing my fingers after application. Once the oil sank in, sweet smell lingers more.

製品についてまずは詳しく見てみましょう。15mlボトルの方も2mlのオイルペンもラベルに成分と使用方法が書かれています。ペンには柔らかい白いブラシが付いていて、非常に塗りやすいです。このペンは1回限りの使用が基本のようですが、補充も可能です。中のオイルがなくなったらペンを分解し、15mlボトルからつぎ足すことができます。補充の仕方はこちらのページで説明されています。

成分について。成分の一覧はラベルと製品ページに書かれていますが、Simply Pureはすべて自然由来の成分でできており、どれも口にしても問題のないものです。中でも一番キーとなる成分はJojoba Wax Ester(ホホバ ワックス エステル)。Bliss KissのオーナーAnaさんのこちらの記事によると、爪を構成する100層ものケラチンに浸透していけるほど小さい分子は水と皮脂の2つしかなく、ホホバは分子構造上この皮脂とかなり近いんだそう。他のオイル分子は大きすぎて爪のプレートには浸透していきません。つまり、ホホバ ワックス エステルを含まないネイルオイルは指を柔らかくする程度の効果しかなく、爪への働きかけは皆無ということになります。そしてSimply Pureの最大のポイントは、市場に出回っているネイルオイルの中でもこのホホバの含有率が一番高いところ。ホホバ ワックス エステルは単価が高いので、他の市販のネイルオイルには最低限の分量しか含まれていないようです。

香りについて。上でも書きましたが、スターターキットの香りはCrispか無臭から選択できます。私はCrispを選択しました。感想はというと、えも言われぬ病みつきになる匂いです。キューティクルに初めて塗って匂いをかいだときに、「あれ??爽やかなシトラスの香りもするし、甘い匂いもする・・」と驚きました。レモンのようなフレッシュなシトラスの匂いとバニラのような甘い匂い、2つの相反する香りが同時にやってきます。あまりにも不思議な感じで、しばらく指の匂いを嗅ぎっぱなしでした。ちなみにオイルが爪に浸透した後は、甘い香りの方が強く残ります。


I'll show you the quick demo on how to use it. When you use it for the first time, hold it with the bristles pointing up and twist the end 20 or 30 clicks until you see oil in the bristles. After first use, you only need 1 or 2 clicks for each application. I use 1 click for 1 hand, and apply 3-5 times a day.

When the bristles is loaded with oil, you brush on your cuticle and under your nails, rub it with the other hand, and it's done!

使い方について。初回使用時は、ブラシを上に向けた状態でペンのお尻側を20~30回ほどカチカチと回します。ブラシがオイルで湿ってきたら準備完了。2回目以降は1~2回回すだけで全部の爪に塗ることができます。私は片手につき1回回し、使用頻度は1日3-5回ほどです。

オイルを含んだブラシをキューティクル周辺とサイド、それから爪の下に塗り、もう一方の手でオイルを浸透させるように擦り込めばOKです。


Starter kit also comes with the instruction you might want to have a look.

スターターキットには使い方を記した紙も同封されているので、こちらで正しい使い方を確認できます。


Soooooo, moment of truth. The pic above is Day 1. This is before I applied Simply Pure. It was taken just after I removed a mani, so you can see the dryness on both cuticles and nails from acetone use. Poor thing. 

では肝心のビフォー・アフターを見てみましょう。上の画像は使用1日目。ネイルをオフして直後に撮影したので、キューティクルも爪もカピカピに乾燥して可哀想な状態。このときはまだオイルは使っていません。


And this is Day 20. My pen is only 30% left. Looking healthy and no dryness whatsoever. This sight really makes me happy!

そしてこちらが使用20日目。ペンは残り3割ほどになりました。乾燥も見られず潤った状態です。自分でも爪を眺めてニヤニヤできるレベル(゚∀゚)


Side by side comparison. I can see annoying little white spots on ring finger on Day 1 pic, but it looks like they are gone!

比較画像。1日目の画像では薬指の爪に白い点がポツポツ見られますが、それも消えていますね。

I also noticed few things during this period. After I applied Simply Pure and rubbed in, the oil penetrates to my skin fairy quickly. I used to apply CND Solar Oil after I painted my nails and just before I took photos, but the oiliness of Solar Oil stayed on my nails quite long even after I rub, rub and rub in. I don't want to show my manis with greasy fingers, but don't want to wait too long to take my nail photos either! So I eventually have to go wash my hands with soapy water, which kind of defeats the purpose of using nail oil as water causes more dryness on your nails. With Simply Pure, the oil sinks in to my nails very quickly, so my nails are photo-ready in no time. I'm thinking this difference is because of the high concentration of Jojoba wax ester in Simply Pure that Ana said about. In any case, great great product!

使用期間中、気付いたことが2つほど。Simply Pureを塗って擦り込んだ後、かなり素早くオイルが肌に浸透していきます。以前はネイルを作成して写真を撮る直前にCND Solar Oilを使っていたのですが、このCNDのオイルはキューティクルに塗って擦り込んでも油っぽさがかなり長く残ります。油っぽい指のまま写真は撮りたくないけど油が消えるまで待てない!ということで、結局水と石鹸で指を洗う羽目になります。水は乾燥を引き起こす爪の最大の天敵なので、オイルを塗る意味がなくなってしまいます。Simply Pureは塗った後爪に素早く浸透して油っぽさが消えるので、すぐに写真撮影に入ることができます。この違いはもしかして、Anaさんが言っていたホホバ ワックス エステルの含有率の違いなんだろうか?とふと思いましたが、いずれにしてもかなりデキるオイルです。


Another thing I noticed is that my long nails don't bother me as much as they used to. I work as a document translator and I spend about 8 hours a day in front of my laptop typing away. When my nails grow past 2cm on my left hand, and 1.8cm on my right hand, I start to feel the annoying clicking sensation when typing on keyboard. (Don't ask me why the different length on left and right, I don't even know.) This usually tells me it's about time to file down my nails. I noticed the other day though, that my right hand nails are almost 2cm, and it didn't bother me at all when typing. I can only assume that it's because my nails are properly hydrated with Simply Pure free from dryness, and kept them very flexible. 

もう1つ気付いたことは、以前ほど爪の長さが気にならなくなったこと。私の本職はコンピューターマニュアルの翻訳で、1日約8時間ほどノートPCに向かってキーボードを叩いています。だいたい左手の爪が2cm、右手の爪が1.8cmを超えると、キーボードを打つときに爪がカチカチっと当たって軽い痛みを感じるようになります。(ちなみに右手と左手で長さが違う理由は謎。)こうなってくると「あ、爪を切る頃だな」と分かるのですが、先日右手の爪が2cmに達するぐらい伸びていることに気付きました。キーボードに当たって痛いという感覚がなかったので、これほど伸びるまで気付きませんでした。これについても推測ですが、Simply Pureで爪が乾燥知らずのしなやかな状態になっているのでカチカチっとした感じが軽減されたのかなと考えています。

So, my thought on Bliss Kiss Simply Pure Cuticle Oil? I absolutely love it. I was quite happy with my previous nail care products, but didn't expect I could find anything better. I will probably use it in conjunction with Burt's Bees cuticle cream, which I still love. If you are unhappy with your current nail care routine, or having trouble with your nail conditions, why not try this oil?

というわけでBliss Kiss Simply Pureキューティクルオイルの総評。一言で言って非常に素晴らしい商品です。以前のネイルケア製品にも十分満足でしたが、もっといい製品が見つかるとは思っていませんでした。今後はBurt's Beesキューティクルクリームも併用して使って行くと思います。現在のネイルケアや爪の状態にご不満な方は、是非試してみてください。

'Spring in the Air' Mani

Saturday, February 20, 2016 0 Comments A+ a-

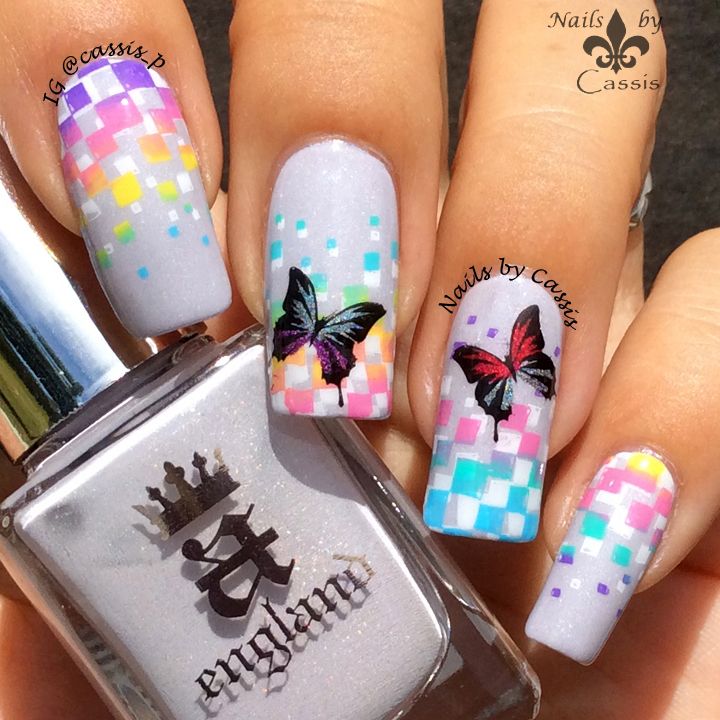
I created another design using Pueen Cosmetics Love Elements collection sent for review. I started off with A-England Cathy, then stamped square box image from Pueen Love Elements 46-49 plate using Pueen Pure White. Then I applied 4 different colours on the same image, scraped few times to blend the colours, and stamped on top of the white stamp.

Once double stamping is done, I made stamping decal out of butterfly image on Love Elements 38-41 plate with Pueen Black Jack, coloured in with A-England polishes, and placed on thumb, middle finger & ring finger. Finished off with HK Girl topcoat.

I'm super happy with how this turned out. A-England Cathy I used for base has a gray lilac undertone, and white stamp on it looks beautiful on its own. For multicolour stamping, I used 5 Pueen Super Intense polishes (turquoise, blue, yellow, pink & purple) all up but only 4 for each nail to create gradient. I changed the colour order for each nail, so the colour transition all looks different. I really enjoyed creating this mani and it was super quick and easy. I hope all my manis would be like that!

Pueen Cosmetics Love Elementsコレクションを使ったネイル第2弾。出来上がりはこちら。
Finished product, with HK Girl topcoat

ベースはA-England Cathy。Pueen Love Elements 46-49プレートのボックス柄をPueen Pure Whiteでスタンプ。次に、同じ柄に4色のポリッシュを横並びに垂らして数回スクレイプし、白スタンプの上にスタンプ。

ダブルスタンプが出来上がったら、Love Elements 38-41プレートのチョウチョをPueen Black JackでスタンプしてA-Englandのポリッシュで色付けしてdecalを作成。親指、中指、薬指に配置してHK Girlトップコートでフィニッシュ。

使用したスタンピングポリッシュはこちら。すべてPueen Super Intenseコレクションより。
Stamping polishes used. All from Pueen Super Intense collection

上段左から、

Pure White
Black Jack
Bright Yellow

下段左から、

Charmed Lilac
Sweet Pink
Mermaid Green
Baby Blue

使用ポリッシュはこちら。
Polishes used. All A-Englands

左から、

A-England Cathy
A-England Captive Goddess
A-England Crown of Thistles
A-England Rose Bower
I didn't go for precious shadow stamping like I did for this mani.
I just stamped away but still like the random, inconsistent look :D

このPueenの四角柄、前から目を付けていたんですが、「ちょっと楽しいことが出来る柄」のいい例ですね。ベースに使ったA-England Cathyは白っぽく見えますが少しグレー・ライラックがかっているので、白のスタンプが割としっかり発色します。そしてその上のグラデーションスタンプ。使ったポリッシュは5本(ターコイス、青、紫、ピンク、黄色)ですが、各爪4色使っています。色の順序を変えているのでどの爪も違う見た目になってちょっと面白いなぁと。中指のピンクと黄色がブレンドしてオレンジになっているところとか結構好き(゚∀゚) まぁ、チョウチョの裏に隠れちゃってるけどw
See the holos on the butterflies? I should have taken a macro shot!

久々に、特に悩むこともなくすんなりデザインが思い付き、簡単かつ楽しく作成できました。「この色とこの色をブレンドしたらどんな色になるかな~?」と子供みたいにワクワクしながらやったのはいつ振りだろうか。今度知り合い・親戚・旦那の同僚に「ネイルやって!」とおねだりされたら絶対このデザインにしよう。簡単だし見た目も可愛いしチョウチョだし。


Retro Geometrics Mani Using Pueen Love Elements Plate

Wednesday, February 17, 2016 4 Comments A+ a-

I created the first design using Pueen Love Elements collection sent for review. Also, this is the first time I used Simply Neat Miracle Mat.

I applied 2-3 coats of pink, blue, and camel on Simply Neat Miracle Mat and let them dry. Then I stamped a circle pattern from Pueen Love Elements 34-37 plate using black & white stamping polishes, peeled the decals off the mat, and cut them in triangles. I applied black on all my nails and while it's still slightly tacky, I placed those decals on each nail. Finished off with HK Girl topcoat, followed by Essie Matte About You.

Some tips for those who want to recreate this look. You may want to apply few coats of polish on the mat to make it easier to cut later. Only 1 coat will be too thin to cut neatly, and too many coats will make the decal too thick and bulky. Also, allow them to dry thoroughly. I went for shopping while I had the decals drying, and came back to peel them off 2 hours later. 30 minutes will probably do, but it was really easy to cut straight when the decals are nice and stiff.

This mani may look to be a colour blocking mani using tapes, but it's much more simple to create than that. With drying time aside, you can do this in 20 minutes. Well, I want all my manis to be like that!

Pueen Love Elementsコレクションを使ったネイルを1つ作成してみました。また、Simply Neat Miracle Matも初使用。出来上がりはこちら。
Finished product, mattified with Essie Matte About You

まず、Simply Neat Miracle Matにピンク、青、キャメルを2,3度塗りし、よく乾かす。Pueen Love Elements 34-37プレートの円形柄を黒と白でそれぞれスタンプし、マットからdecalを剥がして三角形に切り取る。decalを爪に乗せる少し前にベースの黒を塗り、ランダムに爪にdecalを配置したらHK GirlトップコートとEssie Matte About Youでフィニッシュ。

使用ポリッシュはこちら。
Polishes used

左から、

Elcorazon Active Bio-gel 423/261 Cream
Elcorazon Charm & Beauty 892
Face of Australia Don't Judge Me
Essie Sweet Pie
Pueen Super Intense - Black Jack
Pueen Super Intense - Pure White
I went for retro, nostalgic colour combo. I'm so happy that these colours go so well together!

非常に簡単なネイルではあるのですが、コツがいくつかあります。マットにポリッシュを塗るときには2-3度塗りすることをお勧めします。1度塗りだと後で切るときに真っ直ぐ切りにくく、4度塗り以上だと爪に乗せたときに段差が出てカッコ悪いです。ピンクのEssieはシアーなので3度塗りしましたが、それでもちょっとベースの黒が透けてますね。

それから、decalを十分乾かすのも重要です。ポリッシュをマットに塗ってそのまま買い物に行き、マットから剥がしたのが約2時間後でした。おそらく30分乾かせば大丈夫だと思いますが、きちんと乾いている方が綺麗に真っ直ぐ切れます。ただ、その分ベースの黒は乾ききっていない状態にしておかないとdecalがくっつきませんので注意。
I'm so into matte look lately. Making it matte hides the flaws I think. lol

このネイル、一見してテープを使ったカラーブロッキングネイルに見えたんじゃないでしょうか。動画を見てお分かりのように、テープを使うよりあっけないほど簡単です。decalを乾かす時間を除けば20分ぐらいでできると思います。色合わせに迷ったのですが、ちょっとノスタルジックなレトロっぽさを感じさせる色を選定。どれも王道色ではない、少しくすみがかった色でいいですね~。こういう感じのポリッシュ、今後揃えて行きたいです。


Pueen Cosmetics Love Elements Collection & Crystal Stamper Review

Sunday, February 14, 2016 2 Comments A+ a-

Happy Valentine's Day! I have a review post appropriate for today. Pueen Cosmetics recently released Love Elements stamping plate collection gift box and crystal stampers, and I was sent both items for review. 

Before I go into review, here are the links to Pueen Cosmetics store and SNS:

今日はバレンタインデーにふさわしいポストを1つ。先日Pueen CosmeticsよりLove Elementsプレートコレクション(ギフトボックス版)とクリスタルスタンパーが発売され、レビューにということで先日受け取りました。

いつものように、Pueen CosmeticsのショップとSNSへのリンクはこちら。

These are what I received. You can find the Love Elements collection on this page, and Crystal stamper set on this page.

こちらが受け取った品。Love Elementsコレクションはこちらのページ、クリスタルスタンパーはこちらのページから購入できます。

Let's look at the Crystal stampers, shall we? Each set comes with 2 scrapers, 2 stamper heads, and a luxurious holder with a big crystal attached. You can choose either silver or gold holder.

まずクリスタルスタンパーから見てみます。各セットの中身はスクレイパー2枚、スタンパーヘッド2つ、大きなクリスタルが付いた豪奢なホルダーという内容。ホルダーの色はシルバーかゴールドから選べます。

Size comparison. Shown here are all Crystal stamper heads except for the one in the middle, which is Messy Mansion Pink Soft head. As you can see, Crystal stampers are slightly bigger and 2.9cm in diameter.

サイズ比較。上の画像は真ん中のMessy Mansionピンクソフト以外はすべてクリスタルスタンパーです。ご覧のように、MMよりほんの少しだけ大きいのがお分かりいただけると思います。直径約2.9cm。

Squishiness. Crystal stampers are slightly firmer than Messy Mansion Pink (which is a semi-marshmallow), although the difference is marginal.

柔らかさ。クリスタルスタンパーはMessy Mansionピンク(半マシュマロ)よりもわずかに硬いです。写真で見るとあまり違いが出ていないと思いますが。

Pinkup test. The stamper heads are a bit oily, so it is recommended to wash them with soapy water before use. I first tried non-primed, but the pickup wasn't great, so I ended up with priming all with Magic Eraser. The polishes are all Pueen's Super Intense polishes (review here), and the plate is Pueen Nature Lover 01 (review here). All pick up images great after priming. By the way, the bottom one in the pic is the stamper that comes with Love Elements set that I'll show you later.

ピックアップテスト。スタンパーヘッドはやや脂っぽいので、ご利用前にまず石鹸水で洗うことをお勧めします。そしてまずprimeなしでやってみたところ、きちんとピックアップしなかったため、すべてメラミンスポンジでprimeして試した結果が上のとおり。使用ポリッシュはPueenのSuper Intenseポリッシュ(レビューはこちら)、プレートはPueen Nature Love 01(レビューはこちら)です。prime後はすべて綺麗にピックアップしました。ちなみに一番下のやつは後でご紹介するLove Elementsセットに付属のスタンパーです。
 
Now I'll show you the beautiful holder close-up. Crystals are big, shiny and beautiful. I like that it stands on it's own. Some of you may wonder if the crystal gets in the way when holding it, but no, that's not an issue at all. The issue for me is the skinny part of the holder. I've never used the holder of this shape, so it will need a bit of a getting used to.

お次は豪華なホルダーについて。クリスタルはかなり大きくキラキラして綺麗です。クリスタルを下にして立てることができるのがいいですね。ホルダーを持つときにクリスタル部分が邪魔じゃないかと思われる方もいらっしゃるかもしれませんが、特にそういうことはありません。個人的には、細くなっている部分がやや難ありです。こういう形状のスタンパーを使ったことがないので、ちょっと慣れが必要そうです。

Another thing I noticed is that the stamper head gets squeezed tight in the holder. Where the stamper head fits is 2.4cm in diameter, while the stamper head itself is 2.9cm. The advantage of this is that you don't need to worry about the head popping out of the holder when stamping, but the disadvantage is that the head feels much firmer in the holder than what it is out of the holder. I'm a bit bummed about it, because firmer stamper can't accommodate my long curvy nails very well.

もう1つ気付いたこと。スタンパーヘッドをホルダーにはめるときに、かなりグイグイ押し込む感じになります。スタンパーヘッドがはまる部分の直径は2.4cm。ヘッド自体が2.9cmなのでかなり大きさに違いがあります。利点としてはスタンプの際にホルダーからヘッドが落ちる心配がないことですが、その反面、ホルダーから外したときに比べてホルダーにはまっているときの方がかなり硬くなります。硬いスタンパーは私のカーブのきつい長爪には適さないので、この点は少し残念です。

Moving on to the Love Elements collection. This collection was released few years ago as a round plate collection, but it was redesigned on rectangle plates and released as a set with stamper and scraper.

次にLove Elementsコレクションをご紹介します。このコレクションは数年前に丸プレートのコレクションとしてリリースされましたが、長方形プレートに変更されて今回スタンパー/スクレイパー付きのセットとしてリリースされました。


The set contains 6 plates, stamper & scraper. The stamper/scraper is exactly the same with the one that comes with the Lover collection, so head over to this review post if you're interested to know about it.

セットの内容はプレート6枚とスタンパー・スクレイパーがそれぞれ1つ。スタンパーとスクレイパーはLoverコレクションに付属のものと同じですので、興味がある方はこちらのポストをご覧ください。


Plate size is 12.5cm x 6.5cm. It has a thick plastic backing with cute printing on it. Below I'll show you each plate pic followed by paper swatch. All the polishes used are Pueen Super Intense polishes.

プレートのサイズは12.5cm x 6.5cm。可愛い柄が印刷された厚めのプラスチックの台座が付いています。以下、各プレートの写真と紙swatchをお見せします。使用したポリッシュはすべてPueen Super Intenseポリッシュです。


First up is Love Elements 26-29. Each full size image (those on the top and bottom rows) is about 1.8cm x 1.4cm, which is exactly the same with those on round plates. I was expecting that they resized the images to make them bigger, but that's not the case. 

The etching on this plate is a bit on a shallow side, and as I couldn't stamp on paper fast enough, some details were lost. For those that didn't stamp well, I redid them as shown later.

最初のプレートはLove Elements 26-29。プレート上段と下段のフルサイズ柄の大きさは1.8cm x 1.4cmで、丸プレートの柄とまったく同じサイズです。丸プレートのときから柄も少し大きくなったかな?と期待していたのですが、そういうことではないようです。

このプレートの彫りはやや浅めで、swatchの際に素早くスタンプ出来なかった柄については少しかすれが発生しました。後でいくつかの柄をやり直したので再度お見せします。


Love Elements 30-33. Etching is better on this one. I like that this collection has both full size images and cute little small images.

Love Elements 30-33。こちらの彫りは最初のプレートより良好。このコレクションはフルサイズ柄に混じって色んな可愛い小さい柄があるのがいいですね。


Love Elements 34-37. Lots of different hearts and circles. 

Love Elements 34-37。色んなハートやサークルやら。


Love Elements 38-41. More hearts, animals, flowers, etc. I had zero issue with this plate and the remaining 2 plates. I did one mani before using the second from the top right image.

Love Elements 38-41。ハート、動物、お花など。このプレートと残り2枚のプレートは彫りの問題はまったくありませんでした。上段右から2つ目の柄は以前このネイルで使ったことがあります。


Love Elements 42-45. Mixture of cute, elegant and fancy images.

Love Elements 42-45. 可愛い系、エレガント系、ファンシー系の柄のミックス。


Lastly, Love Elements 46-49. I think this is my favourite of all. 19 months ago, I did a mani using the image on the middle far left with an awkward video tutorial. Eeek!

最後にLove Elements 46-49。このプレートが一番お気に入り♪ 19週前に中段左の柄を使ったネイルをやったことがあります。初々しいチュートリアル付きで(爆。


So here are some images that I decided to redo, just to show there's no mis-etching. I switched to MdU Black for this, because it's slow drying. 

そしてこれがやり直した柄。彫りの浅いプレートは乾きの早いポリッシュと相性が悪いので、このやり直しには乾きの遅いMdU Blackを使用しています。

So there you have it! If you don't own Love Elements collection yet, it's a great collection to have. As for Crystal stamper, if you're looking for something different and luxurious other than the plain old stampers, this one is for you. I have already created one mani using some of these items, so stay tuned!

というわけで、Love Elementsコレクションとクリスタルスタンパーのご紹介でした。Love Elementsは使い勝手のいい柄が多いので、まだ持っていない方は検討してみるとよいかと思います。クリスタルスタンパーの方は好き嫌いが分かれるかもしれませんが、スタンダードなスタンパーとは違うスタンパーを求めている方にはいいかもしれません。今回ご紹介したアイテムを使ったネイルを既に1つ作成したので、後日お見せします。


*Products sent for honest review
*記事中の製品はレビュー目的で送っていただいたものです

Cupcake & Ice Cream Mani

Friday, February 12, 2016 2 Comments A+ a-

8th of this month was Chinese New Year, and 14th is Valentine's Day. I've already done manis for each theme (here and here), so what should I create next? I'm still uninspired and couldn't think of anything, so I decided to go through my plate collection and spotted a cute plate that I've been wanting to use for a long time - hehe 055.

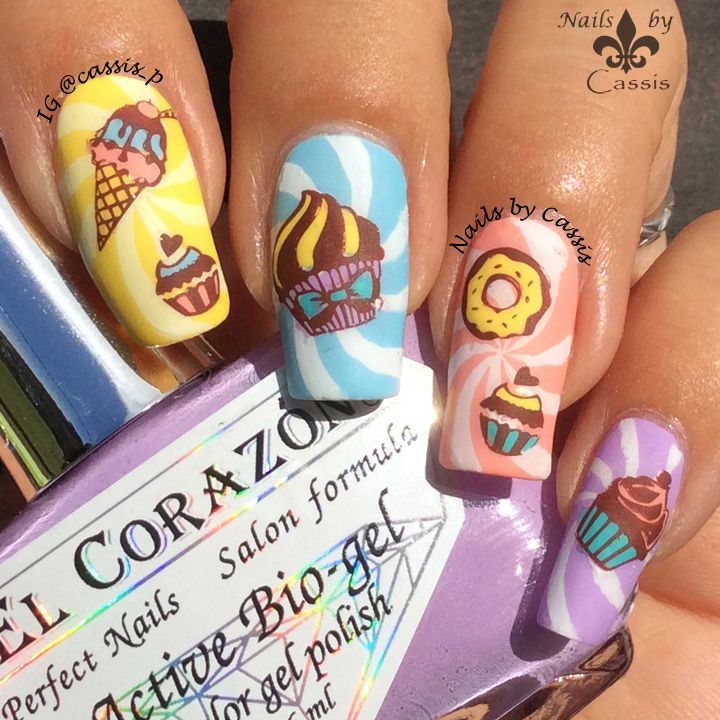
For this mani, I started off with 4 different colours, yellow, blue, pink & purple. Then I stamped a candy swirl pattern on MoYou London Princess 12 with Messy Mansion Chalk (white) for all nails. I used clear jelly stamper from Harunouta to stamp the swirl in the centre. Then I made stamping decals out of cupcakes & ice cream patterns on hehe 055 using Ya Qin An Chocolate (both available from Harunouta), coloured in with the same 4 colours used for base plus turquoise. Finished off with Glisten & Glow HK Girl topcoat, and mattified with Essie Matte About You afterwards.

I first tried to do the swirl using nail vinyls instead of stamps, but it got a bit lumpy and didn't like how it came out. I hardly reach for symmetric stamp like this because I suck at stamping in the centre, but clear stamper changed all that.

I don't know why though, but I really struggled in creating this mani. When I tried to stamp the swirl with clear stamper, white polish didn't adhere to my nails well. I tried MdU White, Ya Qin An White, Pueen Pure White, and finally Messy Mansion Chalk. This Messy Mansion did the best job. I painted my base colours in the morning before work, and did stamping at lunch break, so it could be because the base was really really dry. I also pressed too hard when transferring the image onto my nails, so the swirls got quite wavy. I don't know how many times I had to stop recording to redo the stamps, and felt really exhausted by the time I finish this mani. Ah well, at least it turned the way I wanted.

1週間の出張から戻り、久々のネイル作成。旧正月ネイルバレンタインネイルもやったし、次は何しよう~?と思いつつプレートコレクションを眺めていると、ずっと前から使いたかった可愛いプレートを発見。出来上がりはこちら。
Finished product, mattified with Essie Matte About You

ベースは4色(黄色、青、ピンク、紫)。MoYou London Princess 12プレートのcandy swirl(ロリポップ柄?渦巻き柄?)をMessy Mansion Chalk(白)でスタンプ。爪の中央にスタンプするため、ここでは春の歌のクリアスタンパーを使っています。次にhehe 055プレートのカップケーキやアイスクリーム柄をYa Qin An Chocolate(どちらも春の歌より)でスタンプし、上の4色とターコイスを使って色付けしてdecal化。それぞれの爪に乗せる。Glisten & Glow HK Girlトップコートを塗ってからEssie Matte About Youでマット化。

使用ポリッシュはこちら。
Polishes used

左から、

Elcorazon No. 423/278 Cream
Elcorazon No. 423/279 Cream
Elcorazon No. 423/292 Cream
BC Co. shade #12
Sally Hansen Mellow Yellow
Messy Mansion Chalk
Ya Qin An Chocolate
It was a bit hard to stamp the full-size image with clear jelly stamper, because it's not squishy enough to accommodate my curvy nails. I didn't film the process, but I had to draw the missing lines with detail brush

このネイル、私がよくやる「ベーススタンプ+decal」の何の変哲もないネイルなのですが、何故かとても苦労しました。渦巻き柄を白でスタンプするときにポリッシュが爪に張り付いてくれず、何度やり直したことかorz・・・ MdU White、Ya Qin An White、Pueen Pure Whiteと試して、最後に使ったMessy Mansion Chalkでどうにかこうにかスタンプ出来たという感じ。ベースのポリッシュは早朝に塗っておいてスタンピングは昼休みにやったのですが、ベースが乾きすぎていたのが原因なんだろうか?そのときの爪のコンディションとクリアスタンパーとの相性なのかなぁ。しかも柄を爪全体に転写するために強く押してしまい、渦巻きが波打ってしまったよ(-_-)チーン
This hehe plate also has some cute toy images. I'll use them for another occasion :)

スタンプに失敗→カメラを止めて動画を消す→スタンプをセロテープで剥がす or ベースをやり直し・・というのを5回以上はやりました。しかも、今回はなぜかdecal化したスイーツ柄のスタンプまでてこずりました。「ピックアップできない柄はない」と思えるほど信頼している神スタンパー、Messy Mansion Soft Pinkでやってもですよ(-_-) heheプレートの彫りがやや浅めなのに加えて、Ya Qin An Chocolateの乾きが少し早いのと、40度近い気温の中扇風機をかけて作業していたという作業条件もあったのかもしれません。気温が高すぎてdecalにも気泡が入ってたしなぁ。

そんなわけで完成したときには疲労困憊。まぁまぁ、でも出来上がってホッとしましたよ。久々にマット化してみましたが、この方がなんとなく美味しそうですね。